
Overview: Automation incorporates a powerful and yet user friendly task manager. This module allows the user to set contact and local tasks, appointments and record organisation procedures, also for location using the online job card you can view requests from your technicians. Task functions are seamlessly linked to the marketing options within the program ensuring that the operator follows through on any recorded contacts. Tasks and appointments can be viewed on a daily or weekly basis, the status of a task is icon flagged.
It is possible once security has been enabled to set tasks for user groups, individuals or all operators. Once an operator logs on only tasks and appointment relating to that operator will be displayed. When tasks are completed the item is operator, date and time stamped providing administrators with an audit trail of tasks.
Checklists can be created and attached to a task, these can be printed and the individual checks ticked on completion. Notes relating to the task can be made on the task form.
Integrating the task manager to marketing functions allows you to operate your business more efficiently for instance you are able to record a task directly from a marketing search. The item will appear in your task list with an icon displaying the progress to date. The system has reminders that “pop up” at a predetermined time i.e.: 30 minutes before an appointment.
Task Manager, Accessing: You access the task manager from the top tool bar or diary screen, for the diary select the diary icon from the top tool bar, in the top right hand corner of the diary screen you will see five icons, the last one is a telephone; select this to view the diary screen of the task manager. Alternatively you can short cat to the task manager diary screen by selecting the task icon from the top of screen.
Selecting the first icon and then the telephone will display the task manager in day view. To change the display to week view, select the second icon with the eight squares. The screens automatically default to today (day View) or this week (week View).
If a user has permission to set-up tasks for other users set to true in security settings it is possible to select a user from the drop-down list located on the top right-hand corner of the diary screen and add tasks and appointments. Note: The drop-down list is only available to users with the correct permissions
Task Manager, Changing The Date: To the right of the view selection are your date selection controls, you can select a date using the button to the right of the date field. From the calendar point and double click on the date required your selection will be entered into this field with the diary screen displaying records for the chosen date. It is also possible to manually enter a date by highlighting the current day field, selecting delete then typing the date you wish to move to in a DD/MM/YY format.

Positioned to the right of the date field are the date controls
1 = Back one week
2 = Back one day
3 = Always selects today
4 = Forward one day
5 = Forward one week
Multiple selections will move the date forward or backwards a week or a day at a time depending on the control in use.
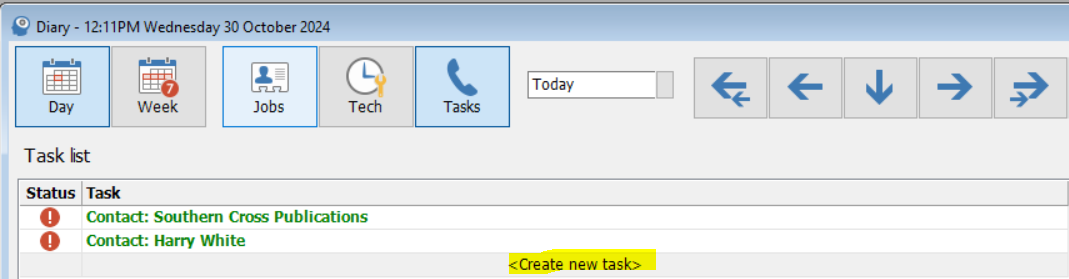
Task Manager, Day View: Selecting day view displays the screen split into two sections, tasks and appointments. Tasks are listed with an icon indicating the task status – Icons represent the following:
Clock – A reminder has been set and the task is pending
Exclamation Mark – Task is pending and overdue
Green Tick – Indicates the task has been completed
Tasks have titles that are displayed in the titles list, to create a new task select the last line which displays the words < Create New Task >
Local tasks are displayed in blue, contact tasks are coloured green
To The right of the task manager screen is the appointments list, appointments are set with a from / to time which is displayed as a yellow block in the specified time cells. Appointments can be made for any time frame in 15-minute intervals. Title of the entry is displayed in the appropriate cell.
Task Manager, Printing Tasks Appointments: Automation allows you to print a task or appointment log of all items displayed on the screen. Select the print button at the top of the screen an option to print either the task or appointment log is displayed on selecting the items recorded for the day assigned to the user will be printed. If the task has been completed the date / time / user / notes are printed.
Task Manager, Week View: You have the option to view a week of tasks and appointments, to display the week view select the second icon with eight squares positioned at the top of the diary screen. The week view is split into 7 days recorded are the appointments and tasks including the start and finish time. The eighth grid displays tasks for the week including title and status, it is possible to enter new appointments and tasks by selecting the < create new > option in the day or task cells.
Printing, Weekly Appointments & Tasks: Selecting the print option in week view displays an option to print either the tasks or appointments for the week. Both the appointment and task log are displayed on screen, to print select the print icon on the top right-hand side of the print screen. Note: Only tasks and appointments relating to the current user are displayed, if a user is authorised to create tasks or appointment for other users the created item will not be displayed on the current user’s screen. To view these entries the user would have to log off, then log back on as another user.
Task Manager, Creating A New Appointment: Point and double click on the time cell you wish the appointment to start at, this action will open the appointment form.
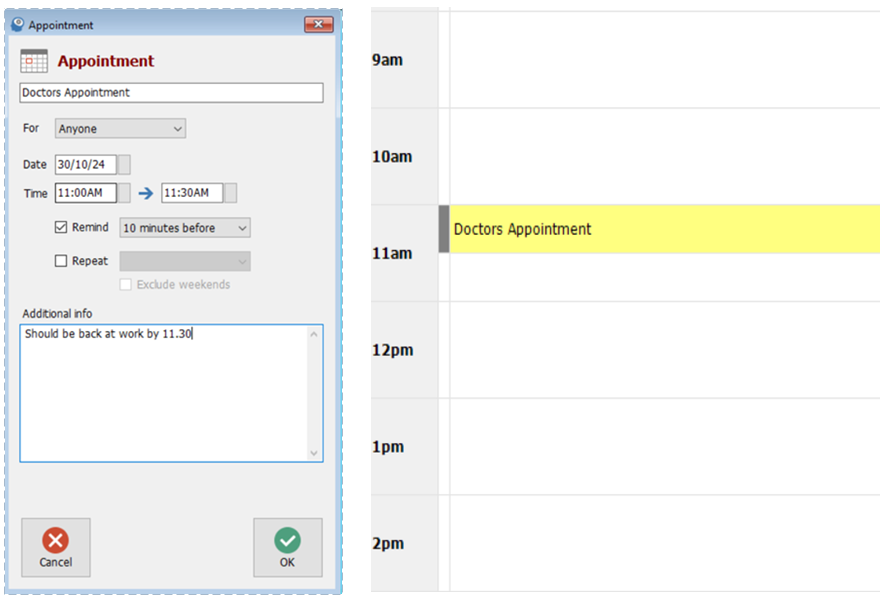
Enter a title for the appointment, next select the arrow to the right of the for field. A list of options is displayed including the ability to set the appointment for a specific user (if the current user has the authority) The date will automatically default to today in the date field, if you wish to change this select the button to the right, point and double click on your selection; the date is entered in the field. Next select the time you wish to perform the appointment to commence and the finish time.
If you wish to be reminded (authorised Repco users only) select the remind option followed by the down arrow to the right of the field displaying 30 minutes before, make your choice from the drop-down menu by double clicking. The reminder can also be repeated on a daily / weekly / fortnightly or monthly basis. Select repeat followed by the field to the right of your selection
Finally, you can enter notes relating to the purpose of the appointment.
Task Manager, Viewing An Appointment: Details of an appointment can be viewed from either the diary screen in week or day view by pointing and clicking on the entry
Task Manager, Editing An Appointment: To edit an appointment go to diary day or week view, point and double click on the appointment you wish to edit, make the changes and save using OK (F12).
Task Manager, Deleting An Appointment: If you wish to delete an appointment open the task manager in day or week view, highlight the entry you wish to delete and press the delete button on your keyboard, confirm your action from the message box by selecting yes.
Task Manager, Creating a New Task: To create a new task select and double click- create new task from the task cell (week view) or the task list (day View). The local task form is displayed.
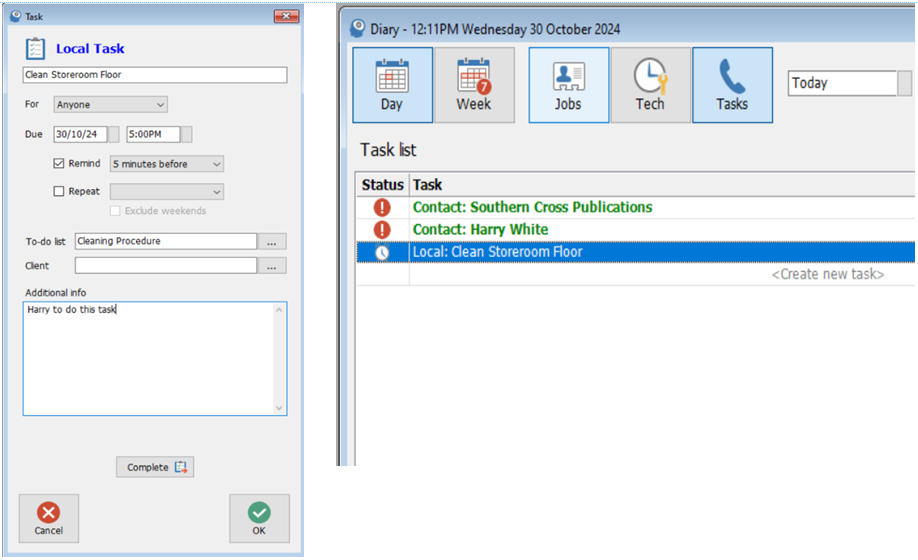
Enter a title for the task in the first field, next select the arrow to the right of the for field. A list of options is displayed including the ability to set the task for a specific user, group or anyone. Note: this option is only available if manage users is active.
The date will automatically default to today in the due field, if you wish to change this select the button to the right, point and double click on your selection; the date is entered in the field. Next select the time you wish to perform the task. If you wish to be reminded (authorised Repco users only) select the remind option followed by the down arrow to the right of the field displaying 30 minutes before, make your choice from the drop-down menu by double clicking. The reminder can also be repeated on a daily / weekly / fortnightly or monthly basis. Select repeat followed by the field to the right of your selection.
Checklists can be attached to a local task, select the button to the right of the checklist field. Stored checklists are displayed, make your selection and press OK. The title of the checklist is now visible. It is possible to link this task directly to a client in which case it is converted from a local to a contact task.
Task Manger, Creating a Contact Task: Select the button to the right of the client field this will open your client listing, search for the client in the normal way, highlight and select OK (F12) from the bottom of the client list. The client’s name and contact details are inserted in the client an additional info field.
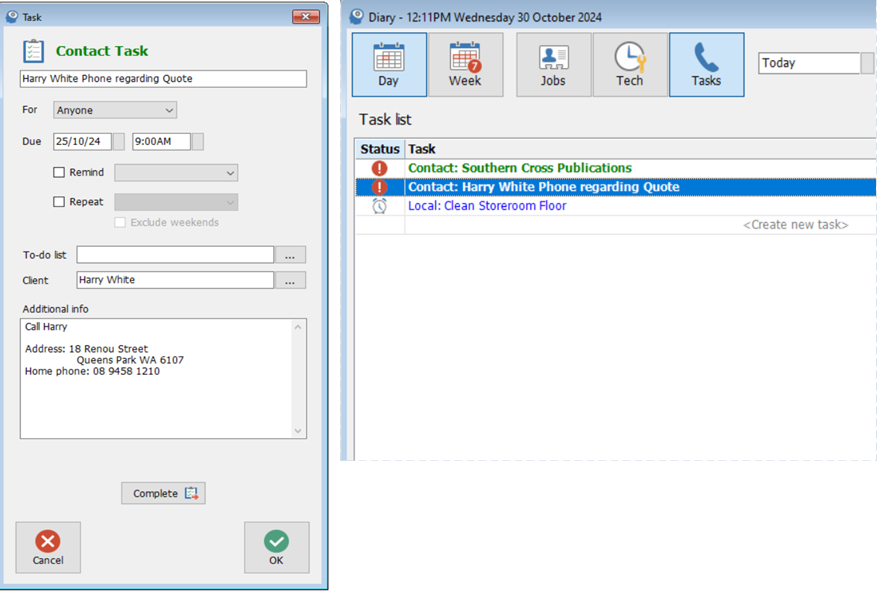
The task is also recorded in the client form / tasks section. The author of the task is recorded at the bottom of the task form. This is an automated entry based on the current user.
To save the tasks select OK (F12) from the bottom of the form. The record will now display on both the day and week views of your diary screen.
Viewing A Task: Details of a task can be viewed from the diary screen in either week or day view by selecting the entry. The task can also be accessed from the client form by searching for the client highlighting the record and double clicking, select tasks from the tabs at the top of the form, to display a task point and click.
Editing A Task: To edit a task go to diary day or week view or the client form tasks option, point and double click on the task you wish to edit, make the changes and save using OK (F12).
Task Manager, Deleting a Task: If you wish to delete a task open the task manager in day or week view, highlight the entry you wish to delete and press the delete button on your keyboard, confirm your action from the message box by selecting yes.
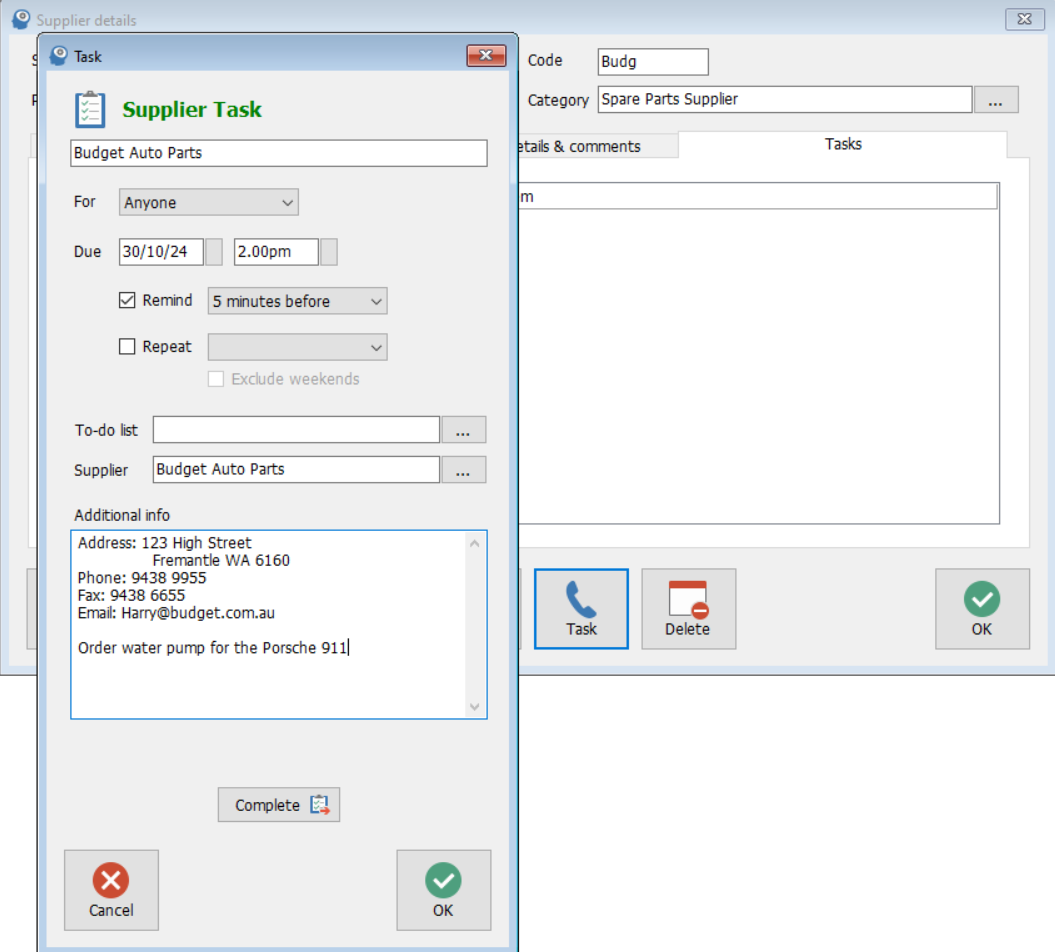
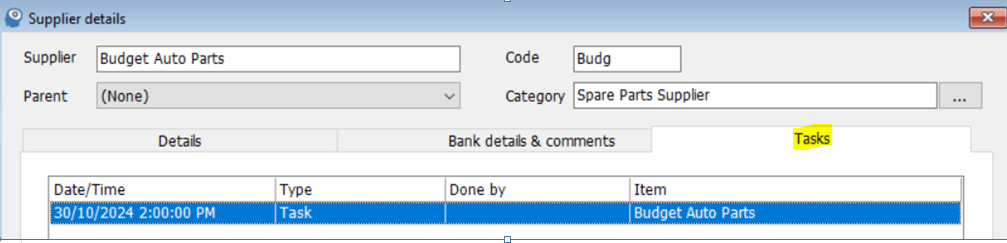
Task Manager, Creating A Supplier Task: To create a supplier task you need to open the supplier form and select the task option The supplier task form is now in view, as with any other task you can set a due date, time and whether you want to be reminded when the task is due, it is also possible to set a repeat within a specified time. As with other task functions it is also possible to attach a checklist if required.
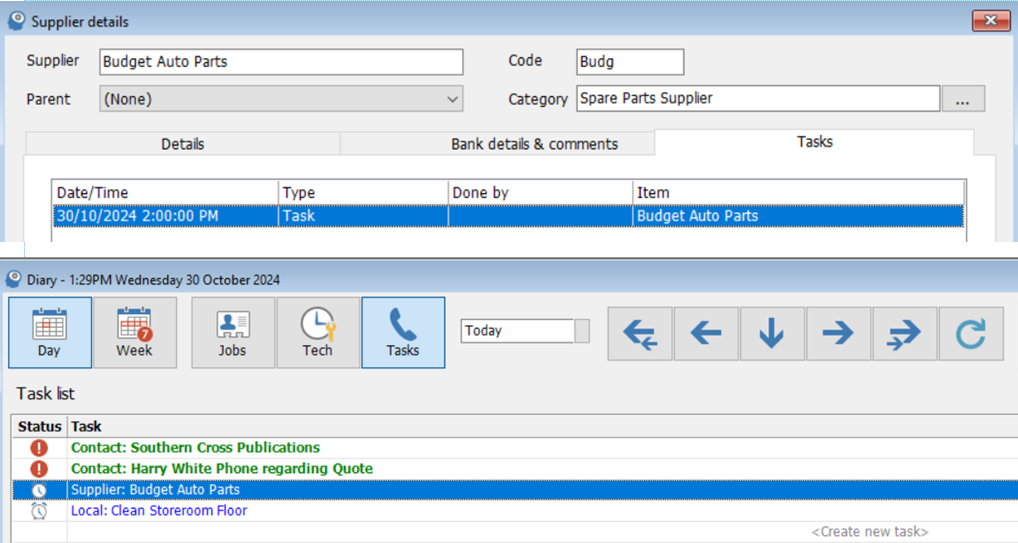
The supplier task is displayed both in the task section of the supplier form and on the diary screen
Task To Do Lists, Adding: The task manager allows you to add checklists to both local and contact tasks. Checklists contain line items with a number assigned and checkboxes, each component of a checklist can be individually flagged as completed this is indicated by a tick in the checkbox at the beginning of the line. To add checklists to a task perform the following:
1) Open the task form by pointing and clicking on a recorded task or < Create New Task > option.
2) Click on the button to the right of the checklist field
3) Highlight the To Do List you wish to add, attach by selecting OK(F12)
4) Save your changes to the task form by selecting OK(F12)
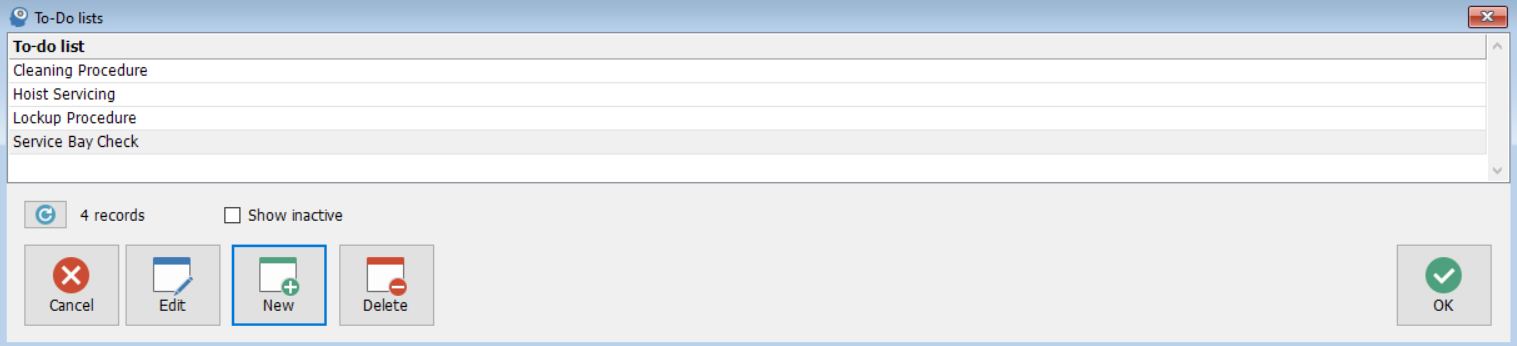
From the select checklist display it is possible to add new checklists, edit and delete by selecting the required function from the bottom of the list.
You can search for a checklist by typing the title in the search field
Task Checklists, Creating: To create a new checklist go to the select a checklist display and perform the following:
1) Select New from the bottom of the list
2) The checklist details form is displayed, to add an item select Add
3) Type the line textinto the checklist item box and save with OK(F12)
4) Repeat item 3 for each line of the checklist to save the checklist select OK(F12)
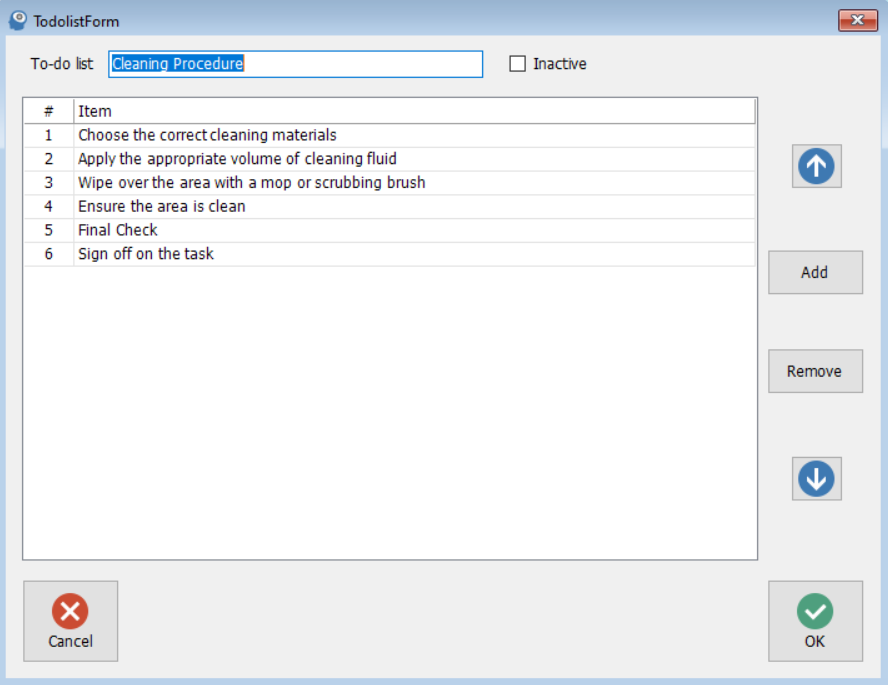
TO Do List, Editing & Moving Text: Edit functions allow you to make changes to the checklist text by highlighting the line and double clicking or selecting edit (F2) from the bottom of the display. Make your changes to the text in the checklist item box and save using OK (F12).
It is also possible to re-order the line items by highlighting the check you wish to move and clicking on the up and down arrows to the right of the display.
To delete a line highlight and select the remove function.
Tasks, Completing: To complete a task select the complete option from the bottom of the task form, checklist (if attached) and completion notes are now visible.
To confirm completion of an item within a checklist point and click on the line a tick will be displayed in the checkbox. Enter your completion notes and save by selecting OK (F12).
Note: The task will always be completed by the current logged on user, the date and time is recorded as the form is saved.
Printing A Task Checklist: Select the print checklist option at the bottom of the screen.
Task Reminders, Pop Ups: Repco authorised users can set tasks to display pop up reminders, these are messages that are displayed at a set time before a task is due (set from the task form).
There are four options available from the task reminder. Firstly, you can reset the remind again period by pointing and clicking on the arrow to the right on the field and selecting a new time period from the list.
Secondly you can select the snooze option that will remove the reminder from the screen for the time displayed in the remind again field. You can dismiss (cancel) the reminder by selecting the dismiss option. Finally, if you wish to view / edit the task details select the details option.
The additional info field allows for text entry and the complete function provides the option to finalise the task.
The task will appear in your list as a supplier task, to view simply point and double click on the entry. To view previous tasks by supplier open the supplier form and select the tasks tab.
Selecting the task option from top of screen will display two option, firstly local tasks which on selection will open the task options. The second titled online request gives you access to your on-line job card communications function.
Online Requests: Online requests consist of three types, job close, order and deletion. The job close request on selection will take you directly to the job which requires closing, when the job has been finalised the request will no longer be visible from the communications screen.

Orders can be processed simply by selecting the order line item, if the technician has specified a supplier you are taken directly to the purchase order form if not the admin machine will need to select a supplier and then move forward to the purchase form.
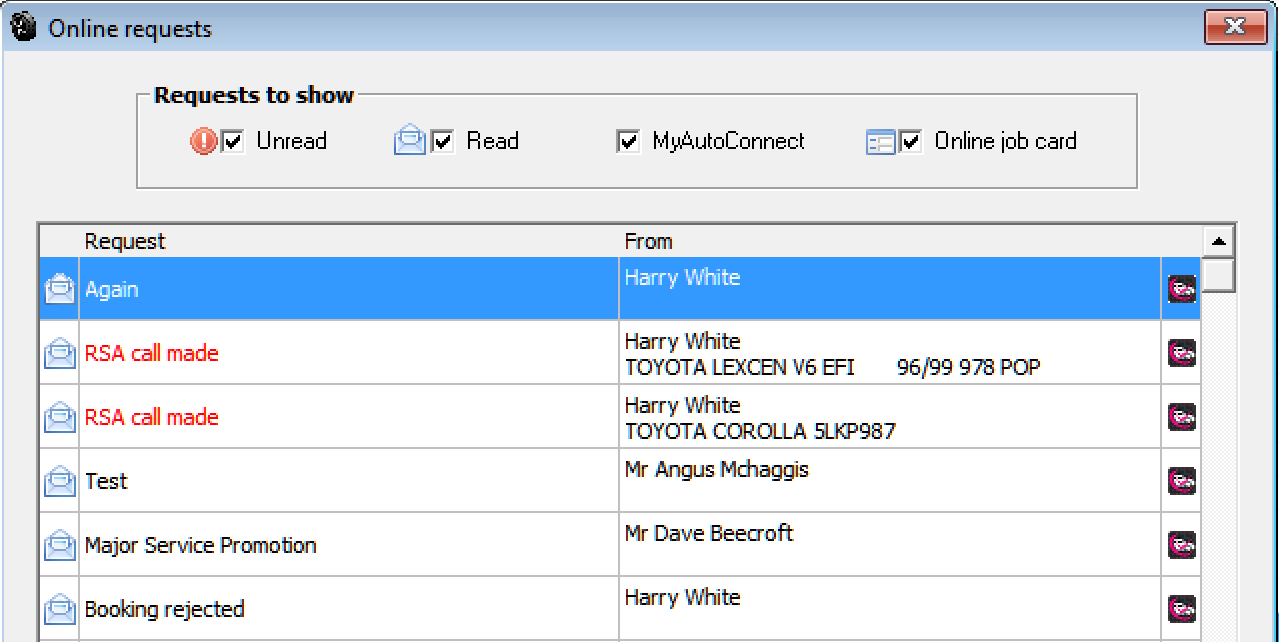
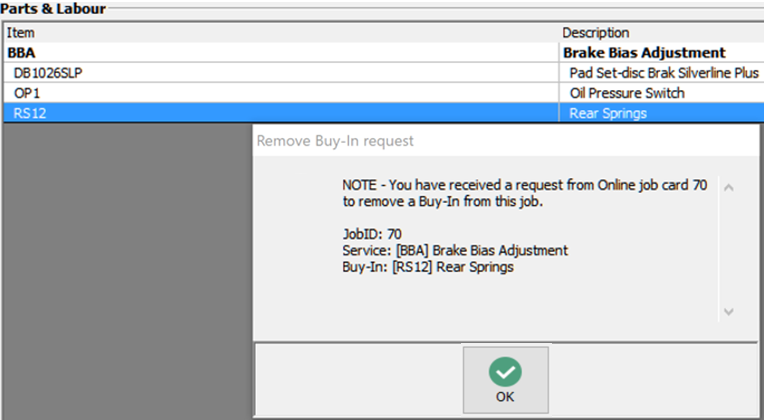
Finally, deletion request for buy-in items, selection will take you directly to the job card displaying details of the item to be removed and highlighting the line item, simply select OK, remove and the option you wish to use from the credit options. You can also filter for specific records by using the filters located at the top of the display.
Once the task is complete the request will be deleted from the On-line requests display.
Note:When tasks require attention an exclamation mark is visible on the task bar icon.
Automation gives you the ability to make unused records inactive for clients, vehicles, suppliers and parts with no activity since a selected date. This option allows you to manage these lists so you only see active records, inactive records can of course be made active at any time by opening the relevant form and form and removing the inactive flag option.
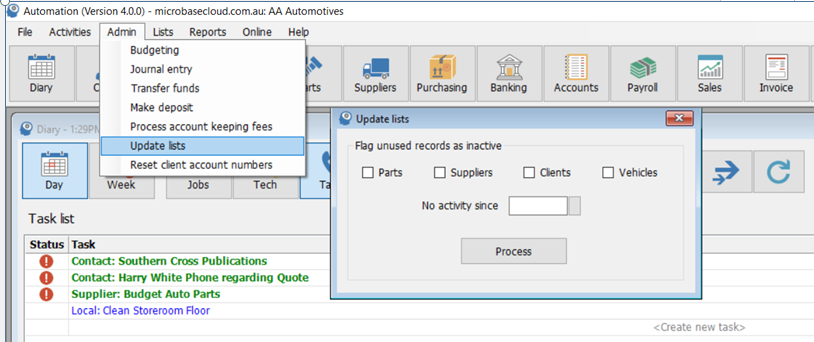
To access this feature, go to Admin / Update Lists, you will see that there are four list selections, individual or multiple filters can be selected. Select the lists you wish to update, move over to the date field click on the button and choose your cutoff date from the calendar. To complete the function, select process, a progress bar will now move across the screen giving you a totalisation of the records moved to inactive