MyAutoConnect Help System
MyAutoConnect allows you to connect with your client directly via smart devices, your main terminal and online job card. The MyAutoConnect system allows for the automation of many communications such as service reminders, registration renewal and roadside assistance expiry / renewal. You have the added ability to send instant promotions, estimates and quotations directly to your client’s smart device. MyAutoConnect has the option to include roadside assistance in the marketing mix with easy access allowing you to truly deliver on the peace of mind motoring promise.
Before you can use MyAutoConnect you will need to register via the Online option from the top of screen in Automation Premium. You will receive an automated email from Microbase once your access has been granted. You are now ready to setup MyAutoConnect communications.
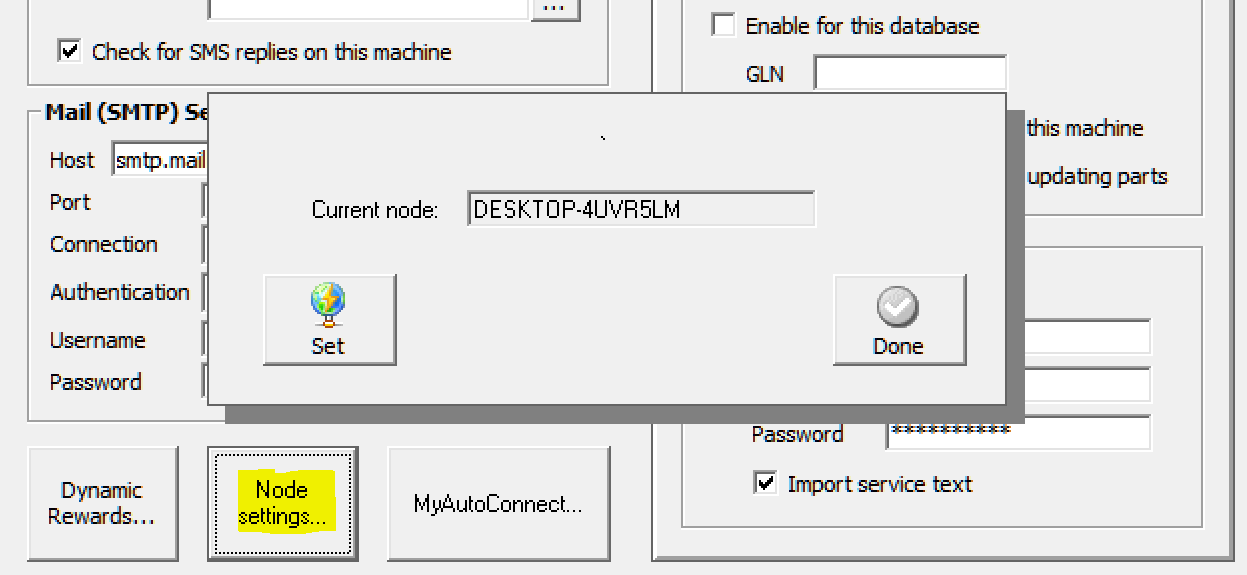
It is essential that you set a terminal to be the node, this is usually the admin machine and will become the main receptor for your MyAutoConnect communications. To access the node settings, select File / Site Settings / Online, positioned down in the left-hand side of the display you will see the node and MyAutoConnect setting. Select the option titled Node Settings, to establish the connection select the set option, the name of your PC will display in the current node field, save the setting with done. Note: If you are using the online job card your node will already be set so you can skip this step.
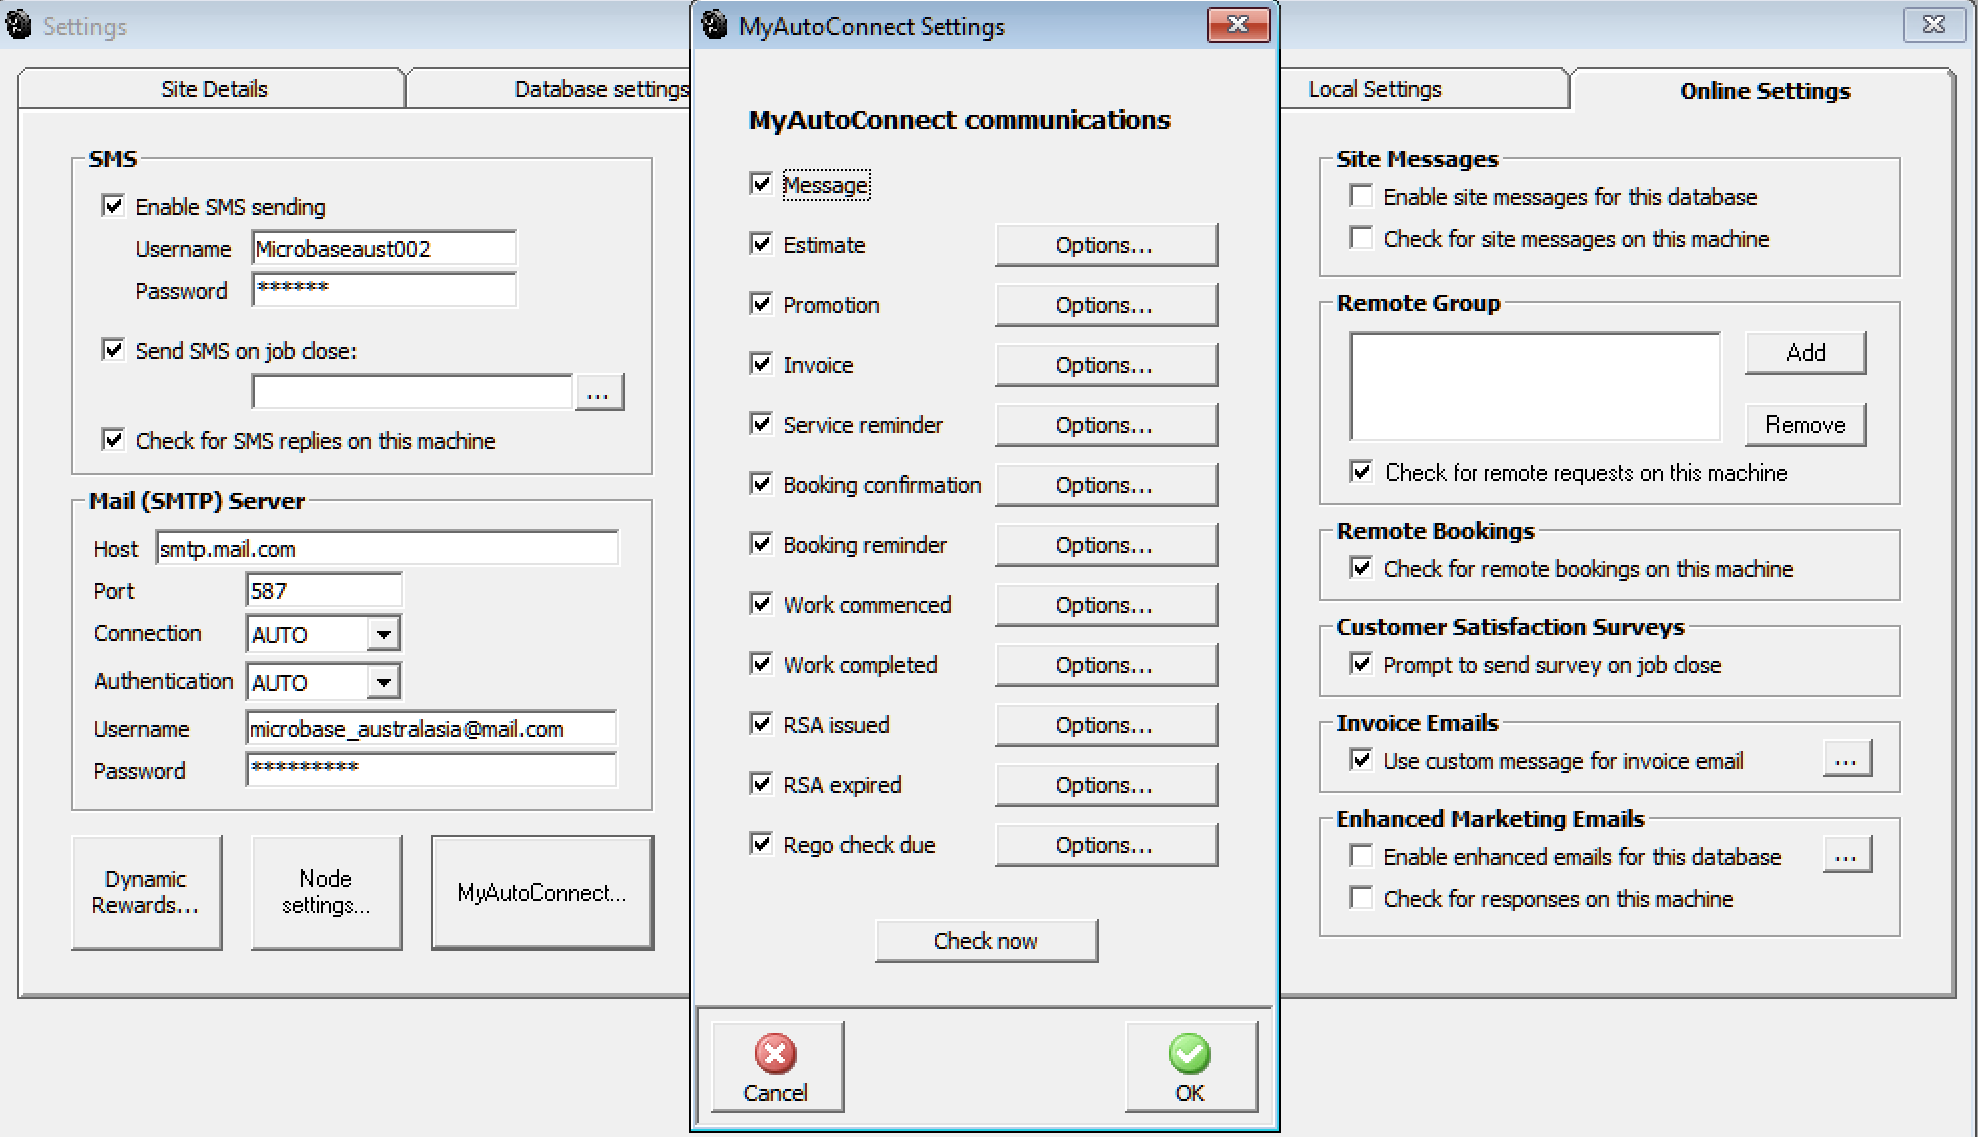
The next step is to set your parameters, to do this select the MyAutoConnect option to the right of Node Settings. The display lists the various options available from MyAutoConnect, the following communications can be set to be sent automatically:
Service reminders, booking confirmation, booking reminder, work commenced, work completed, RSA (Roadside Assistance) issues, RSA expiry and rego check. Servicing reminders and RSA communications give you the ability to select your lead time. Each day these reminders will be sent without any input from the user, you can of course access a communications log that displays all communication sent within a selected date range.
It is important that you give some thought to how you want to profile each communication and indeed whether you wish to disable any of them. It is important that you have a full understanding of how the MyAutoConnect control panel will influence the communications you want to send to your clients. To synchronise all messages instantly use the Check now option, this action bypasses the automatic default.
The client can run MyAutoConnect from either an Android or IOS (Apple) enabled device, the application is downloaded from either Google Play Store or Apple Apps page by typing MyAutoConnect into the search field. Once the app is downloaded and installed your client is ready to register with your site.
For the client to register the details of both the client and vehicle must be on your database, on registration MyAutoConnect will generate an SMS message containing a unique code which is send to the phone number the client enters during the registration process.
These messages are generated via your SMS account so it is essential that you have a current account with Microbase. Once the client is registered you will see a MyAutoConnect icon against the client record, this indicates that you can now communicate using MyAutoConnect functionality.

The MyAutoConnect icon is placed over on the far right in the MyAc column.
To merge a field into your text, select options, move your cursor to where you wish to position the merge and select from the bottom of the Add Field Option.
From the merge list point and double click on your selection, the merge will appear in your text field with the greater than / less than symbols each side of the entry, note do note edit the text contained in a merge field.
Now let’s take a look at each individual option listed in the MyAutoConnect settings screen:
Message Control: This is flagged by default, deselecting the option will cease all communication from MyAutoConnect
Estimate: Firstly, you can customise the message title, allowing your client to know what the message actually relates to, in the body of the message you can free type plus insert certain merge fields, you can see in the example we have the client’s first name, vehicle make, vehicle model and registration number. To add merge fields simply position your cursor where you want the text to appear, select the add field option, point and double click on your selection.
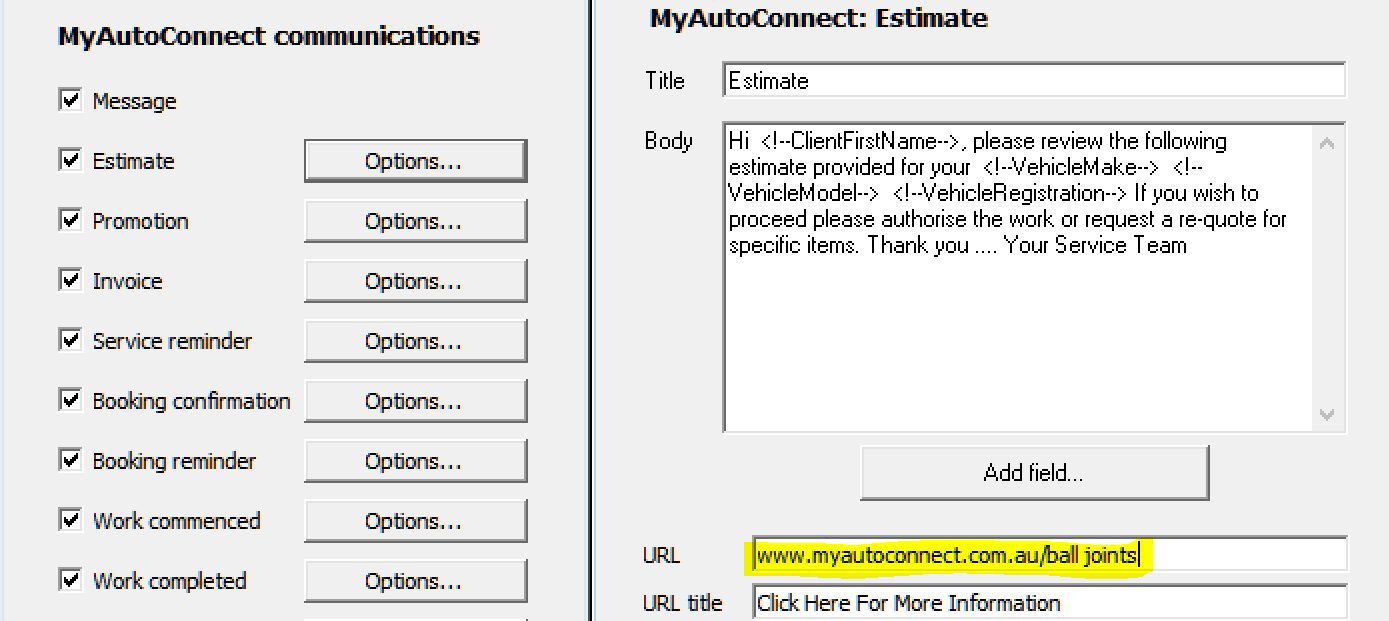
You will notice there are two fields at the bottom of the form URL and URL Title, these fields allow you to give access to a website, page or video that the client can reference by selecting the URL title bar from the message he receives.
|
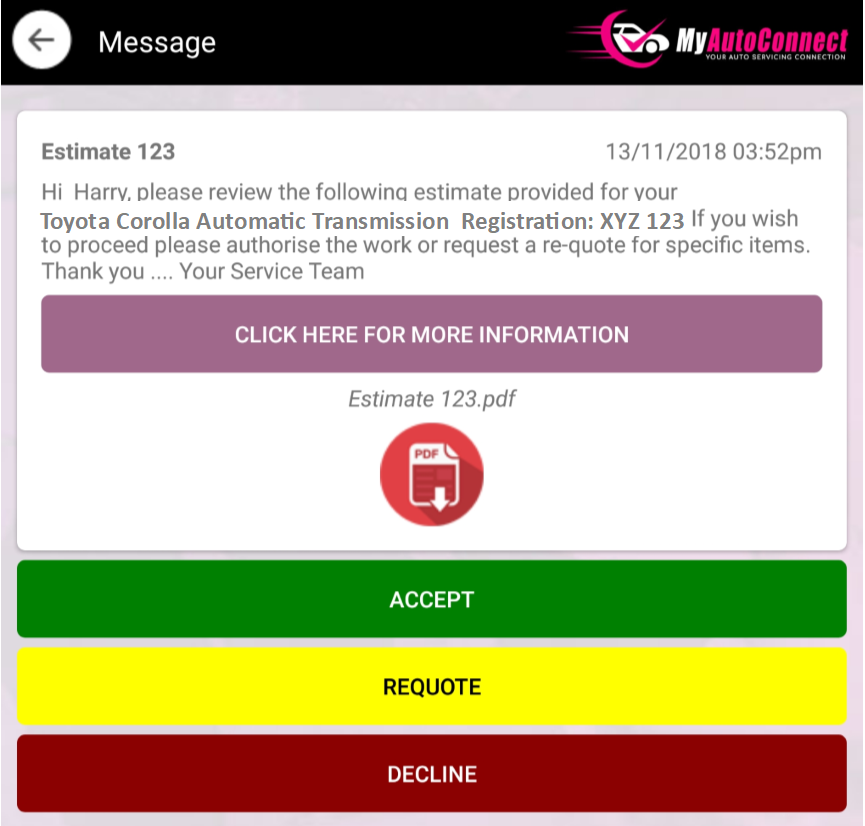
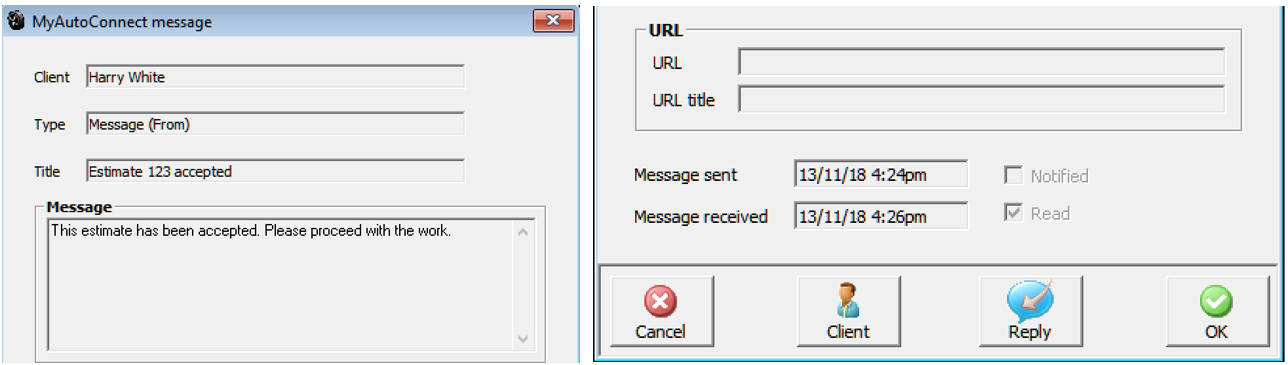
To the right you can see the message your client will receive, if you used the URL link to send more information, he can click on the more information option. This can be a web page or a YouTube or Vehicle Visuals link that allows you to run a video explaining why the repair is required. The client to view the estimate clicks on the PDF option titled Estimate, he can now accept estimate, request a requote, which will require you to rejig the estimate and resend it for authorisation. Finally, the client has the option to decline the estimate. Regardless of the client’s action you will get a message. Automation is equipped with a message centre that will display when there are any unread messages from your MyAutoConnect Clients. To view the full message details simply click on the unread message from the MyAutoConnect communications screen which operates automatically
|
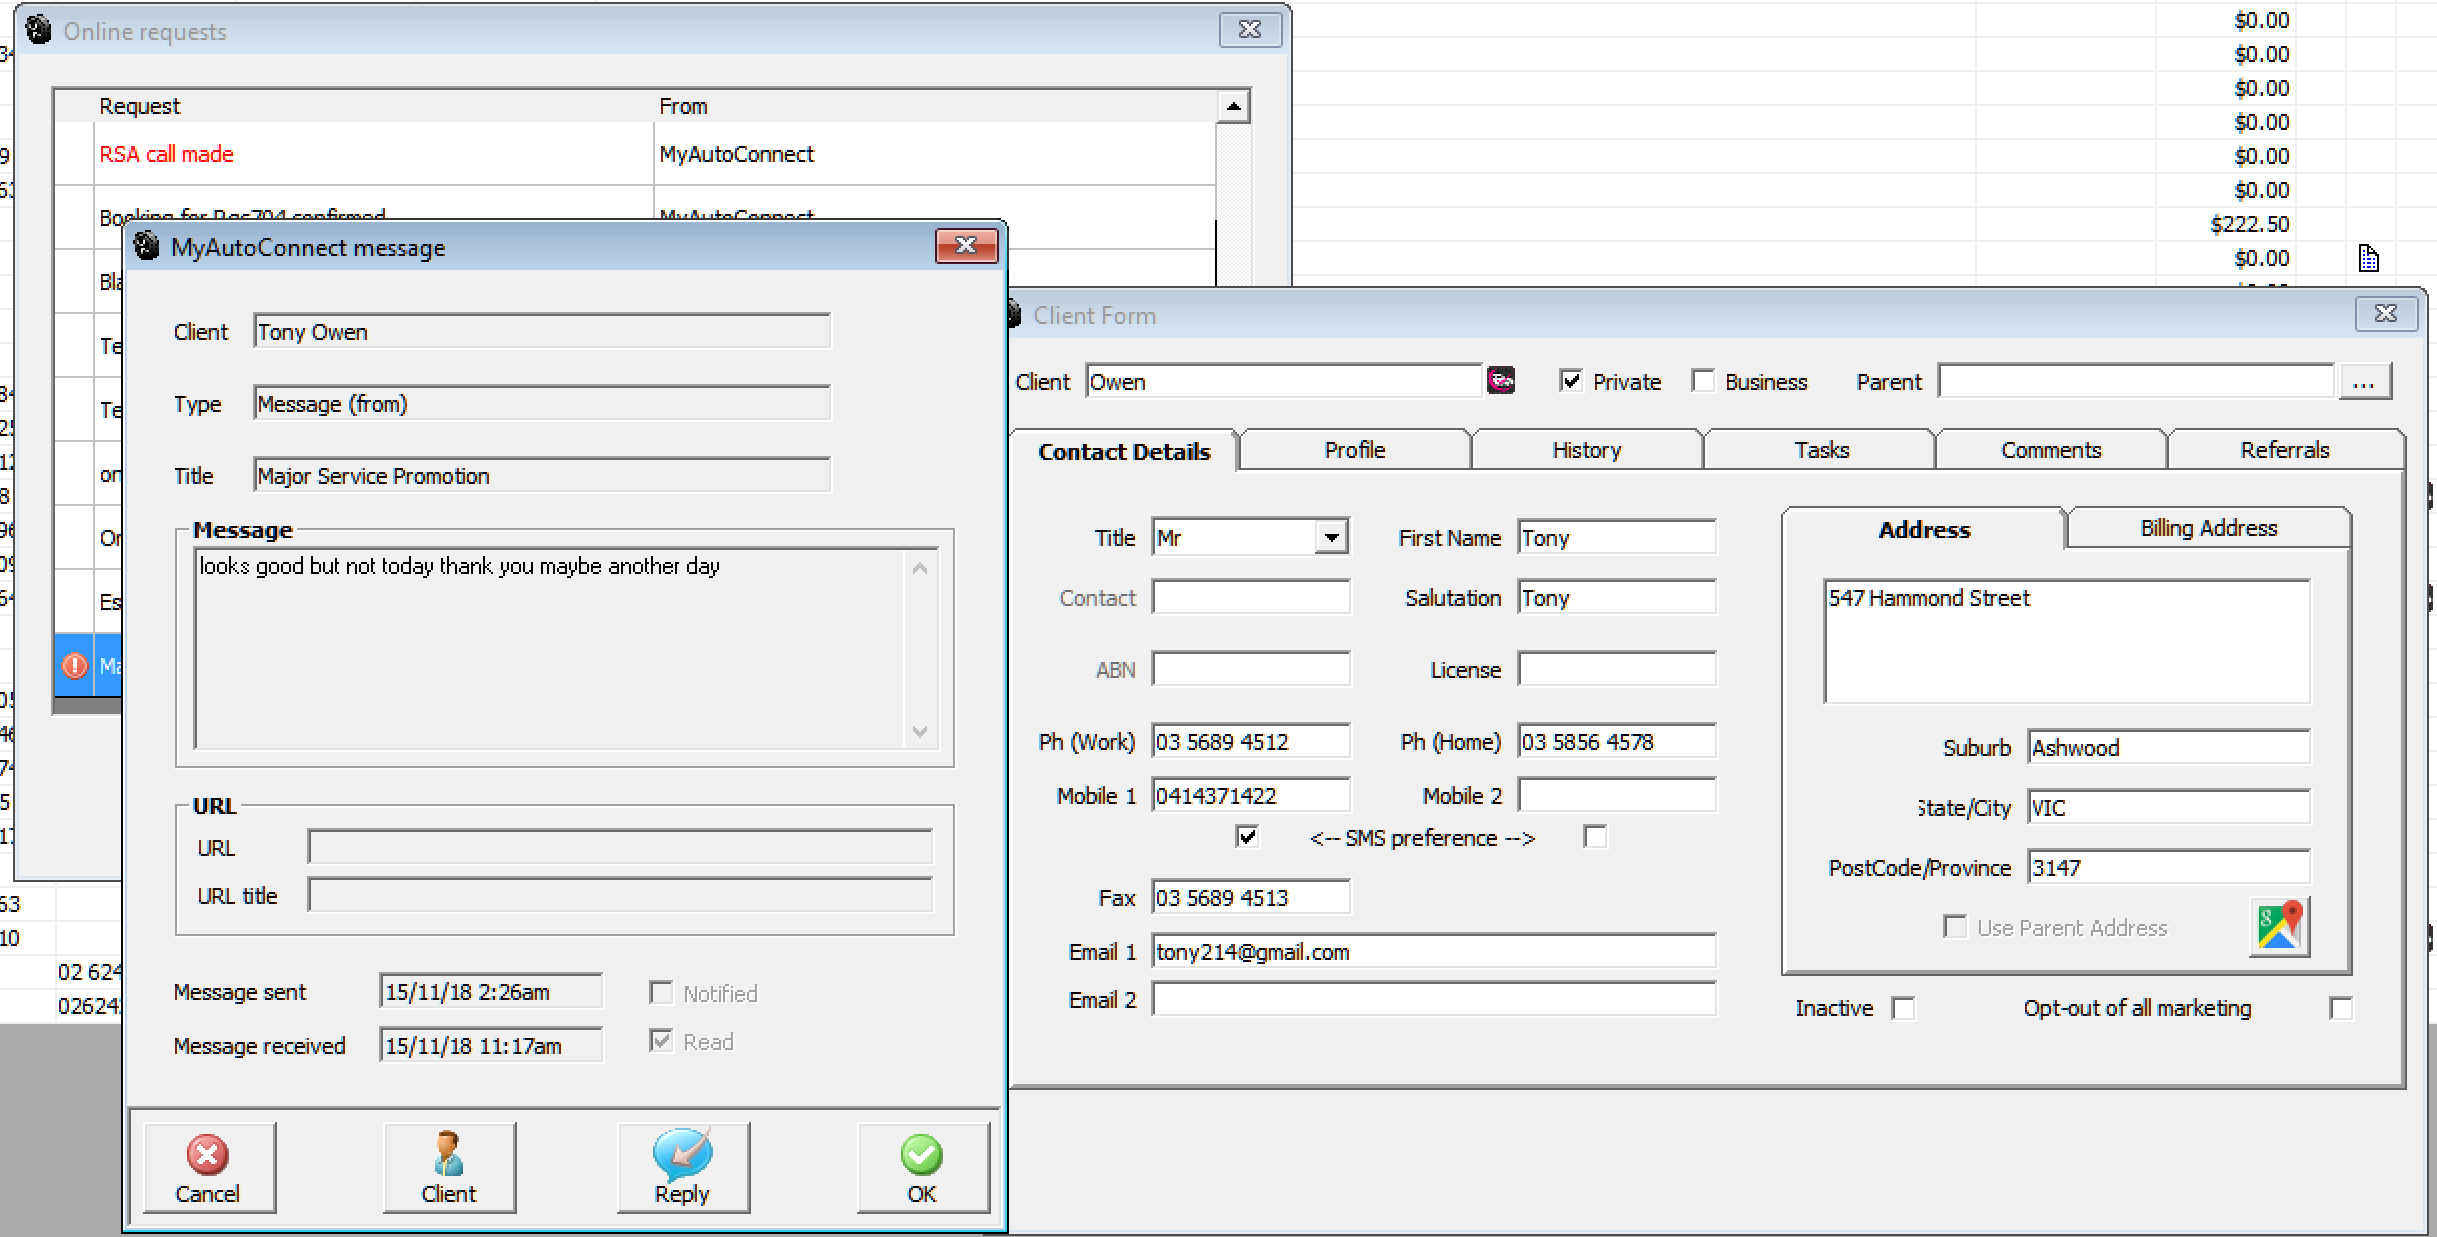
Promotion: This option allows you sent a promotion to your MyAutoConnect clients, the promotion message can consist of a few lines of text plus an URL link and the ability to name the URL link i.e.: Super Special, Click For More Information. Adding the URL link to the message will bring your message alive.
Possibly you are advertising the special on your website, simply type the URL into the URL field and your client can view the details of what you are offering with the ability to book immediately.

If a client makes a booking you will receive this in a form that allows for direct import into your diary, Automation will of course send a message back to the client confirming the booking has been accepted.
Invoice: You can send an invoice in PDF format to your client via MyAutoConnect, you have the same options in settings as the previous forms. You can enter an URL and URL title if you wish, the client can view the invoice by selecting the PDF icon delivered with the message
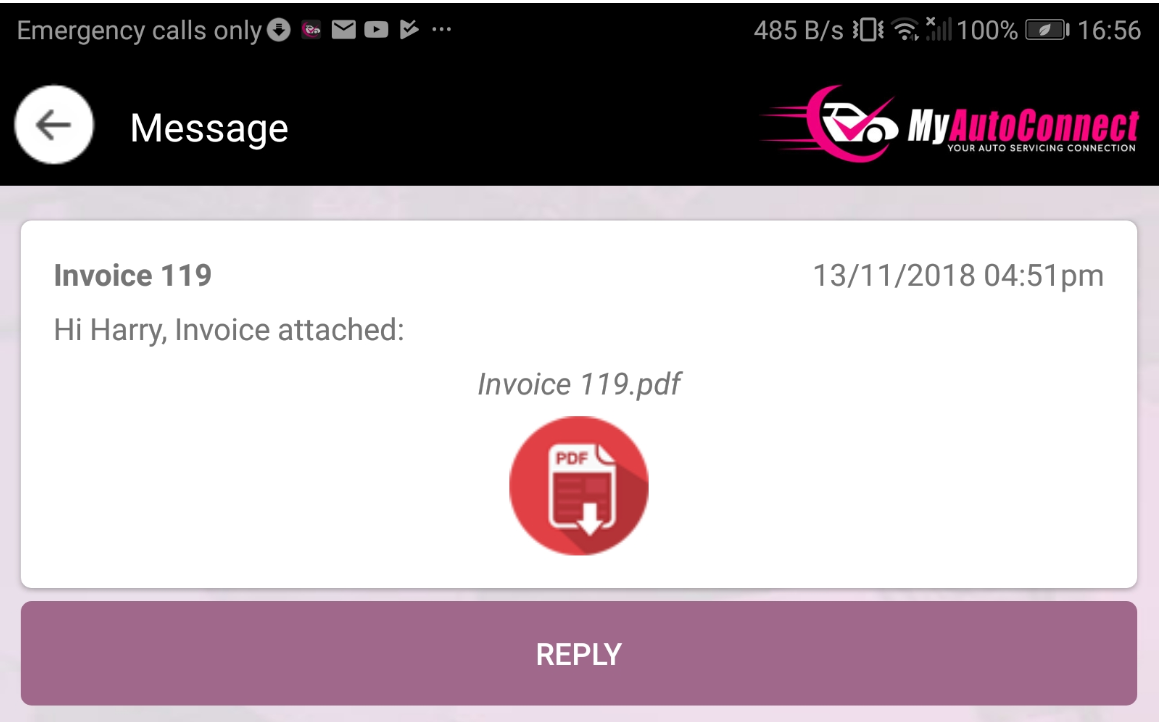
If the client wishes to reply he has an option at the bottom of the message.
Sending An Invoice Via MyAutoConnect: You have an option to send a summary or an invoice to your client, this can only be performed from the job card. In this example let’s imagine you want to send an invoice to a client, open the job card down on the lower task bar you will see a MyAc icon, select this, point and click on the invoice option.

A message will indicate the invoice is being printed in PDF format and will confirm the send.
Service Reminders: You can automate service reminders to your MyAutoConnect clients, to do this open the service reminder options from the MyAutoConnect control panel. You will see at the bottom of the form there is an additional option.
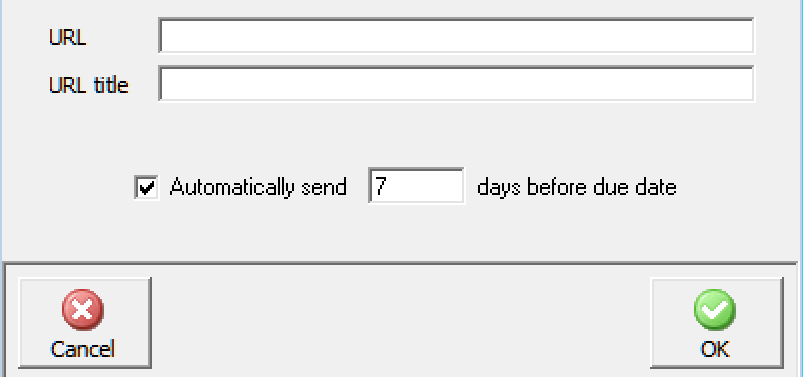
This option allows you send your service reminders automatically with a specified lead time i.e.: 7 days prior to when the service is due. Automation will once a day check for service reminders and send them as a background operation.
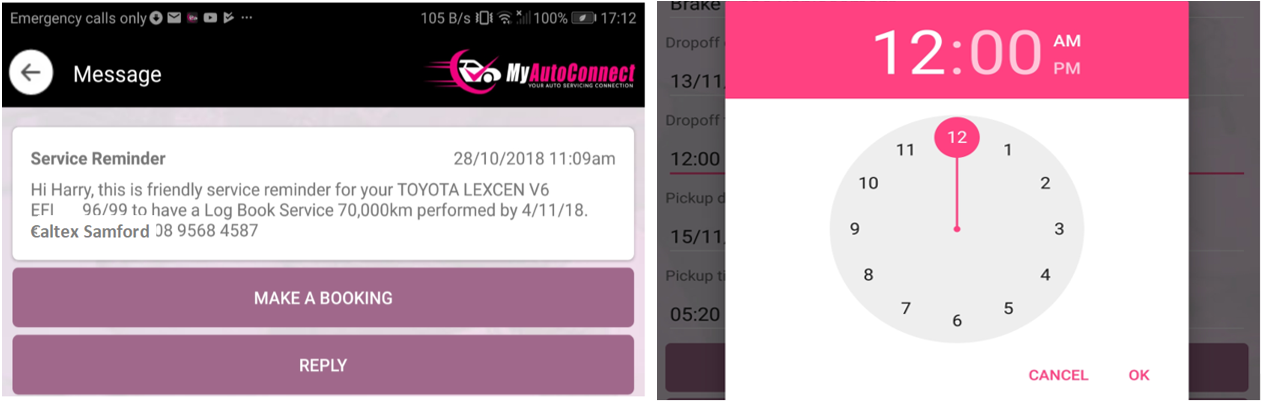
The client using a calendar and clock can book immediately on receipt you have the ability to import the record directly into the diary, Automation will automatically send a confirmation back to the client.
Booking Confirmation: is used to merge booking details into the confirmation message these include the following:
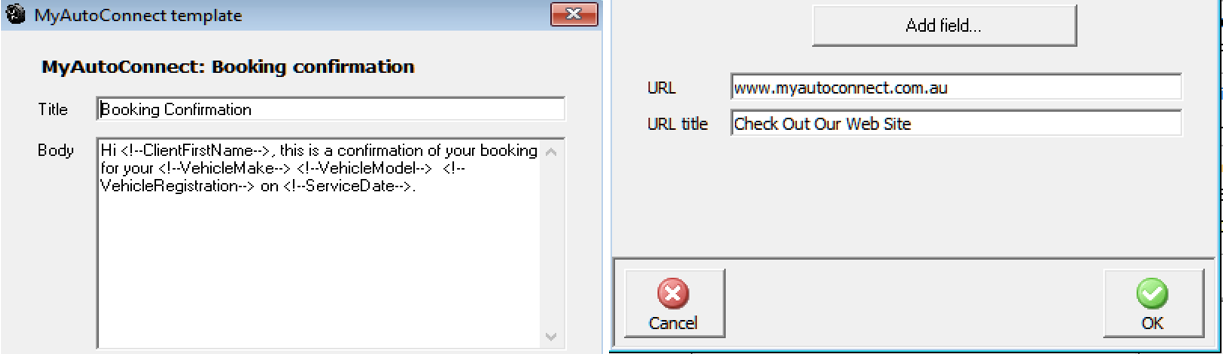
We suggest you don’t edit the merge fields; however, you can edit the text if you wish.
Note, that the forms identify which service date to apply i.e.: Service reminders will merge the next service date and the booking form will merge the date and time of booking. To apply this information, select the service date for both communications, so there is no need to include a specific selection for each form.
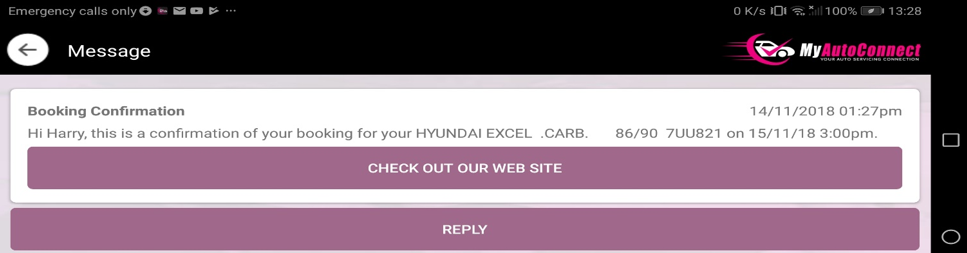
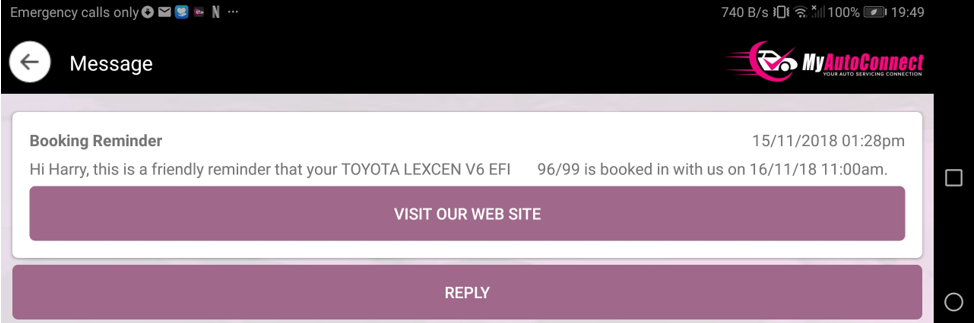
Above is the message received by the client, he can of course reply by selecting the reply option located under the message text.
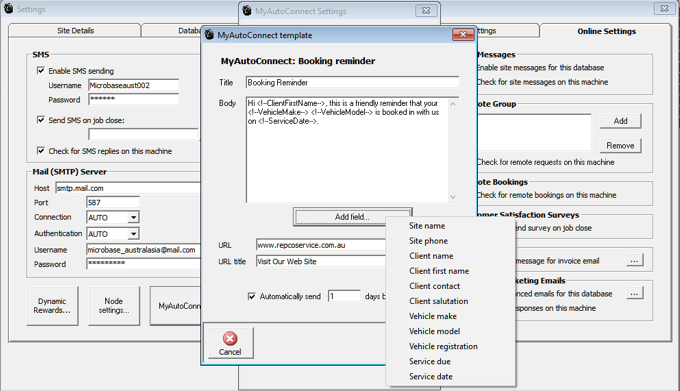
Booking Reminder: Again, we suggest you leave the default text for this message as is and only edit the booking reminder confirmation lead time, usually this would be sent to one so you remind the client the day before service is due.
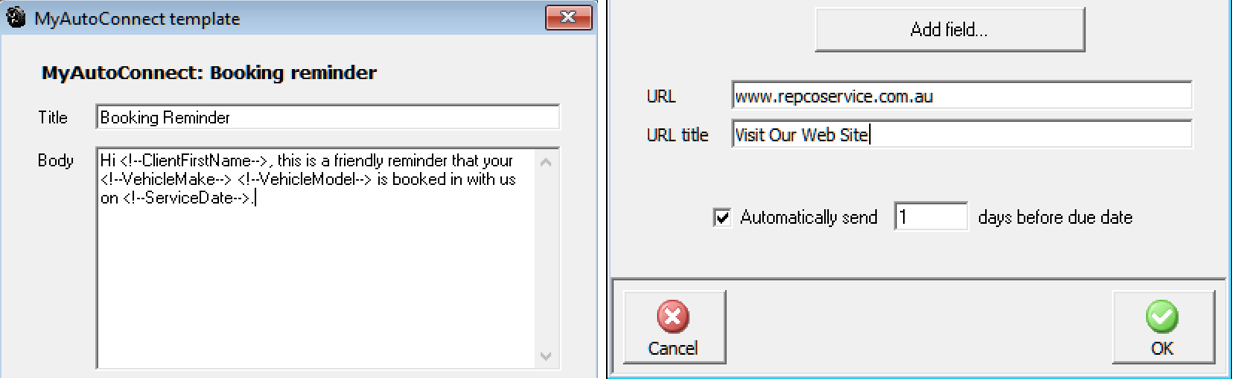
To create more of an impact, you could for instance send the client a link to your web site or if you have a find me page use that URL to make it easy for the client to locate you.
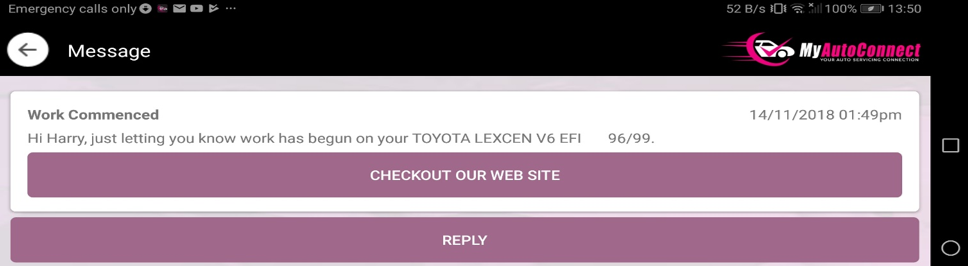
Work Commenced: MyAutoConnect allows for notification that work has commenced, the message is generated when the job card is opened and saved for the first time.
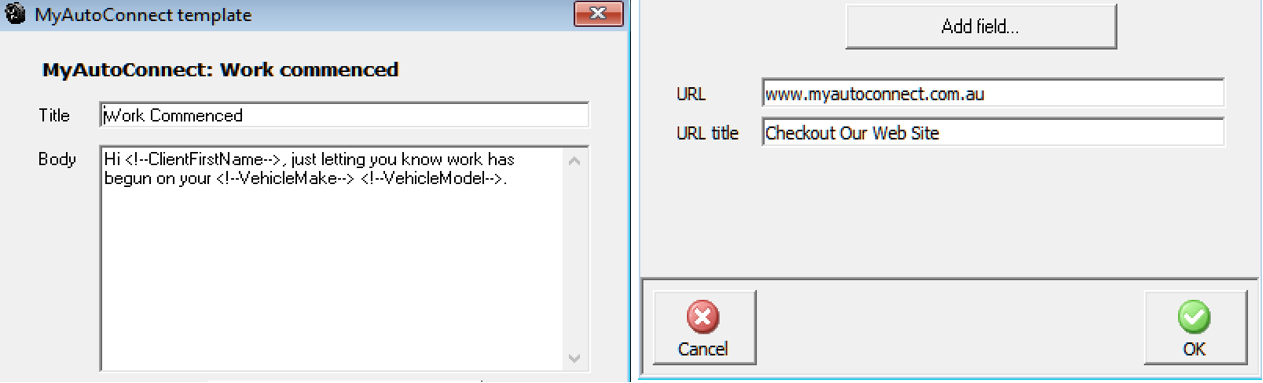
From this form again, you can direct your client to an URL and customise your link message
There is no need to edit the merge fields this message, to strengthen your message we suggest you set your URL options to open your website home page or possibly a promotions page if you have current offers, this is great advertising that will cost you nothing to distribute.
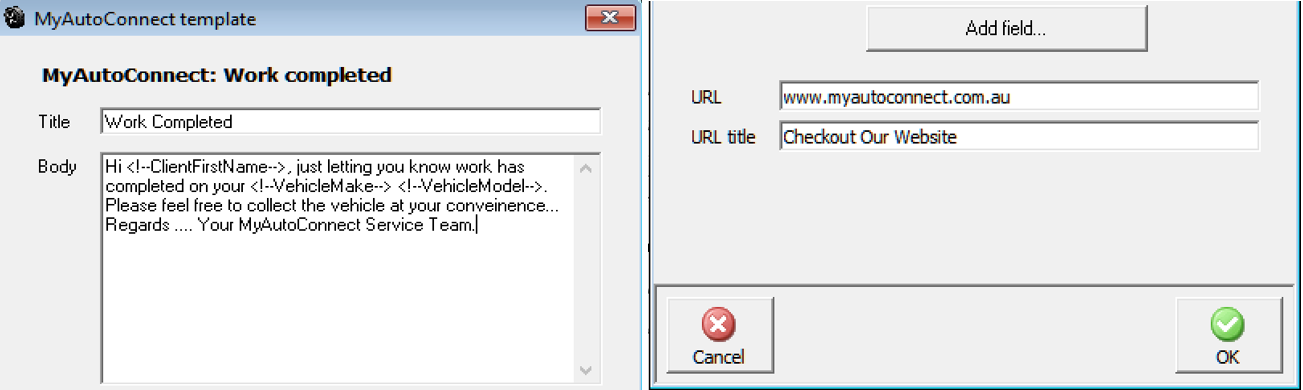
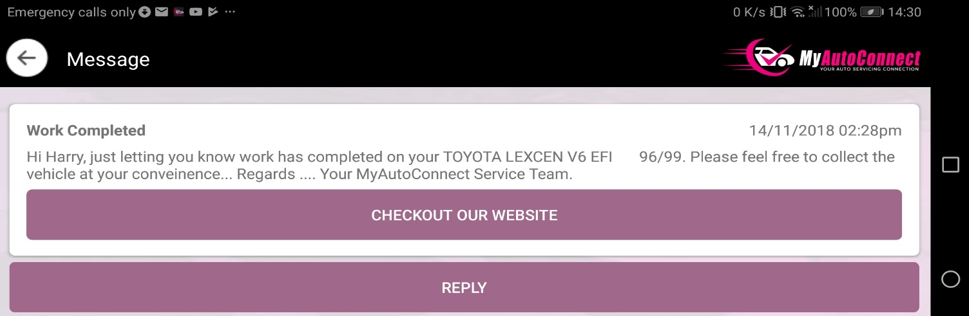
Work Completed: You can choose to send your client a work completed message as you close the job, again you have the URL options that you can include in the communication.
Your client receives the message which includes the merge field information, they can reply to you by selecting the option at the bottom of the message.
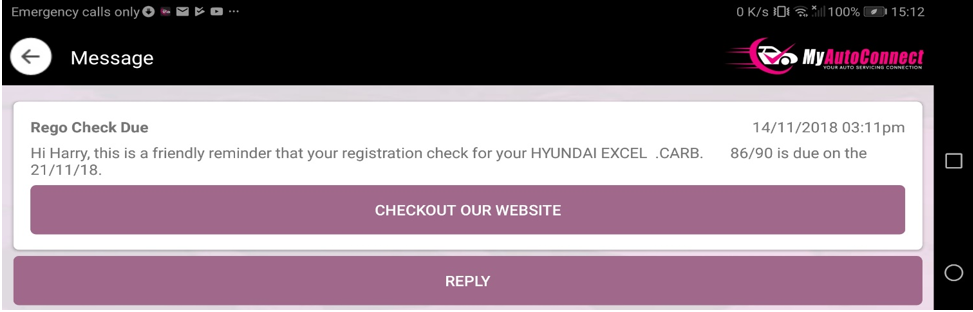
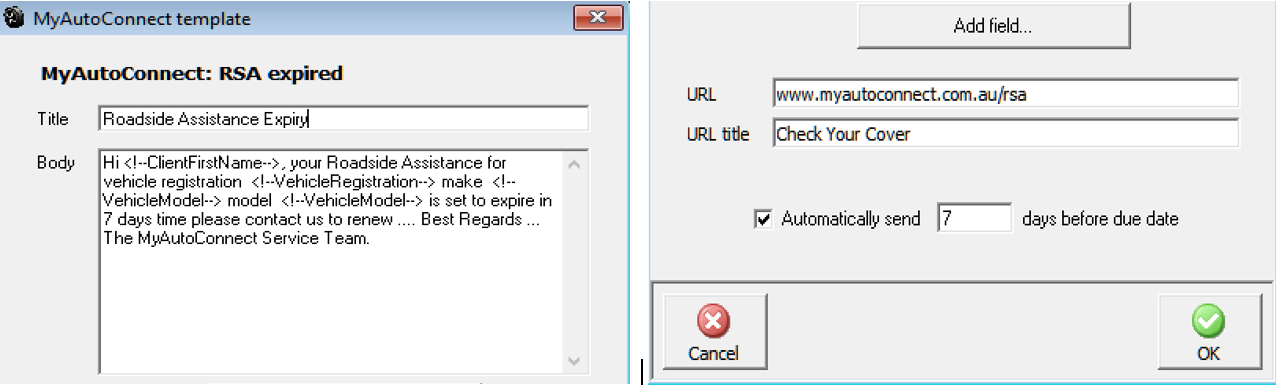
Rego Check Due: MyAutoConnect allows you send registration renewal reminders to your clients, the form contains the following default message:

The form lets you set the lead time for the reminder to be dispatched, we suggest a time frame of between 7 / 14 days prior to the registration renewal date.
MyAutoConnect manages roadside assistance issues and expiry notices the application also provides a direct link to the terms and conditions of cover including an option to initiate a service call. The application will notify you via the communications centre when a client calls for assistance allowing you the opportunity to offer further assistance is required. Membership details are logged against each individual vehicle covered.
You issue roadside assistance in the normal way via Automation Premium, you will need to select the period. Cover details are automatically sent to the registered MyAutoConnect client, you can of course still send the client membership details via Email, SMS and a printed copy produced at point of sale if you wish.
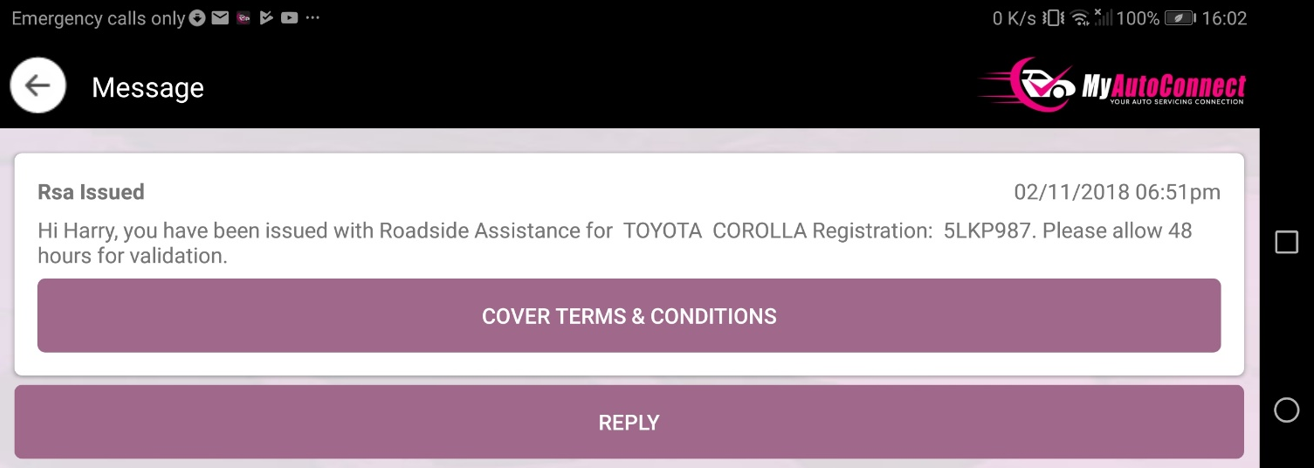
Roadside Assistance Details: your client will receive a message informing him that roadside assistance has been issued, this message is customised to link out to the terms and conditions of the roadside assistance service. It is important that you do not change this URL on the RSA issue form.
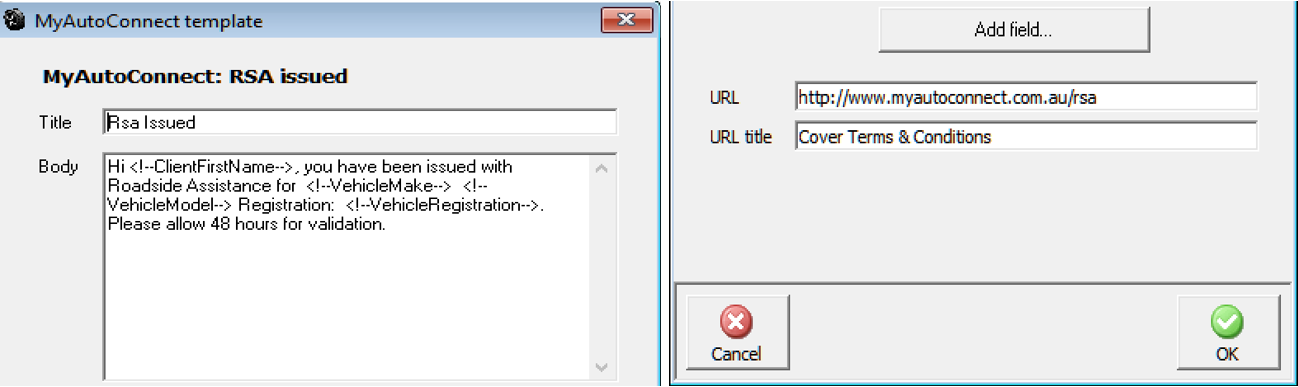
Selecting the terms and conditions will open the information page located at www.myautoconnect.com.au/rsa. To view details of the cover the client selects a vehicle record which displays the RSA details and service history.
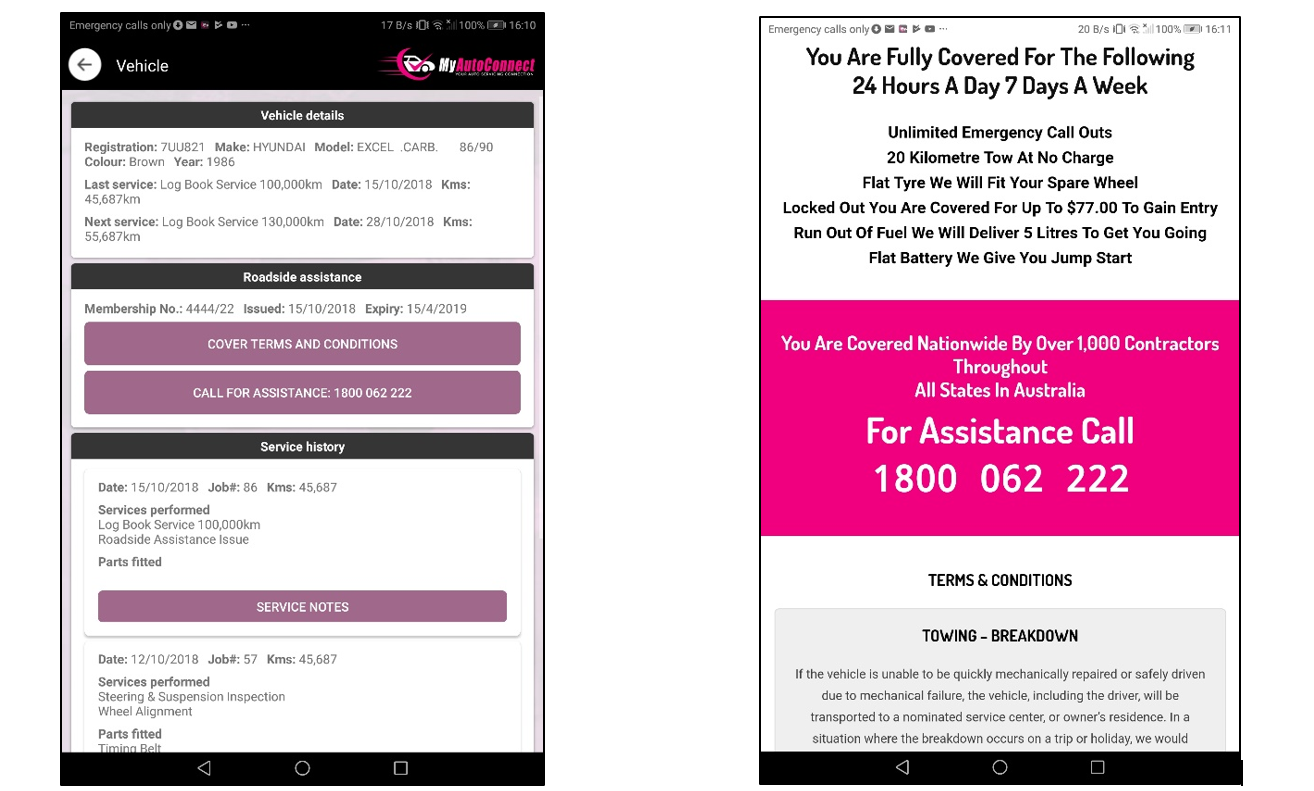
RSA Service, Requesting: If a client requires assistance, he can select the call for assistance option placed in the RSA detail section of the vehicle record. On execution you will be notified via your MyAutoConnect communications centre. You can access the full client details from this screen and if you wish drill down to the vehicle service history from the client card.

The online requests message box will automatically display if there are outstanding unread messages, you will also see an explanation mark on the tasks icon at top of screen. Messages can be viewed on selection by pointing to this icon and double clicking on the online requests option.

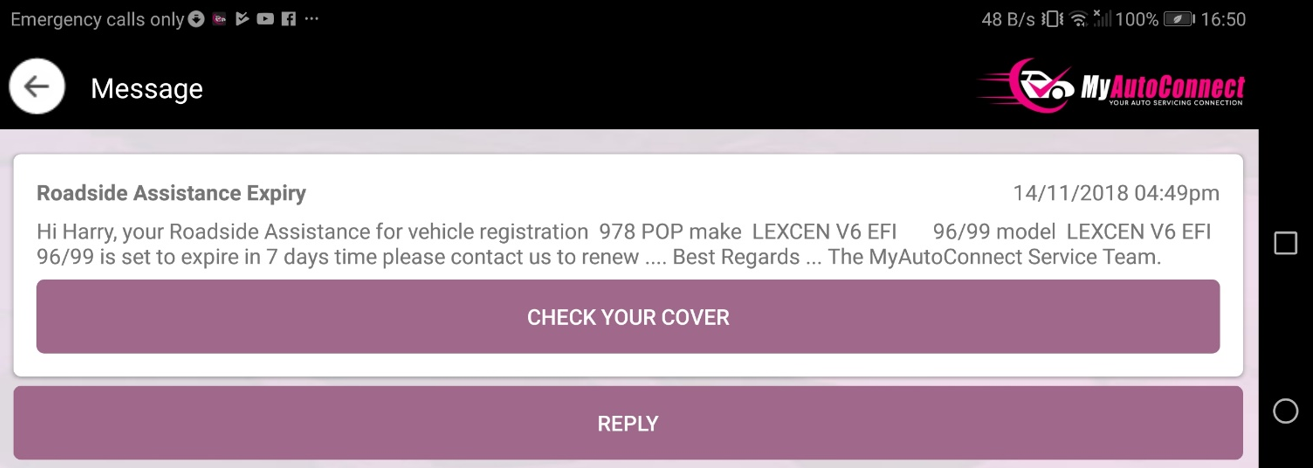
RSA Expiry: To encourage your RSA clients to return for service you set MyAutoConnect to send automated RSA due for renewal notices, we suggest these should have a 7-day lead time however you have the ability to change this default setting. By default, the URL selection will take the client to the terms and conditions page, we also use a title of check your cover.
As you can see from the message below the client has the opportunity to check cover and reply to you, the user also has an option to make a booking directly from the site details display
As you can see MyAutoConnect automates your communications, however there is one that is not that we allow you to use for promotional purposes. In the communication type list, you will see a promotion option. This section steps you through how to launch a promotion to your MyAutoConnect clients.
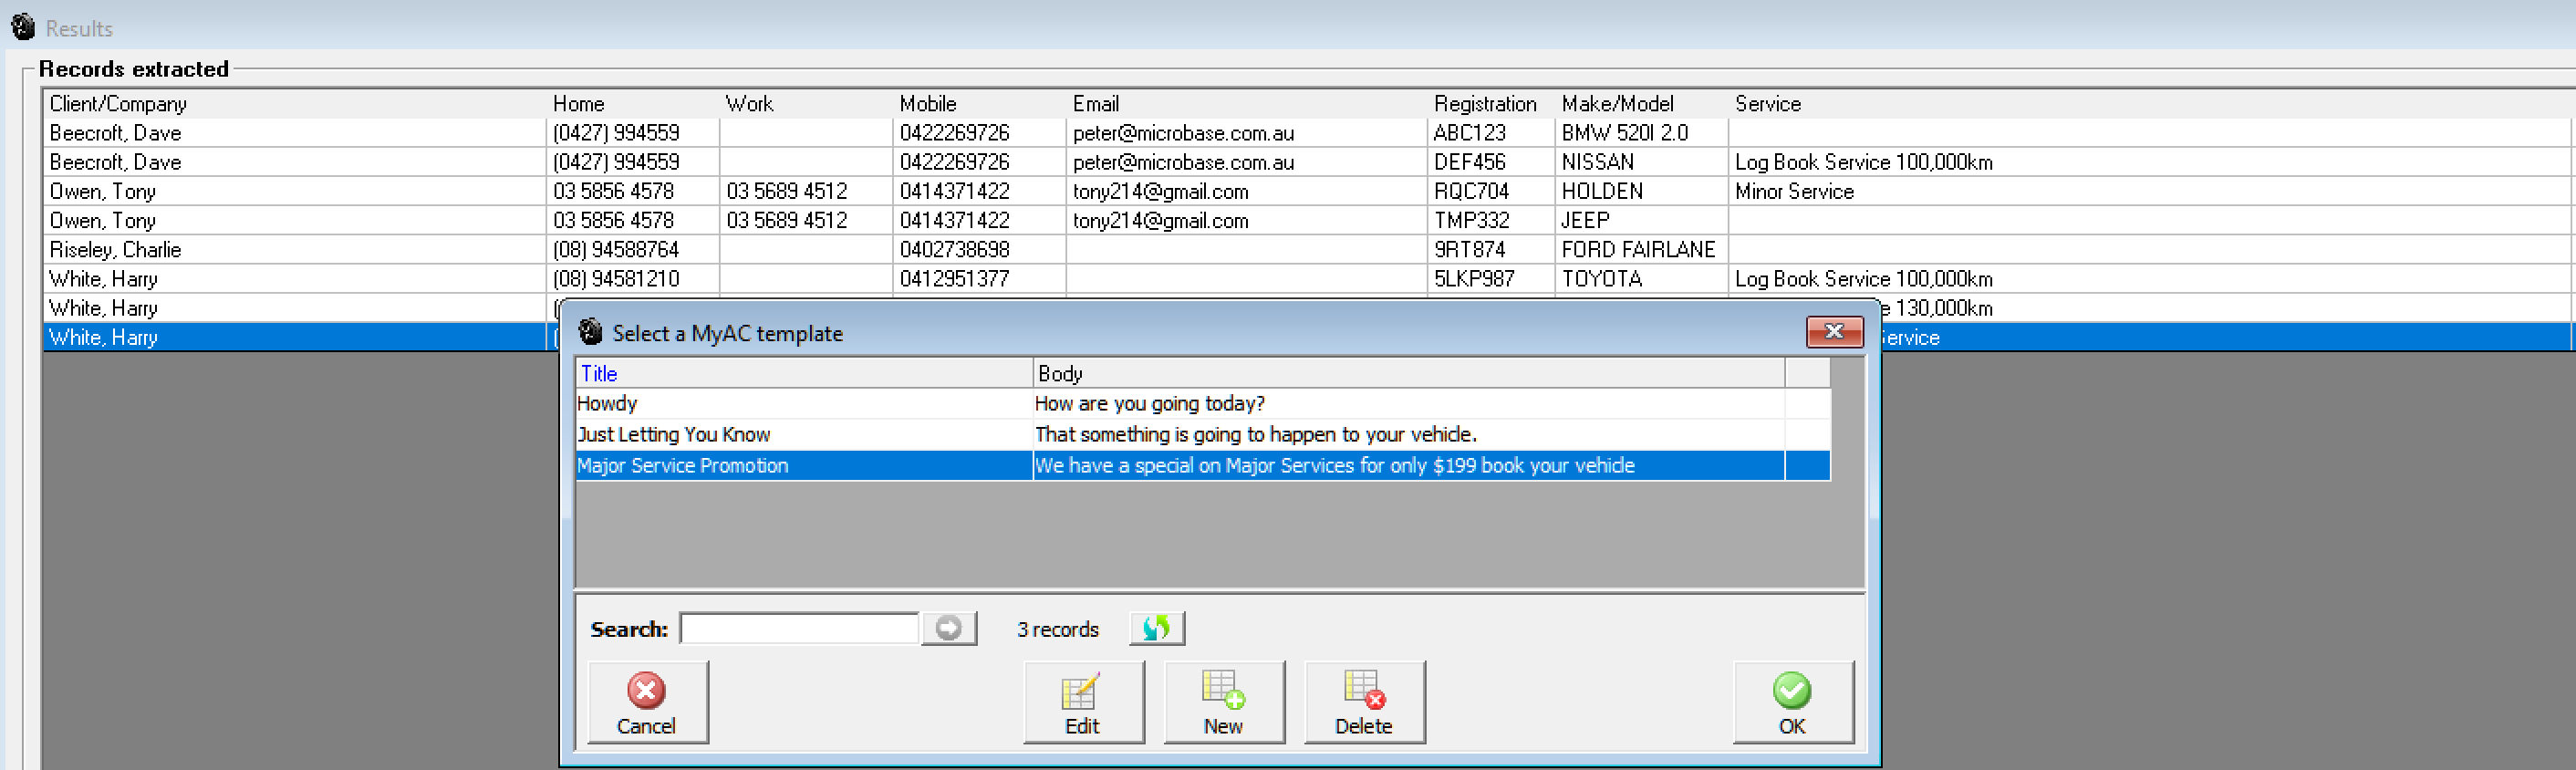
Firstly, you need to decide on the components of your promotion for this example we are going to use a major service special that we are promoting for $199.00. Go to Site Settings / Online / MyAutoConnect, select the promotions option, you will see a list of pre-set promotions. To create a new entry, select the new option at the bottom of the list.
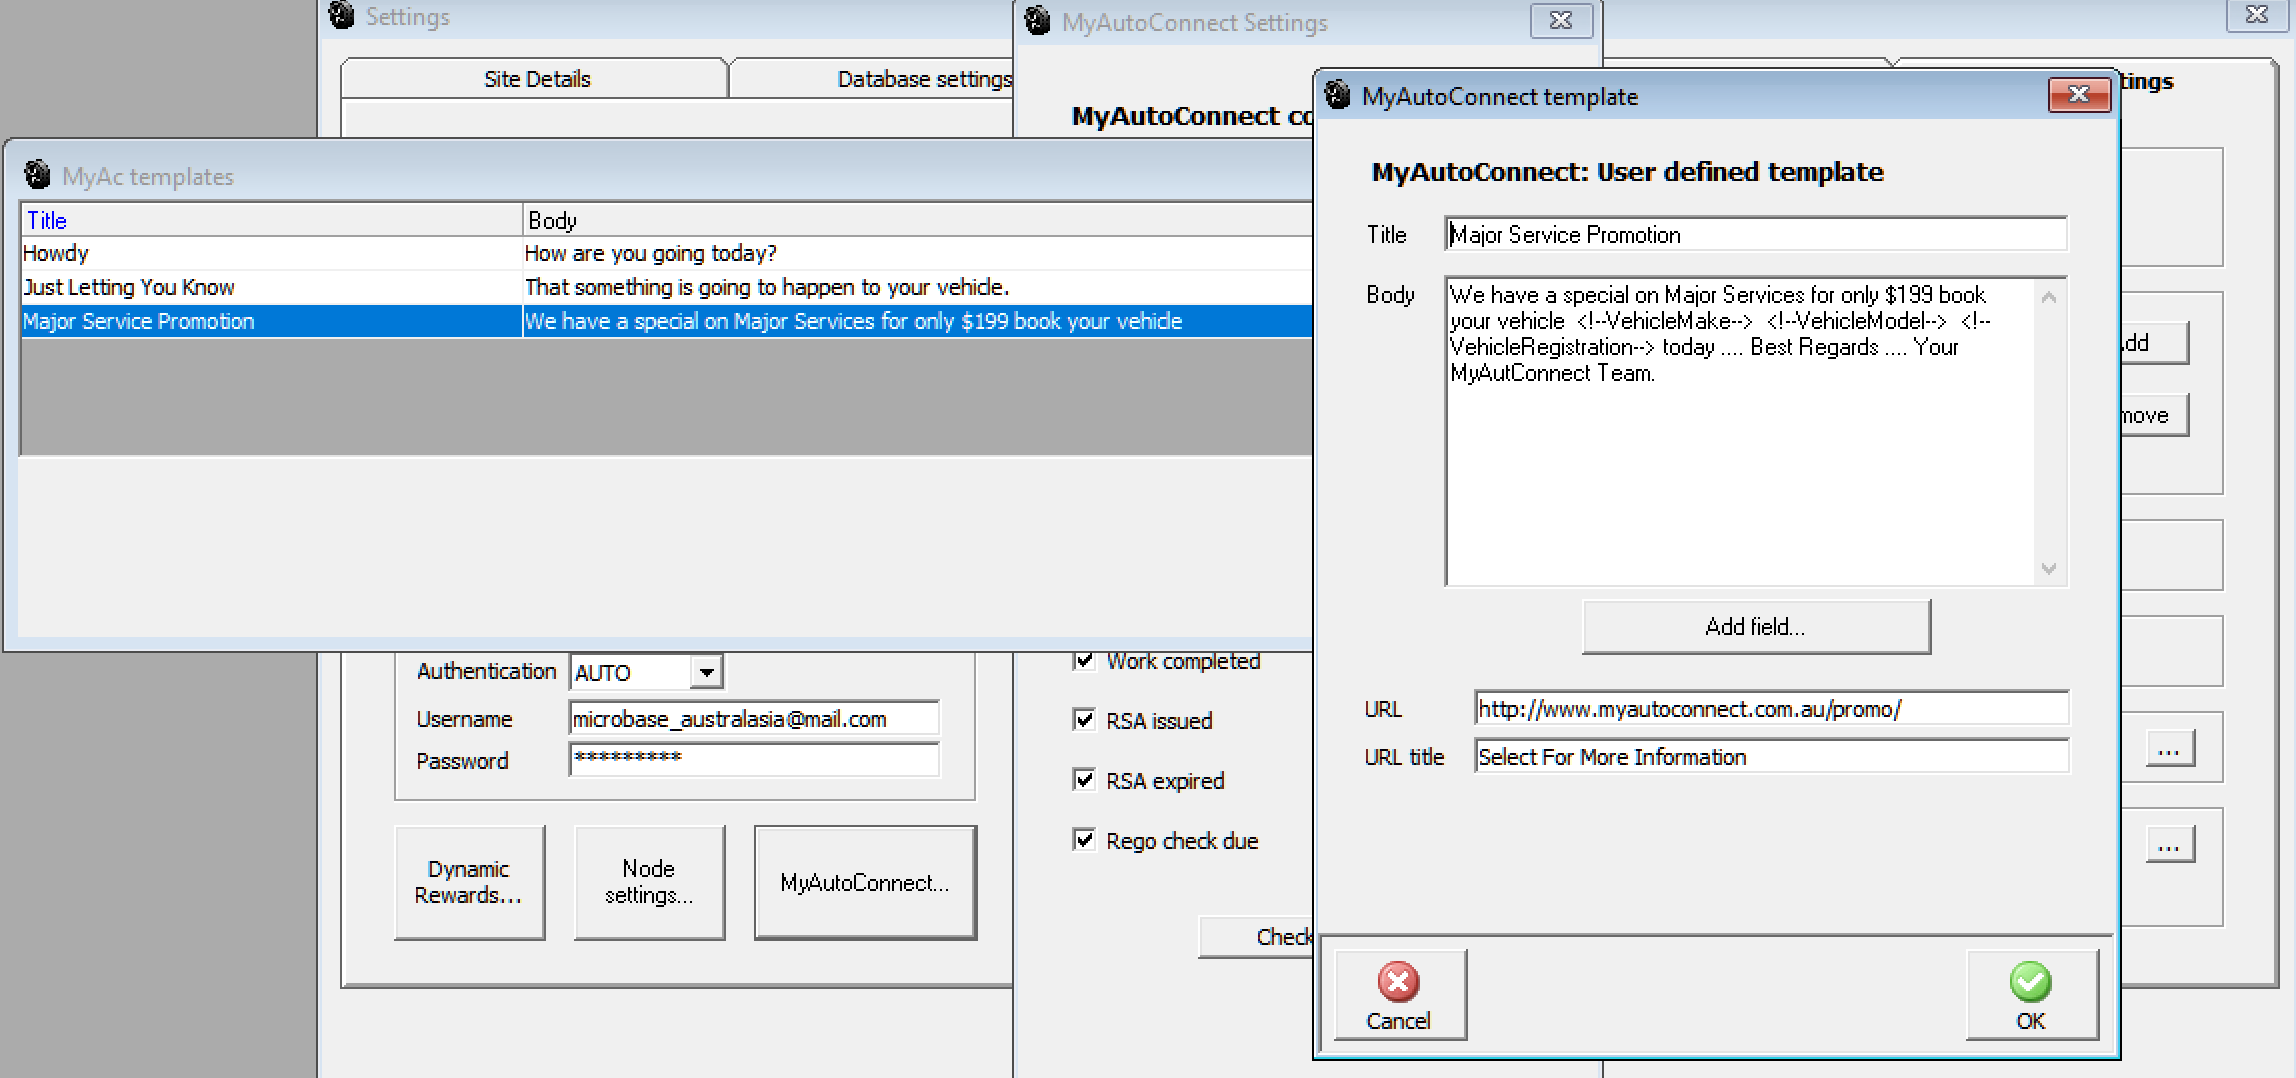
Enter the details of your special, to add the merge fields click on the Add Field option, we suggest so you can tell the full story, you setup a web page and enter the URL in the appropriate field, remember this is going to be viewed on smart devices so the code will need to be active (HTML 5) to fit the smaller screens correctly. Once you have completed these details exit settings and select from the top of screen marketing.

From the data extraction screen choose your search criteria and ensure you select the MyAutoConnect clients only option at the bottom of screen, select OK (F12) to initiate the search, once complete you will see a list of MyAutoConnect clients on screen.
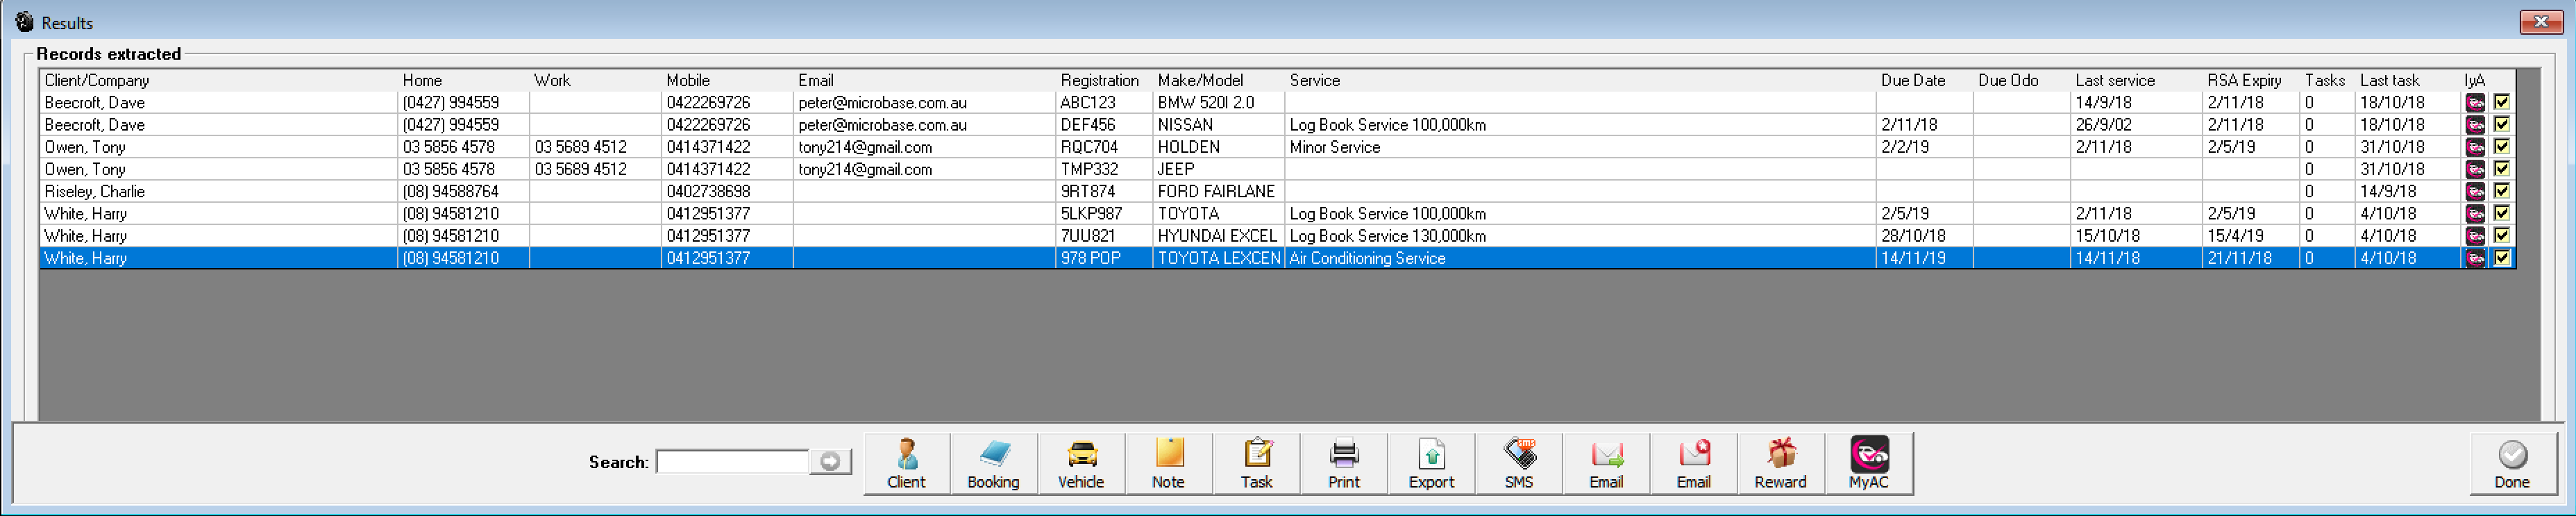
If there are clients in the list you do not want to send to deselect by clicking on the tick at the end of the line next select the MyAutoConnect option from the bottom of screen, you will see a promotions list. Highlight the one you wish to send and initialise with OK (F12).
You are asked to confirm the send, tick the confirmation box and select yes, your messages are now sent, once the process is complete a confirmation message is displayed.
Your client will receive the following and can view the promo details by selecting the select for more information option.
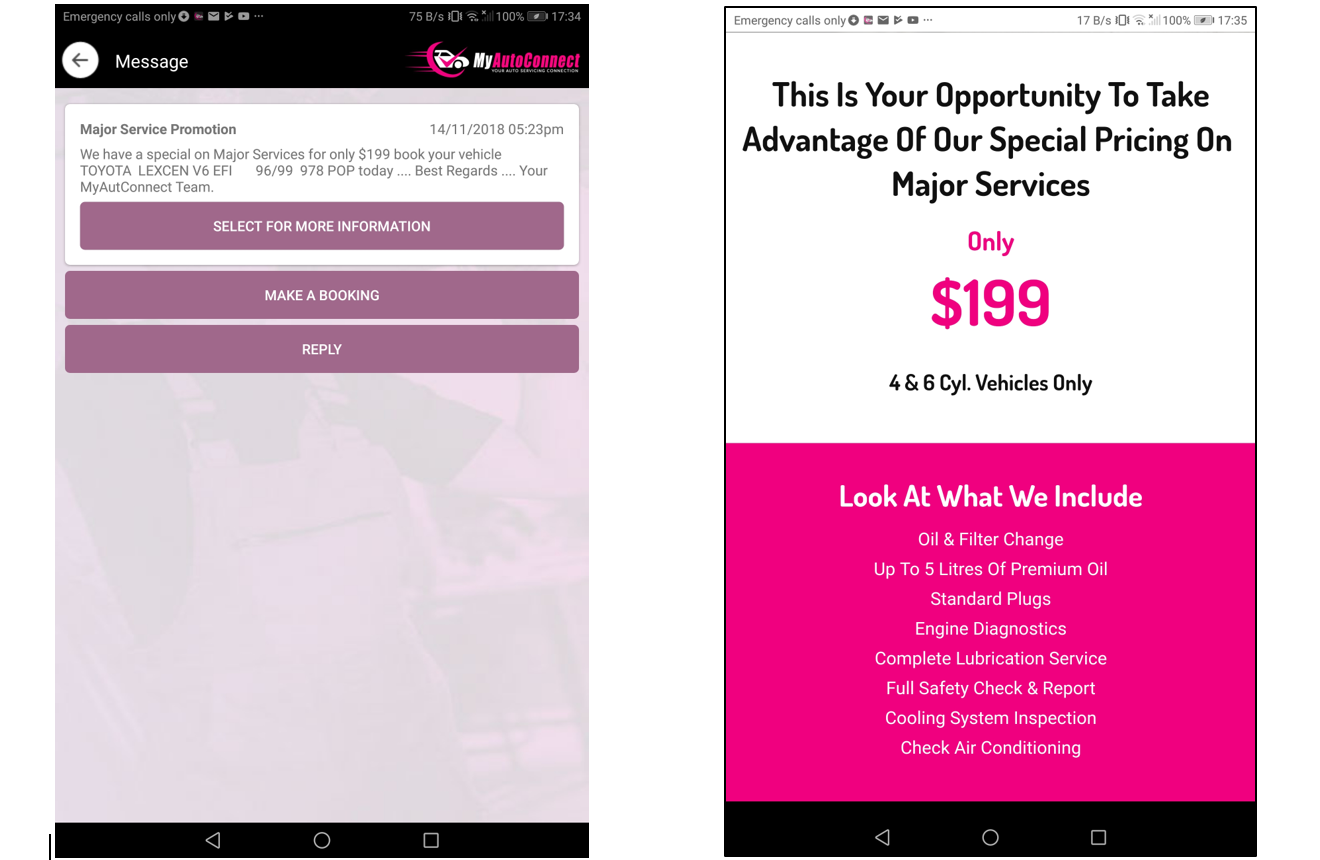
From the promotion message your client has the option to make a booking or send you a reply.
MyAutoConnect introduces a new task option titled online tasks, this is essentially a centralised message centre that contains the communications being received from your MyAutoConnect clients. The display is automated and will return to screen every 2/3 minutes if messages remain unacknowledged, alternatively you can view messages by selecting the task button positioned at top of screen, if there are outstanding messages you will see a red exclamation mark overlaying the task icon.
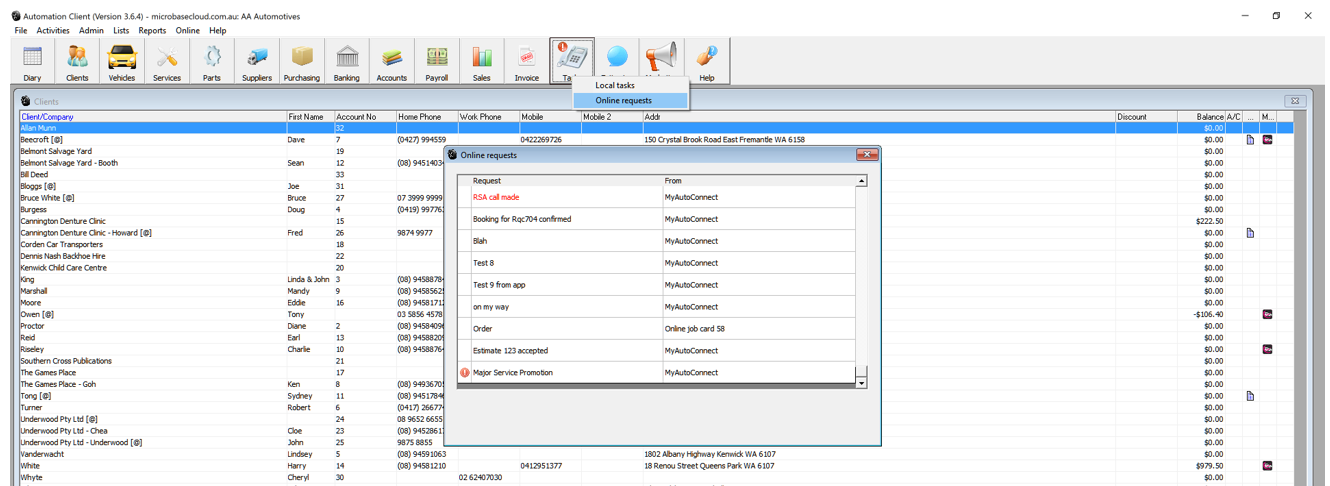
Messages, Managing: To open a message simply point and double click on the message from the online requests screen, if you wish to view the full client or vehicle details click on the client option, this action displays the client form, if you wish to access vehicle details select vehicle from the bottom of the form.
You will notice we also track the date and time a message was sent, the time it was received and whether it has been read or not. To reply select the reply option, type in the message field and add an URL with customised title if you wish.
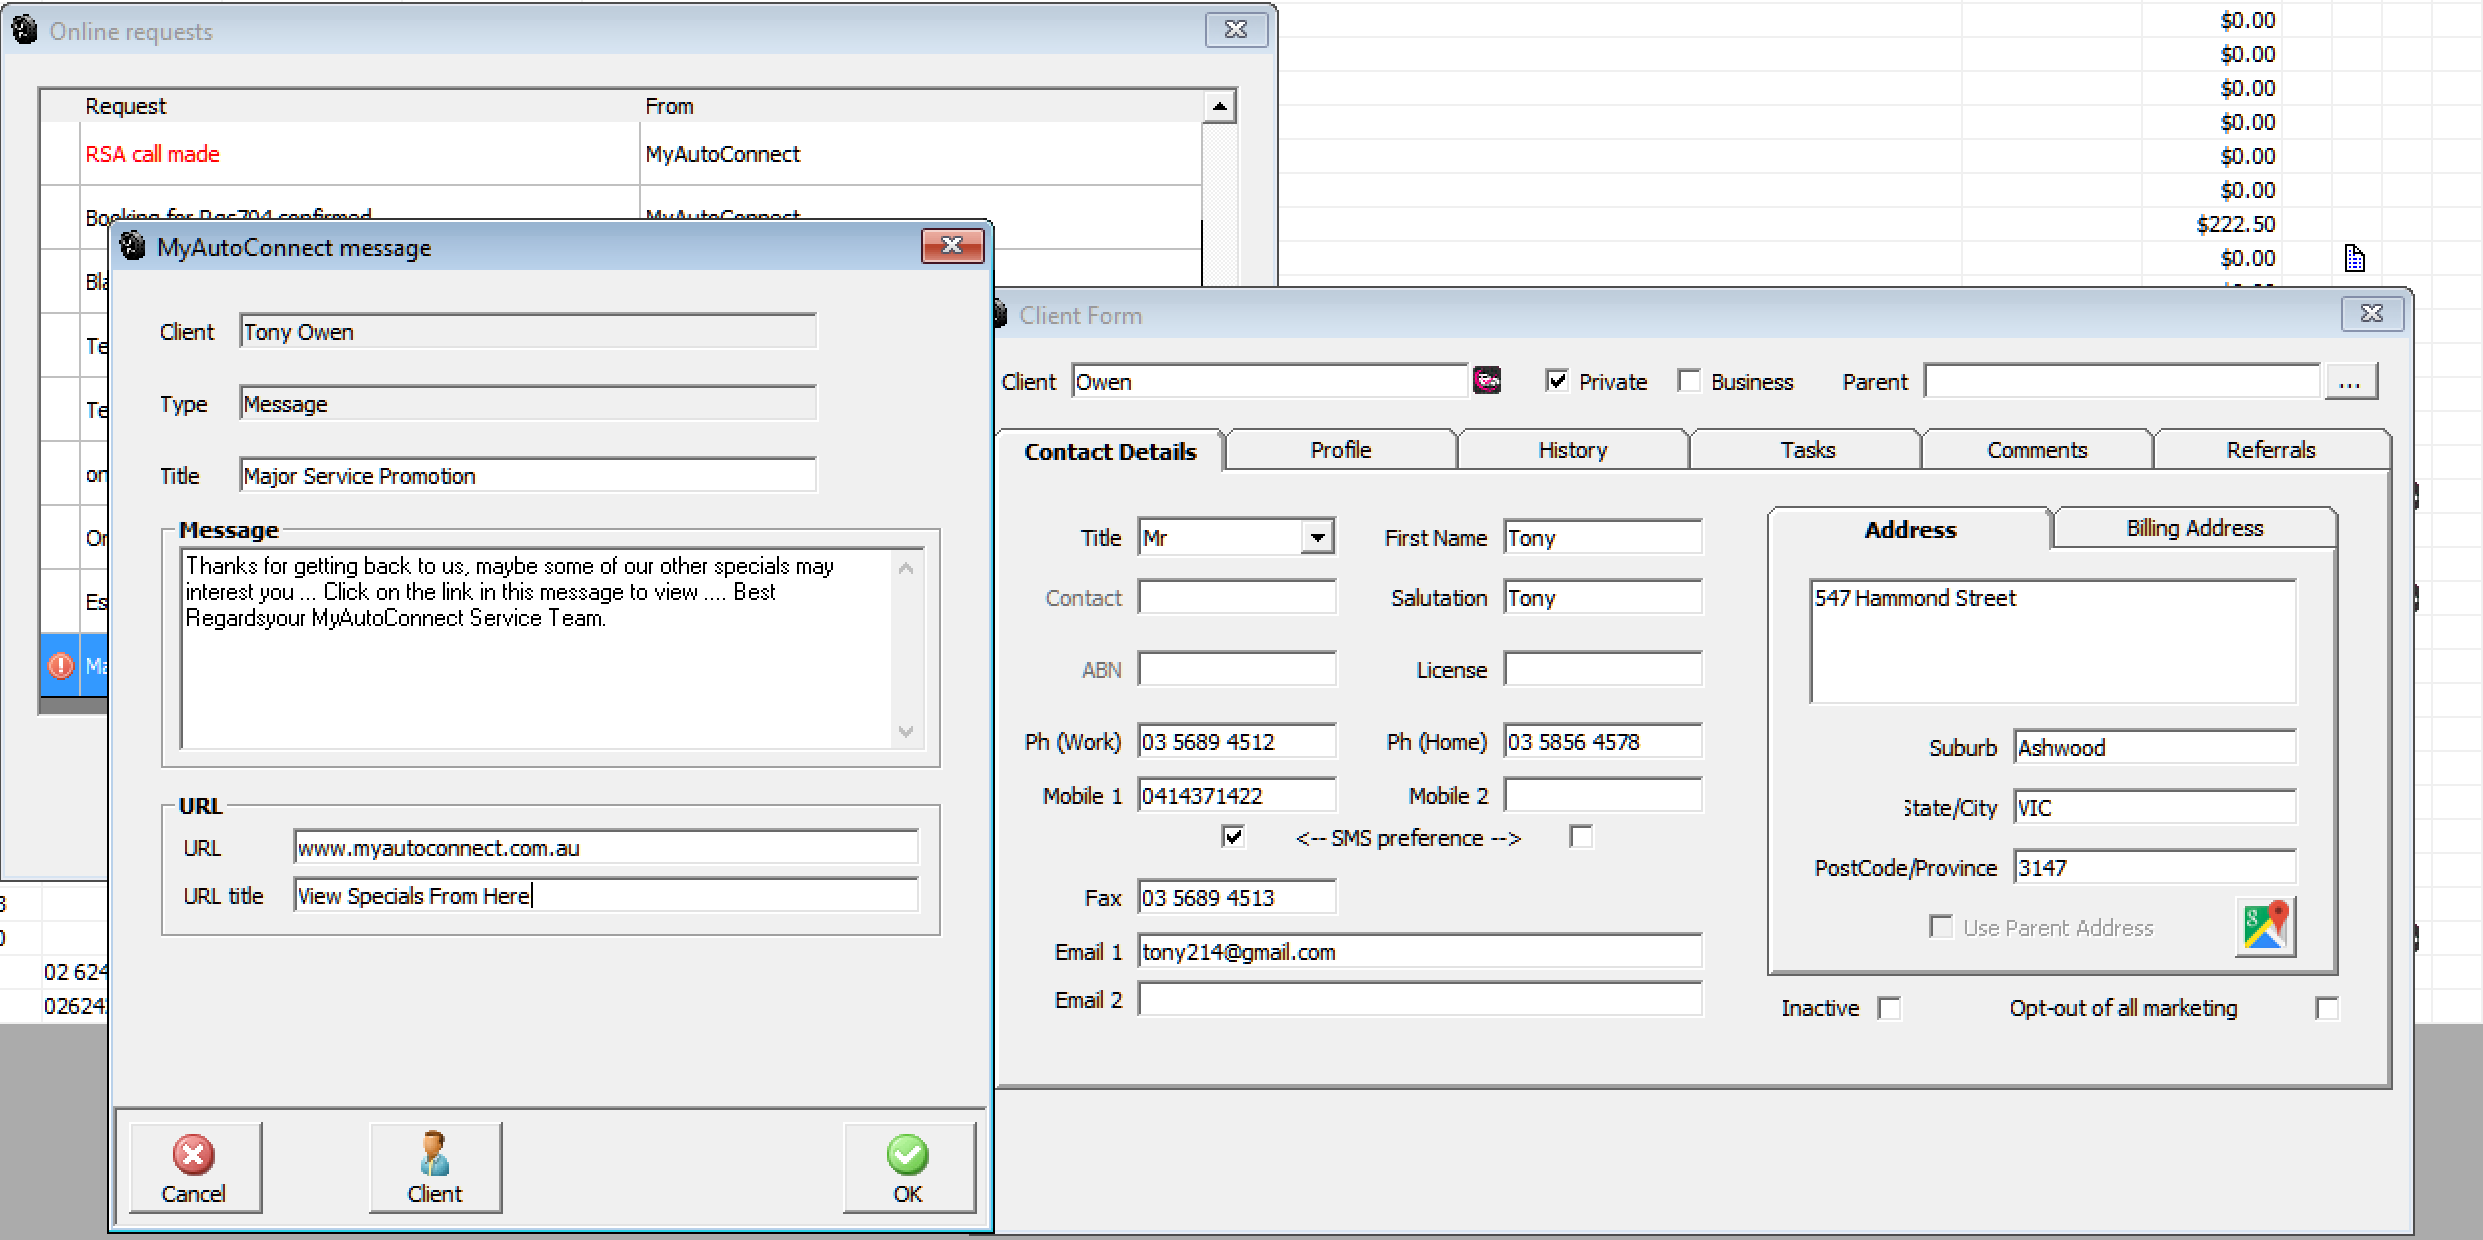
The client will receive the message with the link to your URL imbedded titled View Specials From Here.
Messages, Deleting: You can delete messages from your online tasks menu by highlighting the message and selecting remove from the bottom of the list, you can also refresh the list by selecting the refresh option situated to the left of remove.

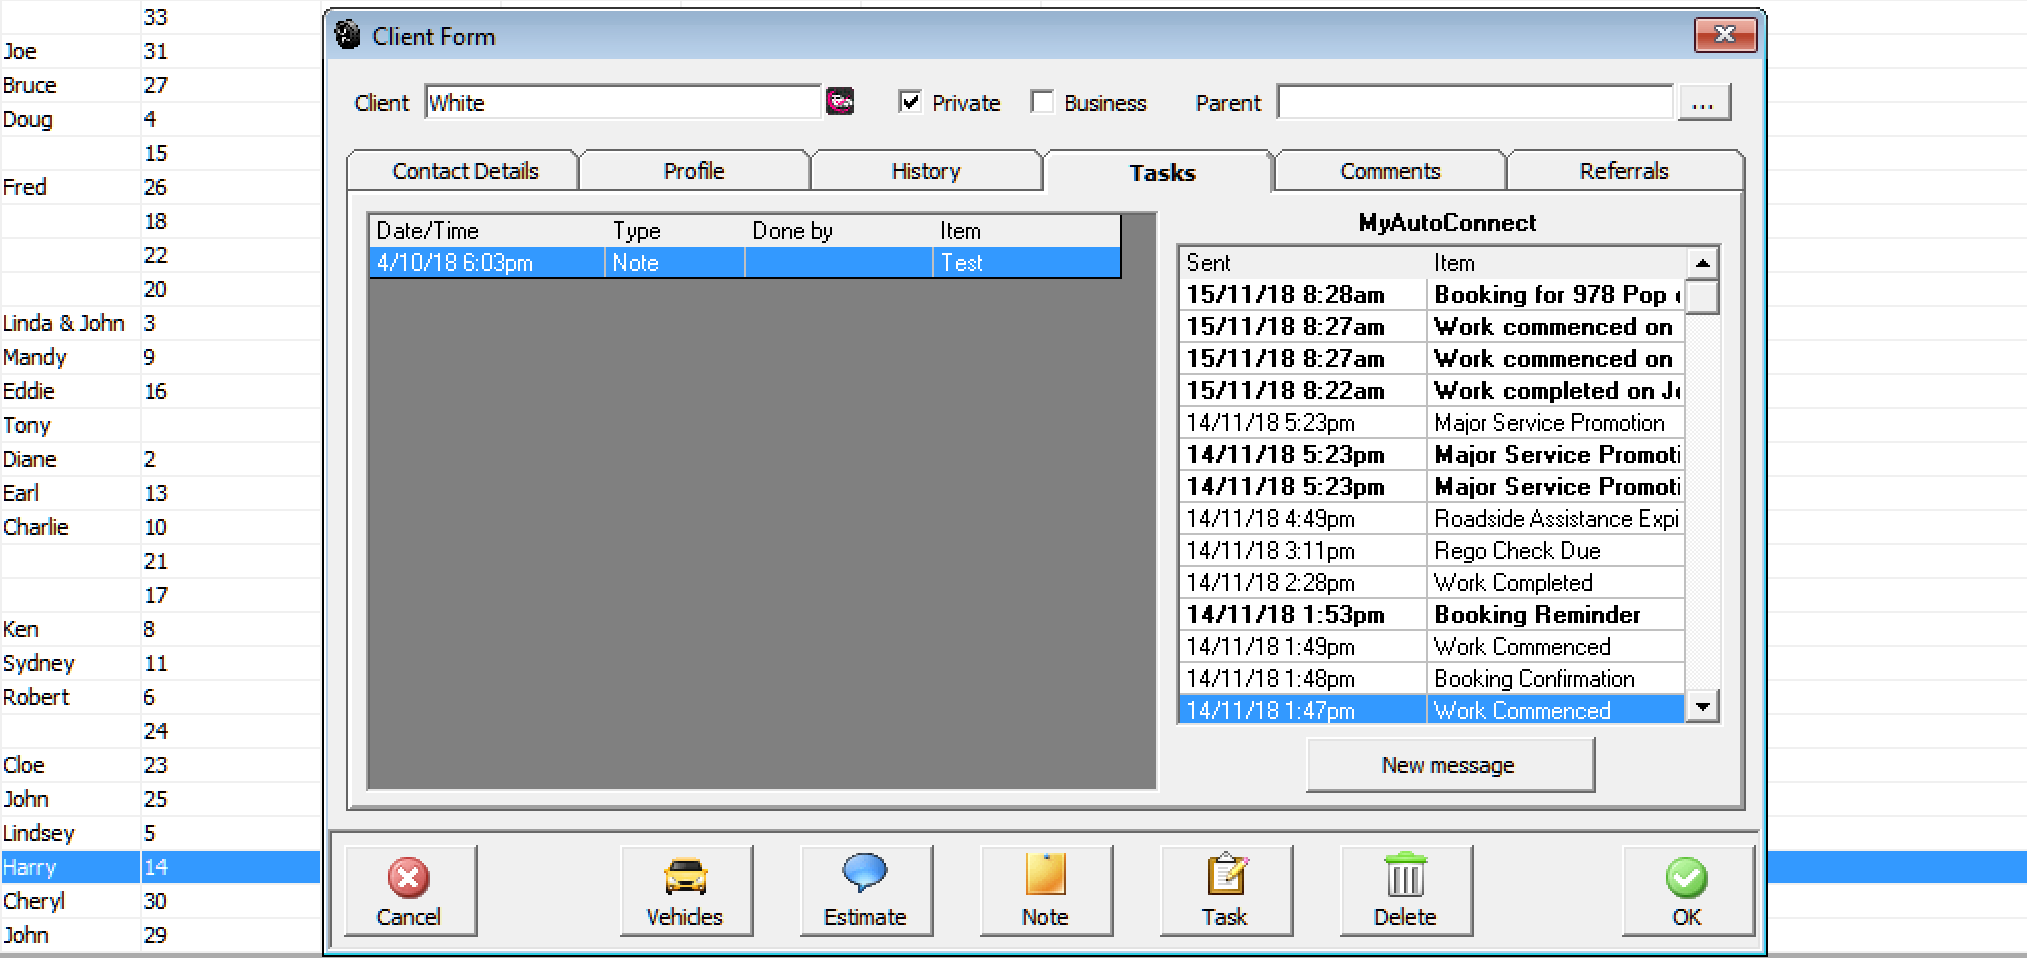
Messages, viewing By Client: Your MyAutoConnect messages are logged in the task screen of your client form, the messages in bold indicate the message has not yet been read. You also have the ability to create a new message by selecting the option at the end of the list. Note: MyAutoConnect communications can’t be deleted, for ease of reference messages are displayed in date order with the most recent at the top of the list.
Messages, Customised: Automation provides you the ability to send a single message to a MyAutoConnect client from the client listing. Once registered for MyAutoConnect you will se an new MyAutoConnect icon at the bottom of the client list.

When sending a message from the client list you can again embed an URL with a customised link title.
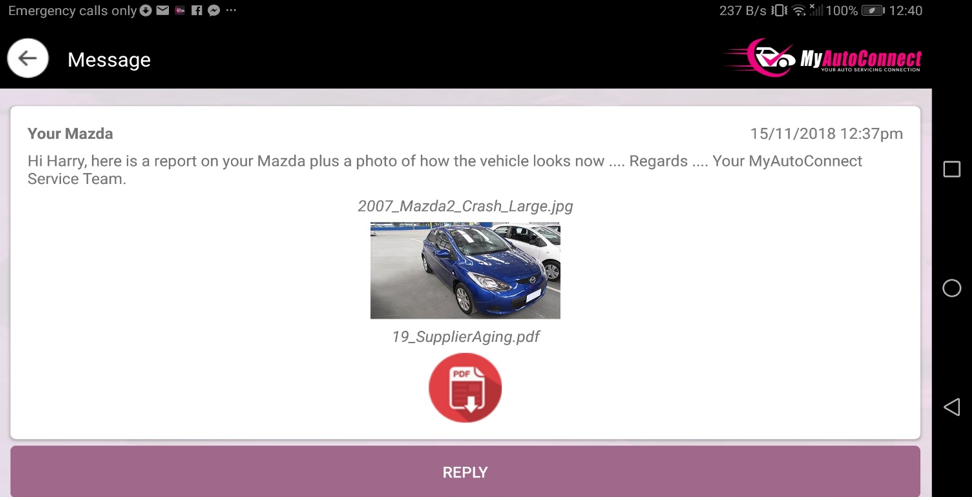
Messages, Sending Attachments: Attachments can only be sent from the job card these include: Job summary, invoice, photos and PDF and Doc extension files. To send photos and files they must first be uploaded to the cloud server, invoices and summaries can’t be sent from the online job card, access to these documents must be initiated from the terminal.
Select the attachments option on the message form, your uploaded files are displayed with an option on the right-hand side to select, point and double click in the checkbox, complete your selection with done. Your attachments are sent once you complete the process with OK from the message form.
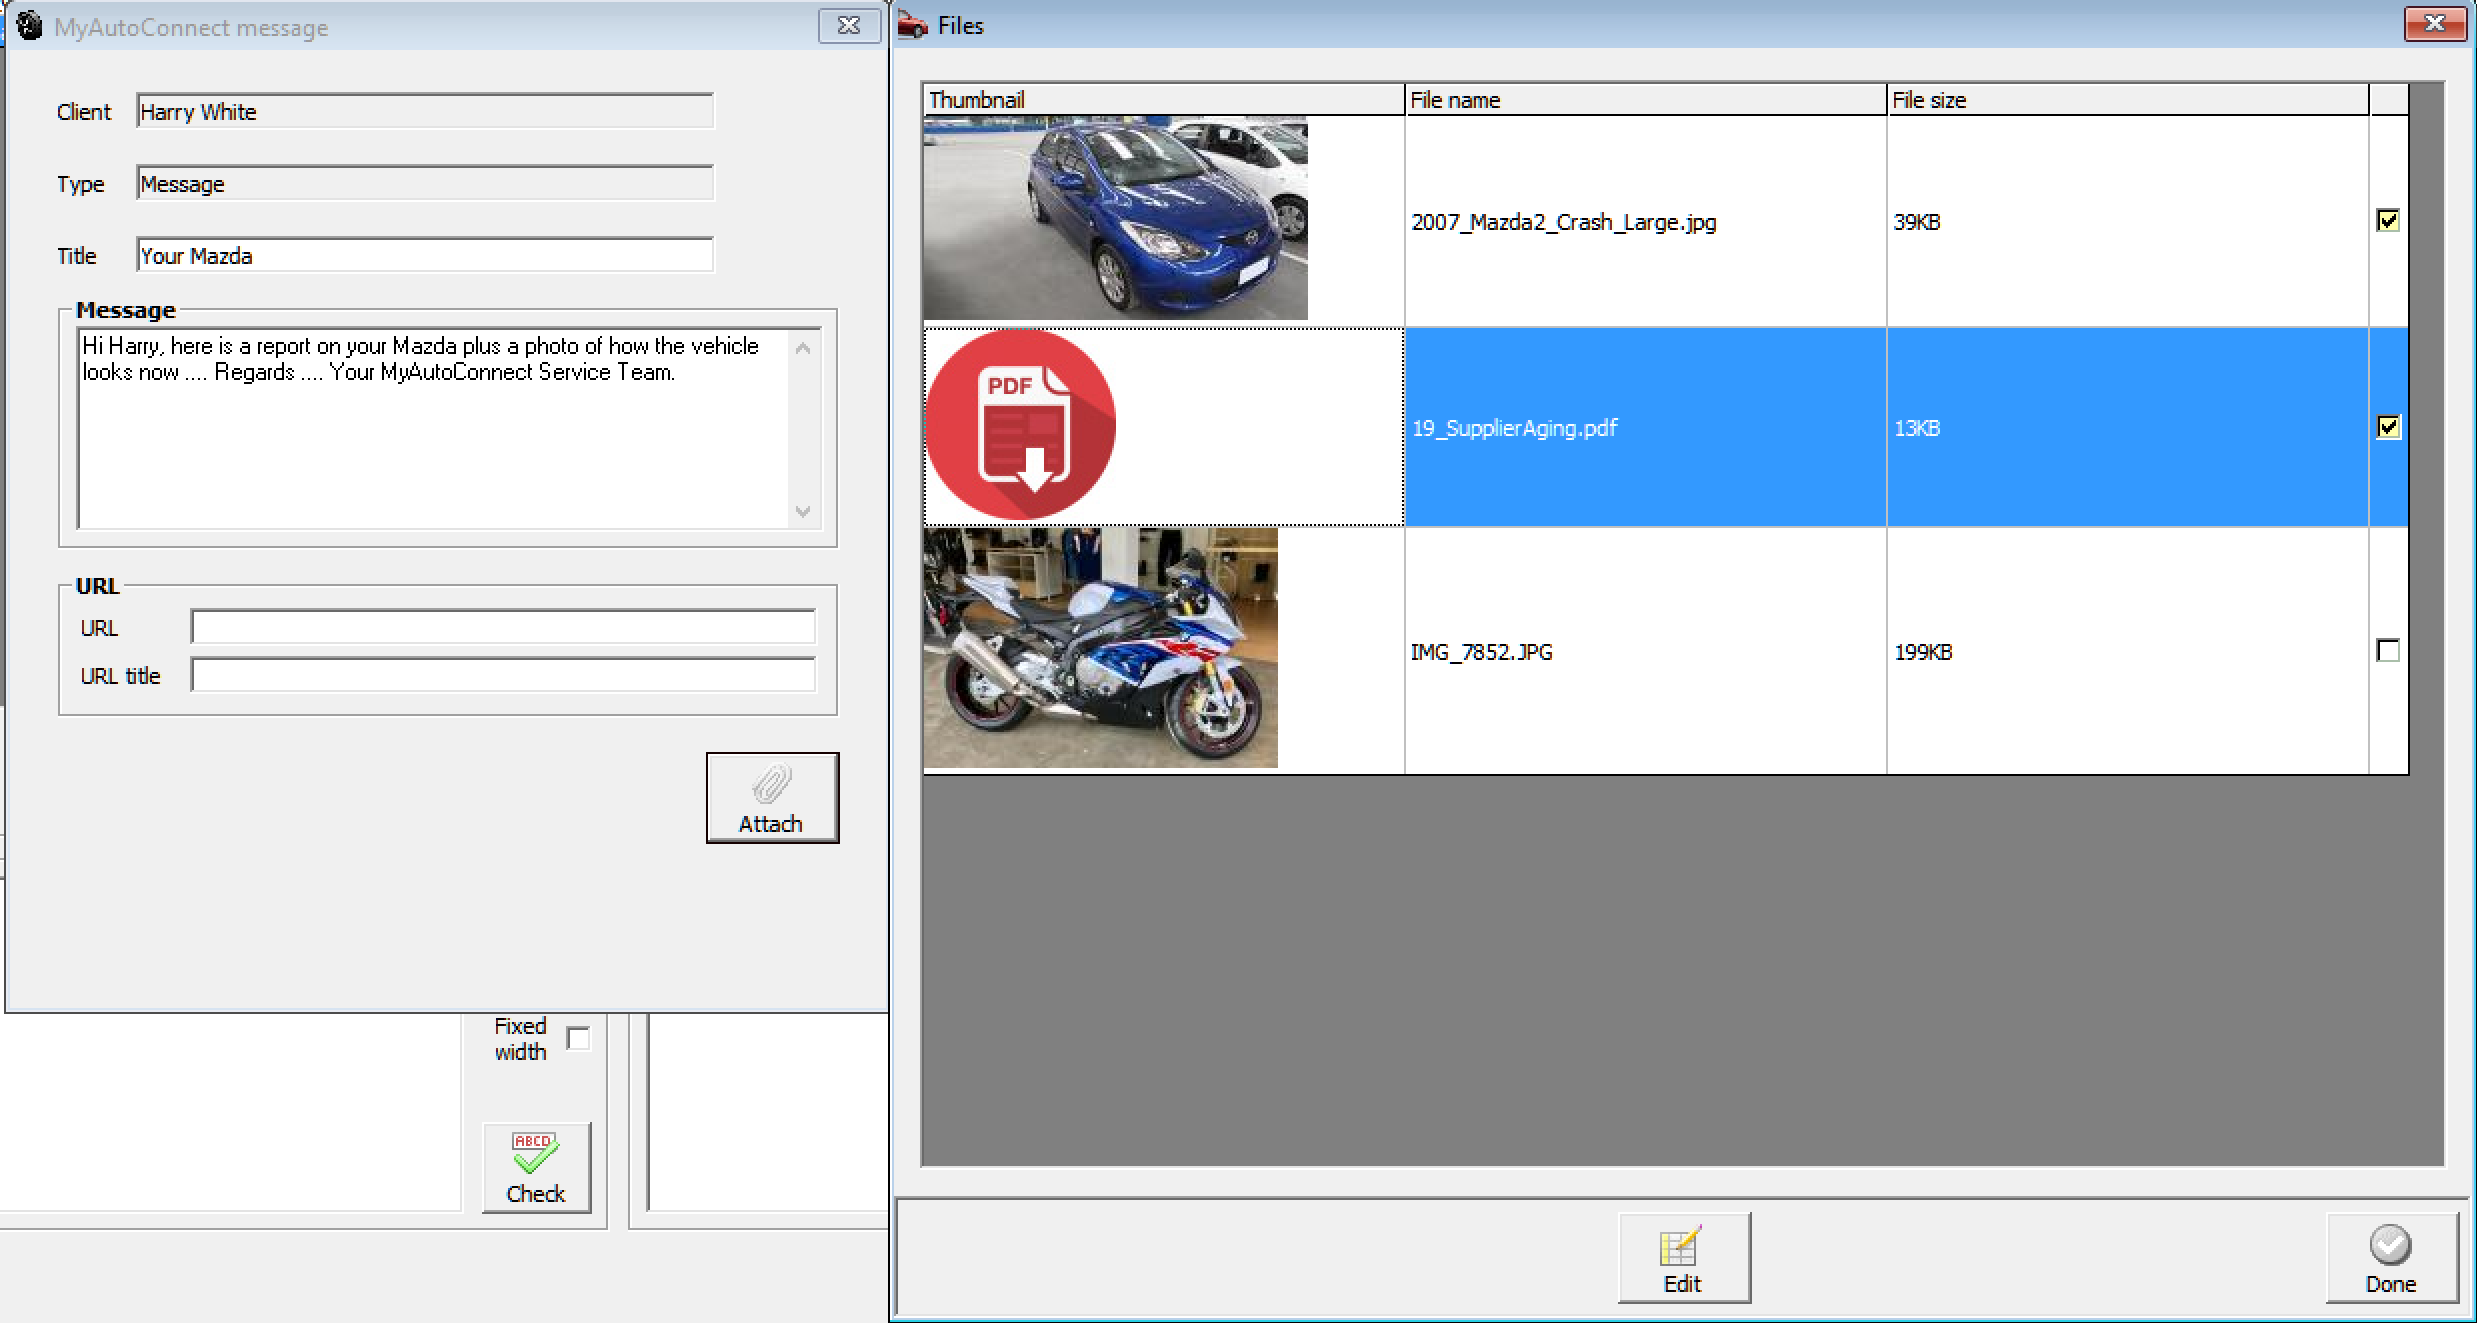
Your client will receive the message below in MyAutoConnect. To read the PDF he simply selects, plus if the image needs to be viewed in a larger format, he can select on the smart device will enlarge.
To send attachments / messages from the online job card again you select the MyAutoConnect, a list of messages is displayed, select new message and then follow the same instructions as sending from a terminal.

Messages, Sending An Invoice: Firstly, make sure the job is closed, open the job card and select the MyAutoConnect icon from the bottom of the display, you will be given 2 options invoice and message, select invoice (or summary on an open job) to proceed.

MyAutoConnect clients can book with you direct either from their site page or using the book now option available from many of your communications. You can dismiss (will return to screen is 5 minutes) accept, the booking will be imported directly to your diary screen or reject in which case you have an option to inform the client of the reason.
Once you have accepted the booking the client is notified that you have logged the job into your diary.
Bookings, Receiving: Bookings generated from MyAutoConnect will arrive immediately they sent and be overlayed on your diary screen.
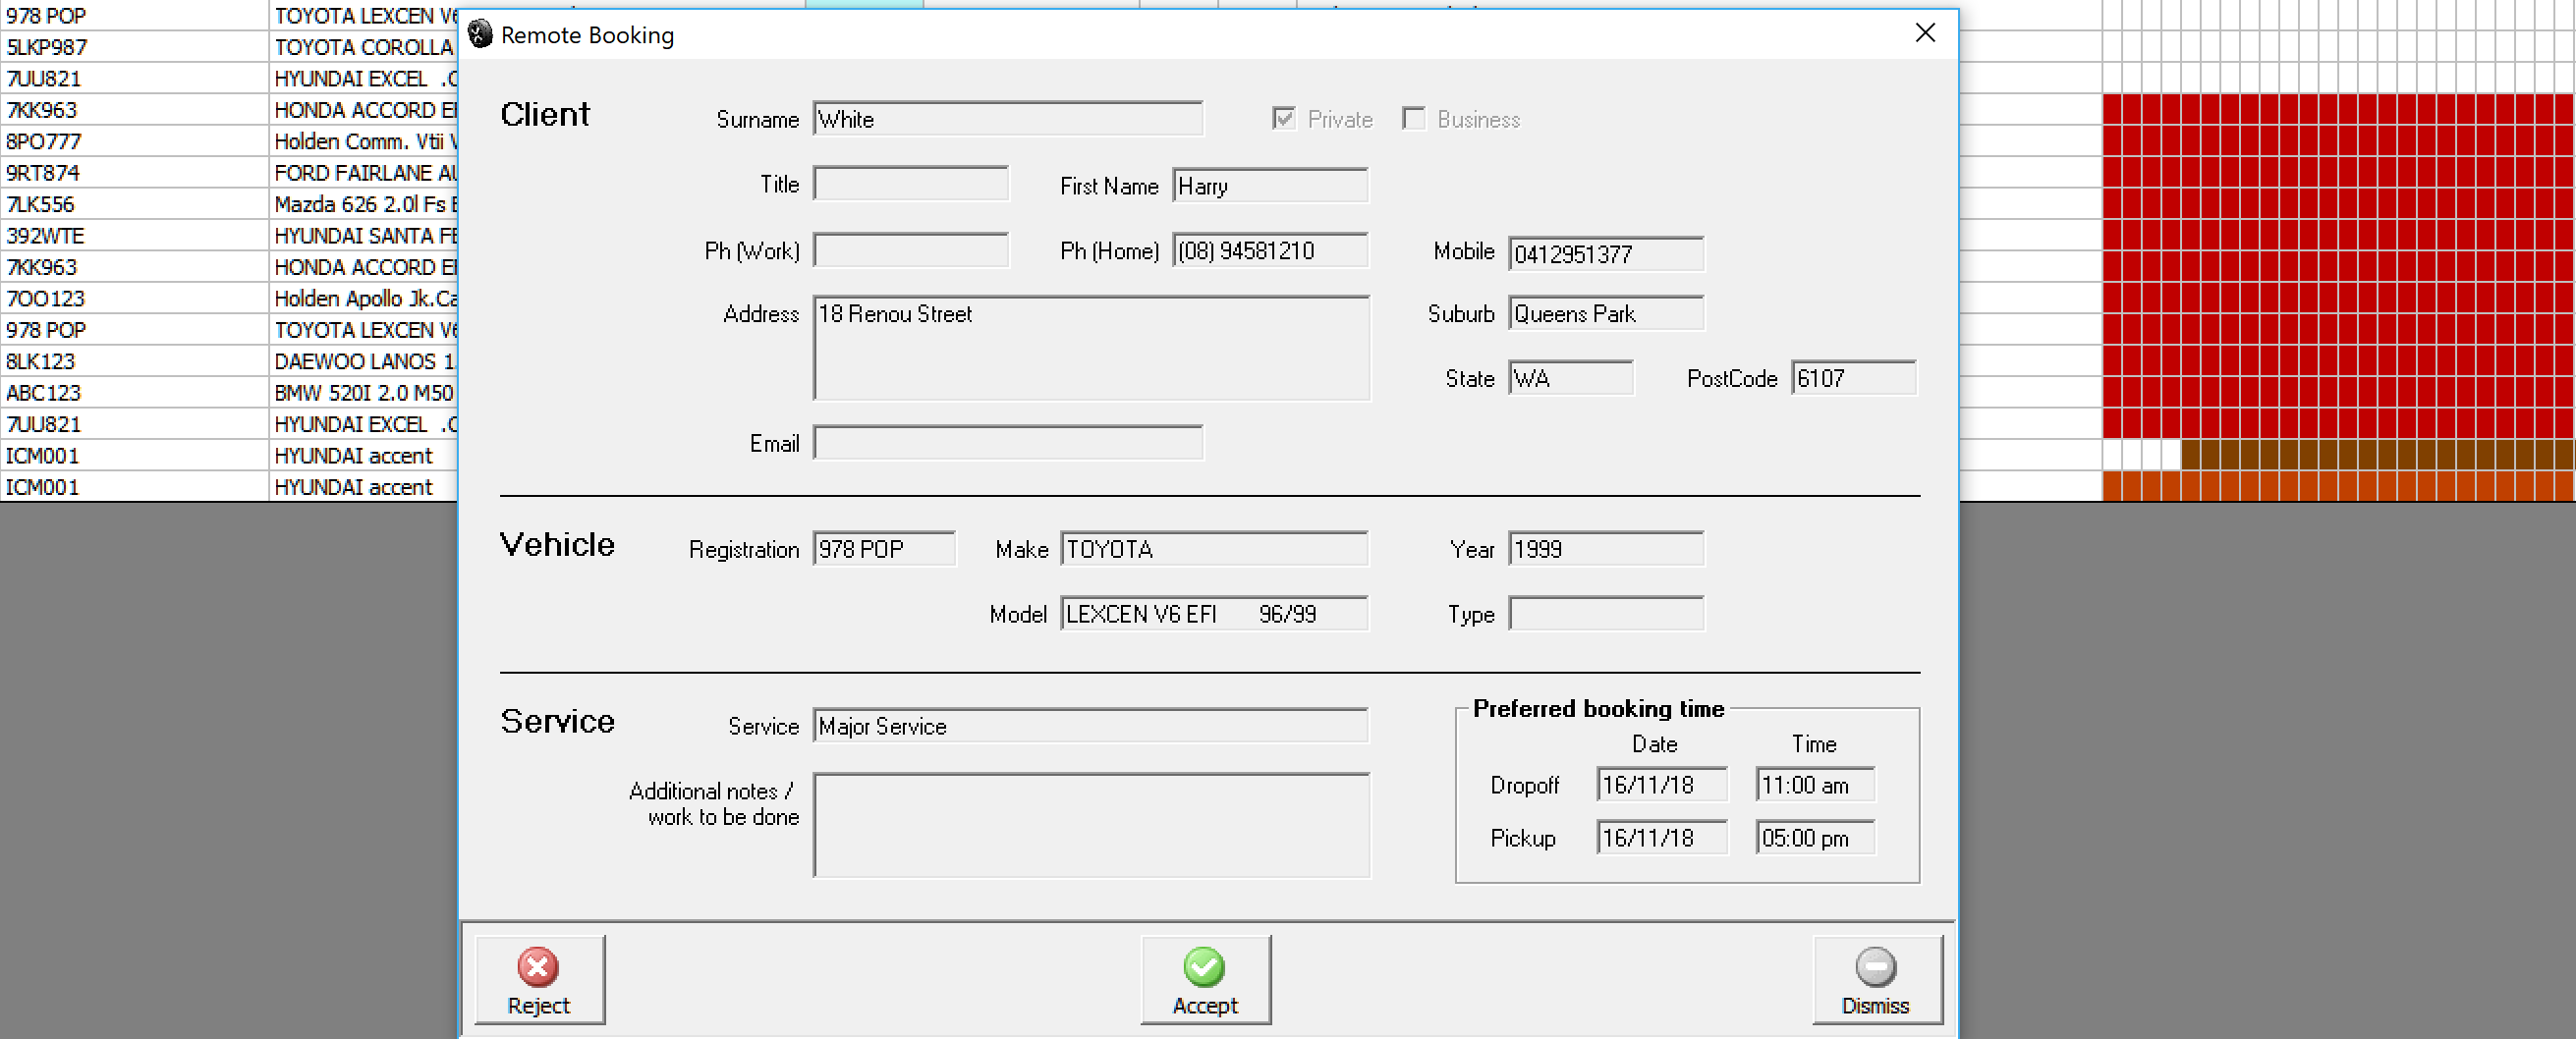
As you can see from the screen grab the form is split into 3 sections, client, vehicle and service, in most cases you will probably simply select the accept option, this action opens the booking form, from here you can add any further information before committing the details to your diary, once complete to finalise select OK (F12).
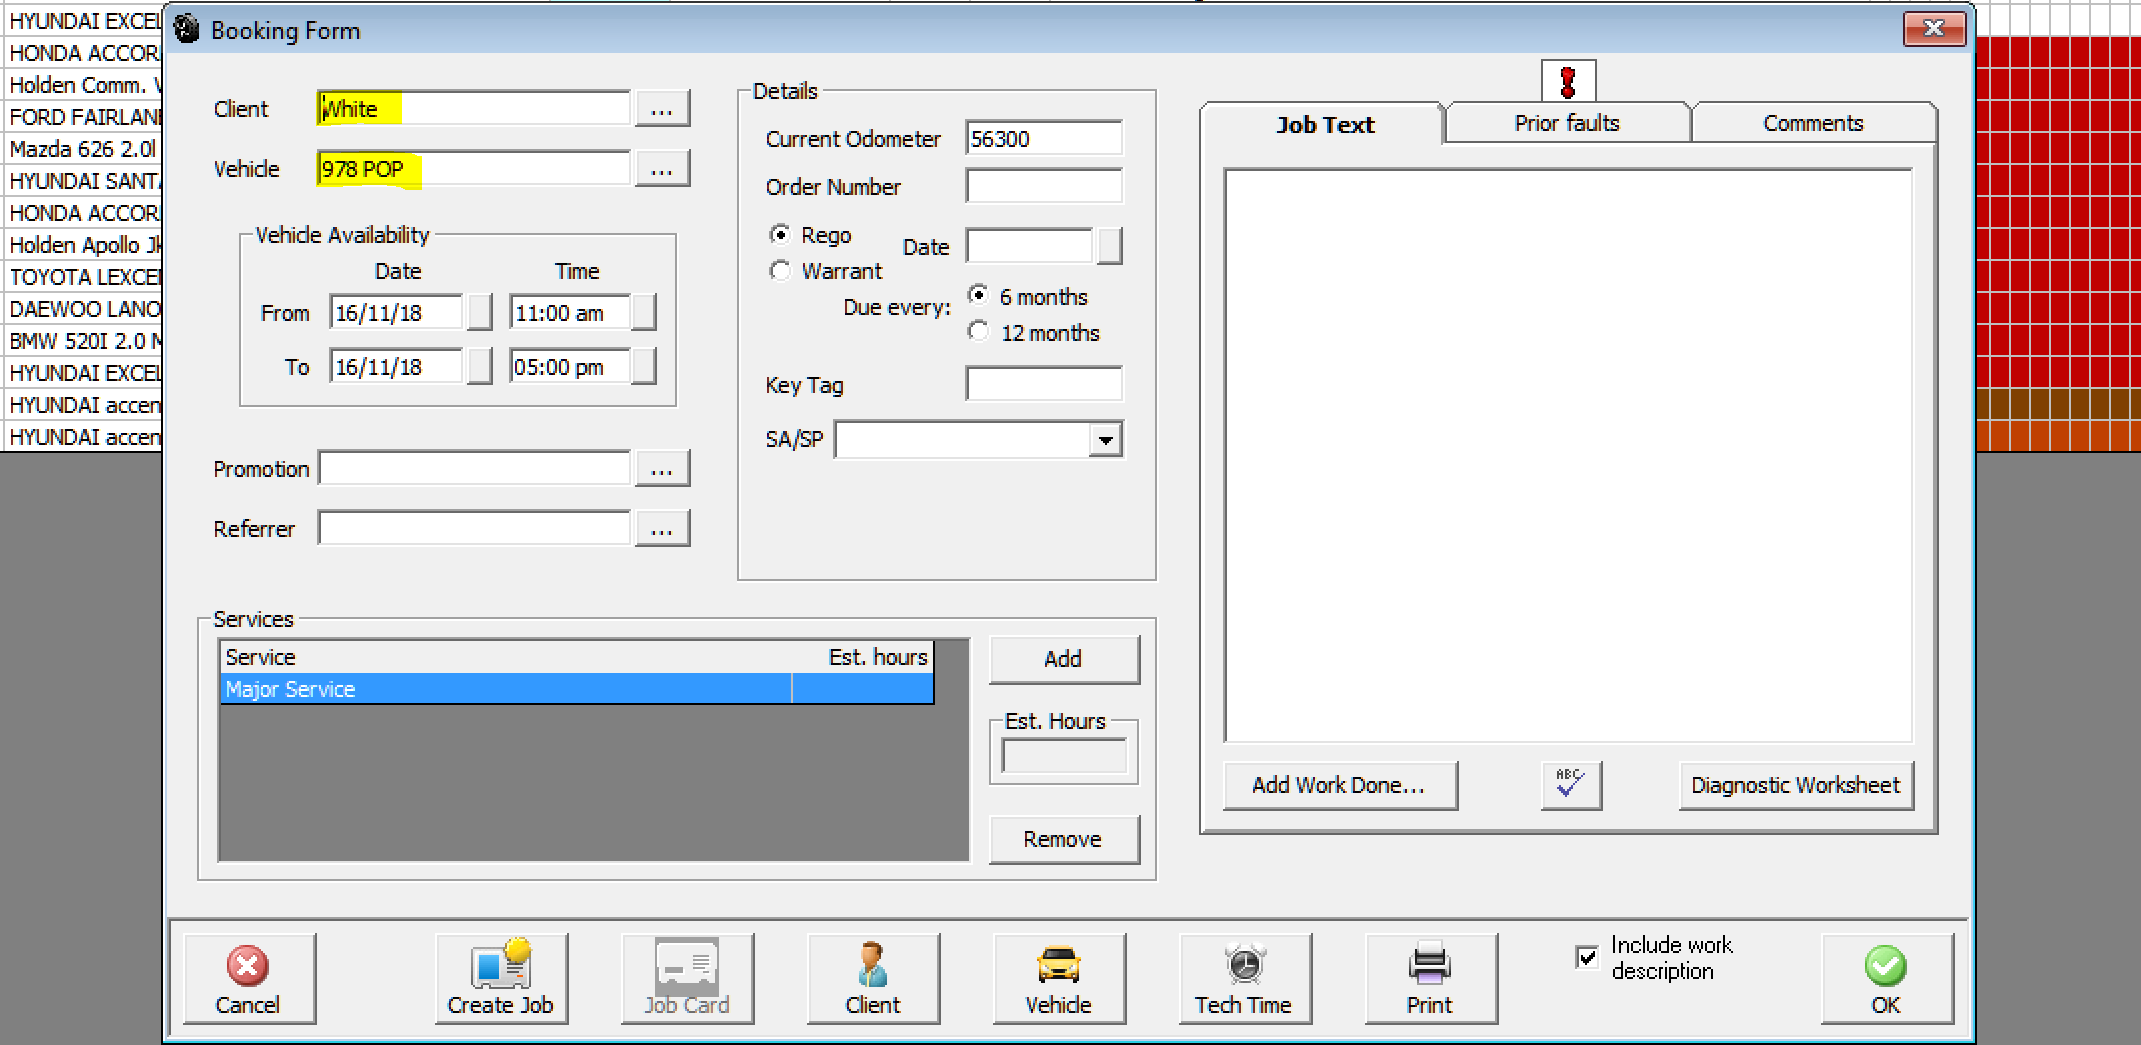
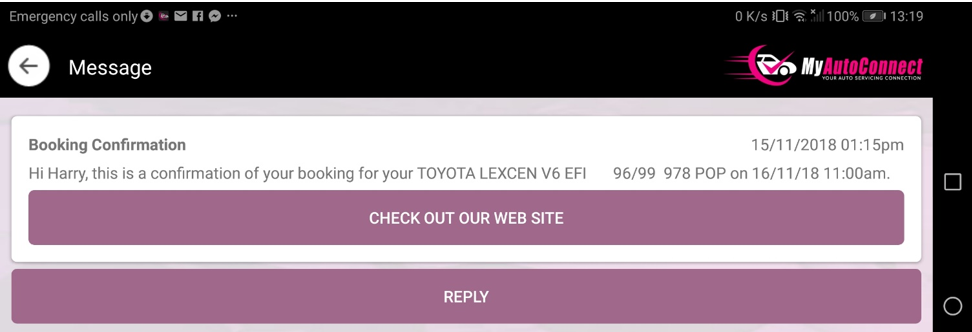
The booking is now entered on your diary.

The client receives an automatic booking confirmation.
Bookings, Rejecting: Automation provides a reject option, you may possibly use this if the date and time is not convenient, you have the option of sending a message to the client suggesting an alternate. To initialise the process, select the reject option from the incoming booking form, you are presented with a message box, the text that is not highlighted is the default. The text we added in this example is highlighted in blue, you can if you wish include an URL with customised title in this communication.
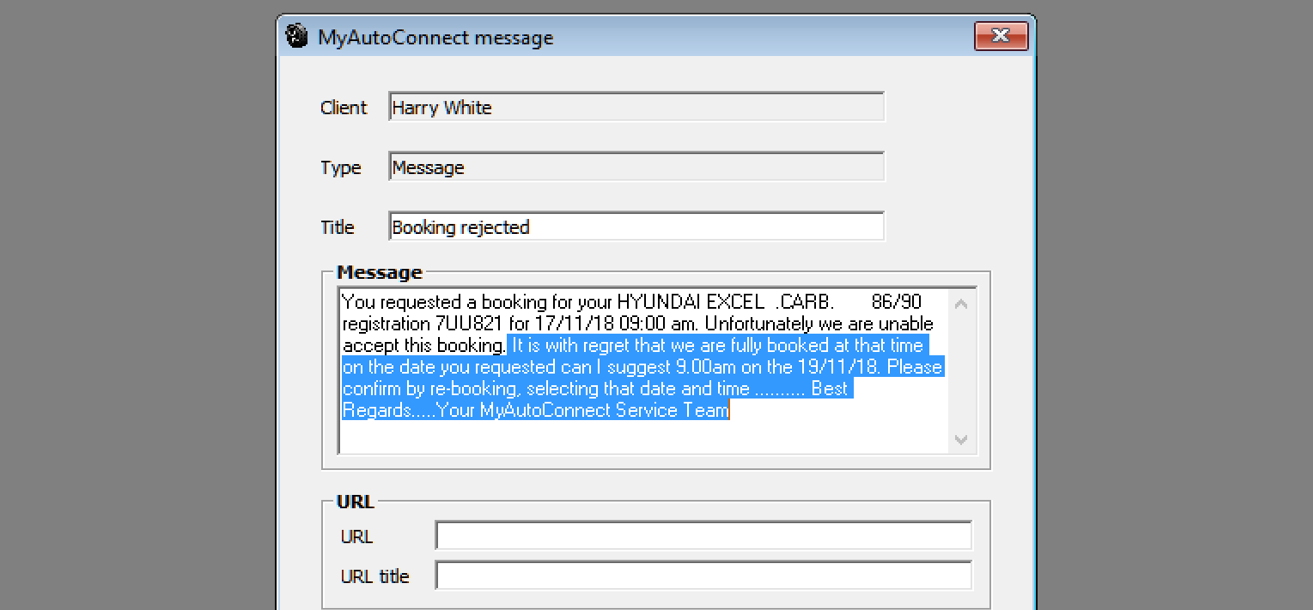
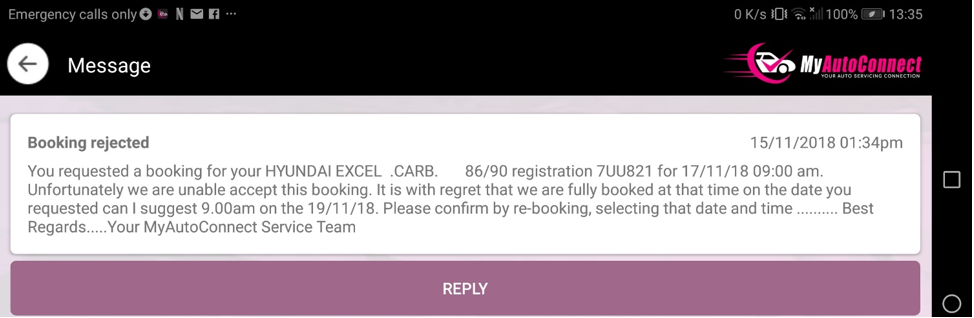
The client receives the following
Job Card, Managing Messages: As explained earlier in the notes the node machine is the local hub of the MyAutoConnect system as this is where the online task screen resides. Obviously, it is important for a technician to know when a message he has sent from the job card on a terminal or the online version that the message has indeed been replied to. Automation makes this an easy task by placing a number on the MyAutoConnect icon representing unread messages from the client. These are displayed on both the local and online versions of the job card.
To access the messages simply point and double click on the MyAc icon.