Overview: Microbase has developed a Repco set-up procedure that loads specified data onto the local machine enforcing category and vehicle management according to standard databases provided. It is important that the operator uses wherever possible the category, part and vehicle listings loaded by the parent organisation to ensure data integrity is maintained. The Repco setting allows the local machine to replicate the database with a central server via a direct SQL connection over the internet. Replication can be set to either automatic or manual mode. The following documentation gives an overview of how the Repco features should be used.
Note: Do not select the Repco option unless instructed by Microbase or Repco Personnel
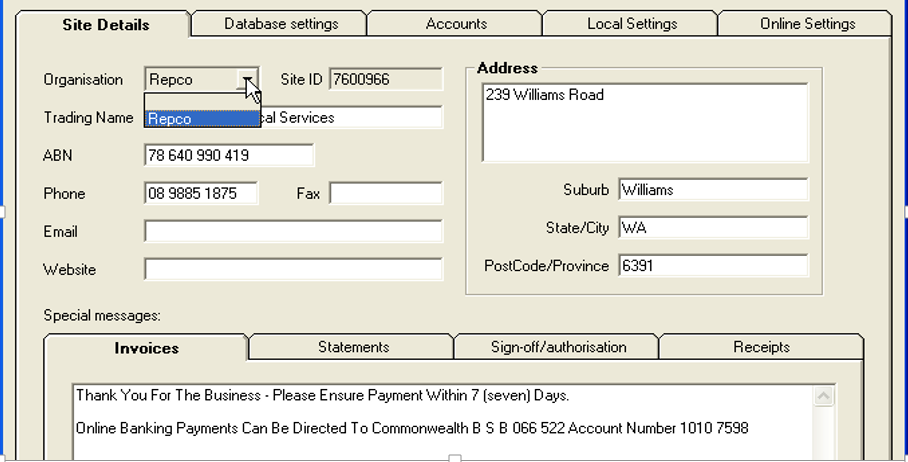
Repco Set-up Procedure: When creating the new database ensure you enter the correct site identification as provided by Repco. Open the program; select File / Settings from the top of the screen the site detail form will be displayed select the button to the right of the organisation field. Point and click on Repco.
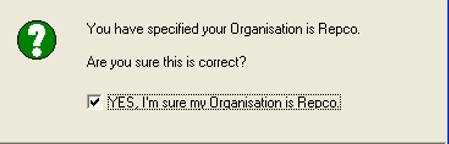
To save the new setting select the OK button located on the bottom right hand corner of the display. You will now be asked to confirm your selection, if you wish to continue select the yes button from the bottom right hand corner of the message box.
Selecting yes from confirmation screen will connect your PC to an internet server (if you are not on broadband your machine will auto dial and connect to your service provider). When connection is established the Repco database will be downloaded to the local machine. Status of the download is indicated by a progress bar. Once the files have been downloaded successfully the program will automatically update the local machine The update process performs four passes on the database, categories, services, suppliers and parts. When the process is complete a message is displayed, if you are using a dial up connection you are prompted to hang up select yes if you wish to go off line. To return to the program desktop select OK (F12) from the bottom right hand corner of the settings display.
Categories, Viewing: It is suggested that you familiarise yourself with the categories that have been loaded from the Repco database. To view the list select lists / categories from the top of screen, the categories are grouped into the following:
Parts
Services
Suppliers
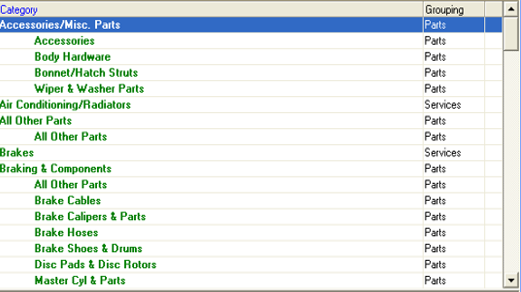
It is not possible to edit the Repco specific categories for any of the groups, however new categories can be entered if required. It is suggested that wherever possible you apply the Repco category to parts, services and suppliers. To search for a category select either the category or grouping column by pointing and clicking on the header record. Enter text into the search field; the cursor will highlight the required record. If you are searching by keyword select the double arrows to the right of the field the cursor will cycle through all fields with that entry.
Categories, Printing: It is possible to print a list of categories from Automation Premium by selecting Reports / Other Reports / Category list from the top of the screen. The report lists all categories by part, supplier and service groups.
Categories, Removing From View: You are unable to delete or hide Repco specified categories, however other records can be hidden by opening the category form from the category list (point and double click on the record or highlight and select edit (F2) from the bottom of the display) and ticking the hidden box.
Overview: When your organisation has been set to Repco certain rules apply to the allocation of categories for suppliers, parts and services. It is not possible to finalise a sale without parts and services being allocated to a category. Once a category has been assigned to a part or service record there is no need to re-allocate the record. Your system contains over 3,000 parts from the Repco catalogue that have the correct categories already assigned it is suggested that wherever possible these records should be used.
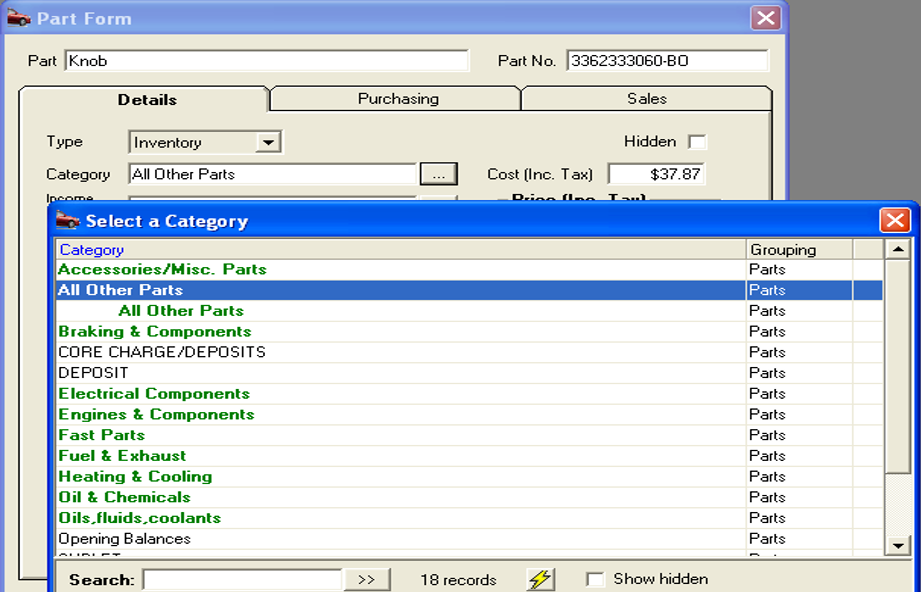
Categories, Applying to Parts: From the parts listing select the part you wish to assign a category to. Double click on the line item or highlight and select edit (F2) from the bottom of the list. Select the button to the right of the category field, your category list is now in view, search for the required record highlight and select OK (F12) to insert onto the part form. Select OK (F12) from the bottom of the part form to save the record change.
Categories, Applying to Parts from the Job Card: It is possible to enter parts or services that have not been assigned a category onto a job card, cash sale or charge invoice, however you will be prompted to enter a category on finalising the entry. The assigned category is recorded on the service and part forms and will not require any subsequent assignment.
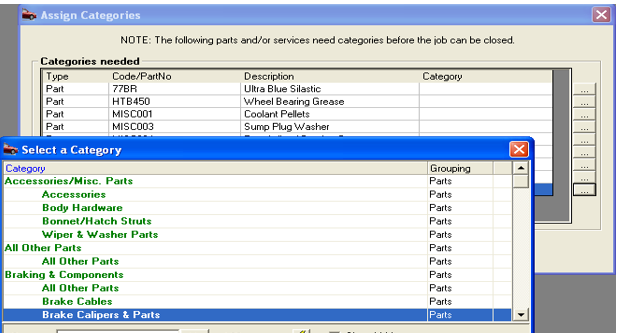
To assign a category select the button at the end of the line item, the category list will display, search for the required category, highlight and select OK (F12) the record is enter in the list. Perform the same task for subsequent services or parts in the display, when complete select the done button to save.
Categories, Applying To Services: A Repco service listing has been loaded onto your machine the name, code and categories are listed in the following table. It is however possible to create a new service and apply a category. From the service listing select the new button at the bottom of the display complete the fields as required selecting the button to the right of the category field will display the services category list, highlight the record you wish to apply and save by selecting OK(F12) from the bottom of the category display.
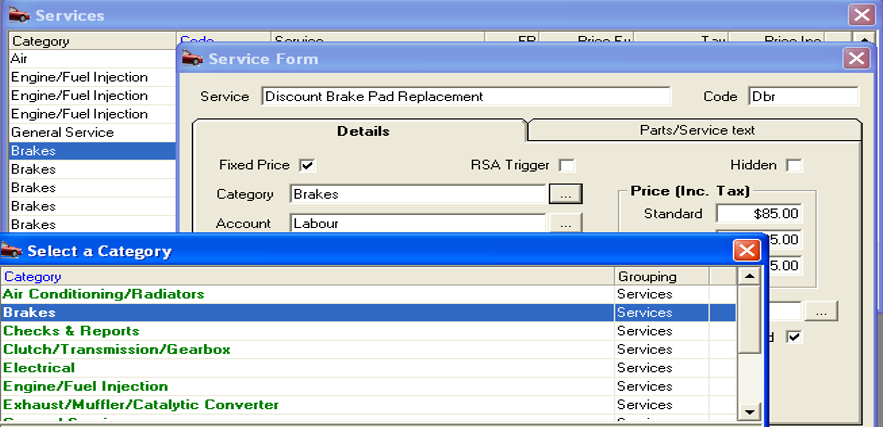
If a service that has not been assigned a category is applied to a job card a prompt will display requesting a category be entered.
Service Name |
Code |
Category |
Air Conditioning Service |
ACS |
Airconditioning |
Automatic Transmission Flush |
ATF |
Automatic Transmission |
Disc Brake Service - Front |
DBSF |
Brake |
Drum Brake Service - Rear |
DRBSR |
Brake |
Brake System Flush |
BSF |
Brake |
Drum Brake Service - Front |
DRBSF |
Brake |
Disc Pad Replacement - Front |
DPRF |
Brake |
Brake Shoe Replacement |
BSR |
Brake |
Disc Brake Service - Rear |
DBSR |
Brake |
Brake Disc Machine |
BDM |
Brake |
Disc Pad Replacement - Rear |
DPRF |
Brake |
Wheel Cylinder Replacement |
WCR |
Brake |
Carbon Clean Fuel Injector Service |
CCFI |
Carbon Clean |
Carbon Clean Diesel Injector Service |
CCDI |
Carbon Clean |
Comm. Vehicle Surcharge |
CVS |
Surcharges |
Surcharge Fixed Price (specify) |
SUR |
Surcharges |
Cooling System Service |
CSS |
Cooling System |
Engine Diagnosis Carburettor |
EDC |
Diagnostic |
Efi Engine Diagnosis |
EFID |
Diagnostic |
Efi System Clean |
EFISC |
Tuning |
Hi-tech Tune 4 Cyl. |
CT4 |
Tuning |
Hi-tech Tune 6 Cyl. |
CT6 |
Tuning |
Hi-tech Tune 8 Cyl. |
CT8 |
Tuning |
Efi Hi Tech Tune 4 Cyl. |
EFIT4 |
Tuning |
Efi Hi Tech Tune 6 Cyl. |
EFIT6 |
Tuning |
Efi Hi Tech Tune 8 Cyl. |
EFIT8 |
Tuning |
Efi Major Service |
EFIMJ |
Major Services |
Major Service |
MJS |
Major Services |
Four Wheel Drive Major Service |
4WDMJ |
Major Services |
Minor Service |
MS |
Minor & Lubrication |
Efi Minor Service |
EFIMS |
Minor & Lubrication |
Lube Service & Filter Efi |
EFILUBE |
Minor & Lubrication |
Lubrication Service |
LUBE |
Minor & Lubrication |
Four Wheel Drive Minor Service |
4WDMS |
Minor & Lubrication |
Power Steering Flush |
PSF |
Minor & Lubrication |
Log Book Service 30,000km |
LB030K |
Log Book |
Log Book Service 150,000km |
LB150K |
Log Book |
Log Book Service 100,000km |
LB100K |
Log Book |
Log Book Service 10,000km |
LB010K |
Log Book |
Log Book Service 40,000km |
LB040K |
Log Book |
Log Book Service 80,000km |
LB080K |
Log Book |
Log Book Service 90,000km |
LB090K |
Log Book |
Log Book Service 20,000km |
LB020K |
Log Book |
Log Book Service 140,000km |
LB140K |
Log Book |
Log Book Service 120,000km |
LB120K |
Log Book |
Log Book Service 60,000km |
LB060K |
Log Book |
Log Book Service 70,000km |
LB070K |
Log Book |
Log Book Service 110,000km |
LB110K |
Log Book |
Log Book Service 130,000km |
LB130K |
Log Book |
Log Book Service 50,000 Km |
LB050K |
Log Book |
Log Book Service 15,000km |
LB015K |
Log Book |
Log Book Service 45,000km |
LB045K |
Log Book |
Log Book Service 160,000km |
LB160K |
Log Book |
Rego Check Passenger Vehicle |
REGOPV |
Roadworthy Certificates |
Rego Check Trailer No Brakes |
REGOT |
Roadworthy Certificates |
Rego Check Trailer Brakes |
REGOTB |
Roadworthy Certificates |
Lp Gas Certificate |
LGC |
Roadworthy Certificates |
Roadside Assistance Issue |
RSAISS |
Roadside Assistance |
Wheel Alignment |
WA |
Steering & Suspension |
Shock Absorber Replacement |
SAR |
Steering & Suspension |
Exhaust General Repairs |
EGR |
Exhaust |
Exhaust Muffler Replacement |
EMR |
Exhaust |
The operator should use wherever possible services from the standard listing, if new services are created they should be assigned to Repco service categories as per the above table.
Categories, Applying to Suppliers: Major supplier names have been added to your supplier listing these include: Coventry, Motor Traders, Auto One, Auto Pro, Independent Motor Mart, Sprint Auto Parts, Rare Spares.
There is no need to apply categories to these records as they are pre-assigned. It is important that you select these suppliers when purchasing parts, do not create suppliers with duplicate names (the system will warn you if this is attempted). To add a supplier category select the supplier from the list point and click to open the supplier form or select edit (F2) from the bottom of the display. Select the button to the right of the category field highlight the required record and save by selecting OK (F12). Save the supplier record by selecting OK (F12) from the bottom of the form.

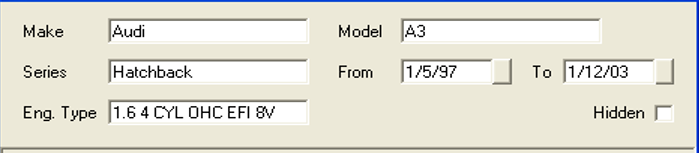
Overview: A database containing vehicle make / model / series / engine type and manufacture dates has been loaded into your program. It is possible to add new vehicle to the listing, however wherever practical the Repco listing should be used. Settings do not allow you to create a job card unless the make / mode / series / engine type and manufacture date and year have been completed. Automation will prompt you to select the necessary records from the listings provided.
Vehicle Makes & Models, Viewing: To view the make and model listing select Lists / Makes & Models from the top of the screen.
Vehicle Makes & Models, Adding to the Vehicle Record: Vehicles entered prior to configuring the program to Repco will be retained in the vehicle file including the original make / model and manufacture dates. When creating a booking you will be prompted to add the required information to the vehicle form. New vehicle records the same rules apply the make / model / series / engine type and manufacture dates must be entered otherwise you will be unable to save the record.
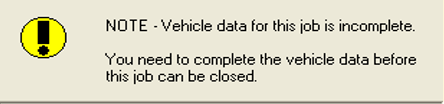
A warning message is displayed when job cards are created for vehicles that have incomplete details; selecting OK will open the vehicle record with the required fields highlighted in yellow
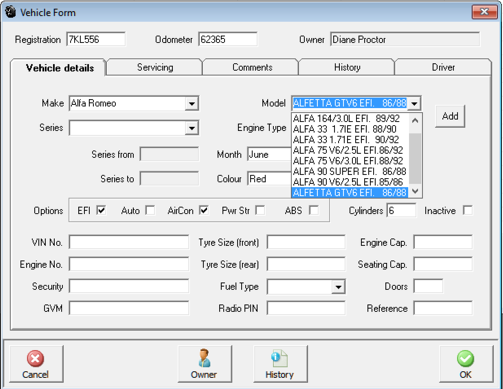
Point and click on the button to the right hand of the fields highlighted in yellow, select the make / model / series / engine type from the drop down box. The lists are indexed, typing COM for instance will highlight commodore in the model list point and click to insert. In the date and year fields select from the grid provided save the vehicle record by selecting OK (F12) from the bottom of the form.
Make & Model Adding to the Database: Adding a new record to the make & model database can be performed in two ways.
1) Vehicle Form – Type the make / model / series / engine type into the required fields, select add a message will prompt you to confirm your selection, the make / model form is displayed, complete the manufacture from / to fields and save by selecting OK(F12).
2) Make & Model Listing – Select Lists / Make & Model from the top of the screen, from the listing select new to display the make & model form. Complete the details and save by selecting OK(F12)
Overview: The equipment maintenance register allows you to track scheduled equipment maintenance based on a regular service cycle including the ability to record if the scheduled task has occurred.
Automation also allows you to record maintenance check-lists for regular servicing, the register is linked to the task manager giving you the ability to set reminders at a certain date and time, once a service has been completed the next date of service is entered automatically based on the cycle recorded. The equipment maintenance register is accessible from your chart of accounts by prompting whether you wish to add an item being recorded as a fixed asset to the register with the ability to establish a service cycle with check-lists and reminders if required.
Equipment Maintenance Register, Accessing: To access the maintenance register select Activities from the top menu, point and double click on the Equipment Maintenance Register option displayed on the drop down menu, the main screen listing all scheduled maintenance is in view.

The
register can also be accessed from your chart of accounts. You will automatically
be prompted to add an item to the equipment maintenance register when
recording an entry as a fixed asset. If you wish to set a service schedule
and reminders for the new plant or equipment select yes when prompted
to open the equipment form. On completion the entry is automatically recorded
in the register displaying the next date of service and whether a task
has been established.
Equipment Maintenance Register, Entering A New Item: A new item can be entered by selecting yes when prompted from the chart accounts or by selecting new from the bottom of the register display. Both these selections will open the equipment form.
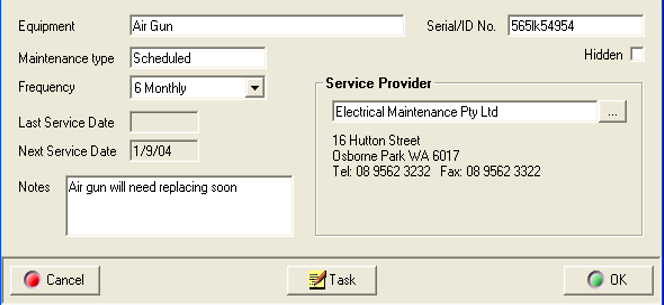
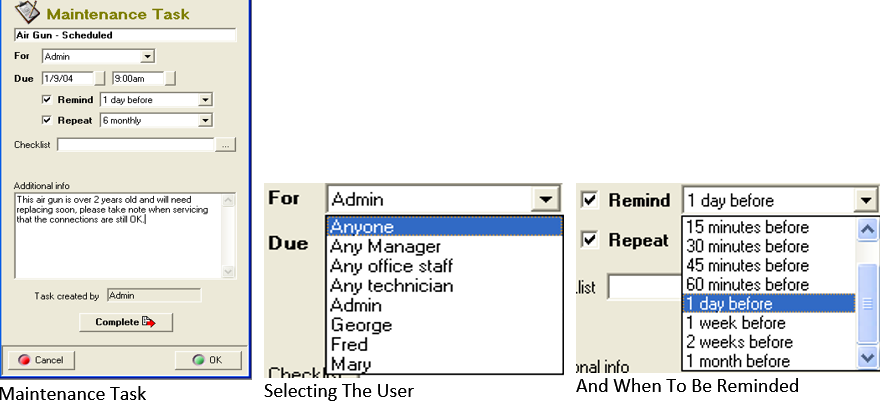
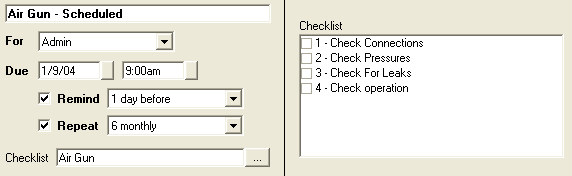
The equipment form allows you enter the equipment description ie: Tyre Changer, manufacturers serial number, the maintenance type, frequency can be selected from a drop down menu, the next date of service is automatically recorded based on last date service was completed plus the frequency. Initially the next service date is established by selecting the Task option from the bottom of the display. The Maintenance Task form allows you to establish who is going to be reminded of the task and when, enter any check-lists and make notes if applicable.
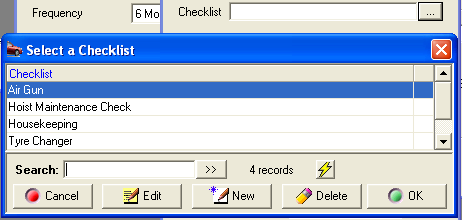
To select the person user type you wish to be reminded when the task is due point and click on the down arrow to the right of the for field. A list of users and user types is displayed in the drop down menu select the group or user by pointing and double clicking on your selection. Enter the due date into the Due field by clicking on the button to the right and selecting from the calendar displayed, next select a time from the table. If you wish to be reminded point and click in the check-box select the arrow to the right of the Remind field point and double click on your selection from the drop down menu. The repeat field will automatically display the service cycle entered onto the equipment form. If this has not yet been recorded select the arrow to the right of the Repeat field make your selection from the drop down menu. If you wish to add a checklist to the maintenance task select the button to the right of the Checklist field.
Maintenance Task, Adding A Checklist: Automation allows you to store multiple checklists and attach a predetermined list to a maintenance task. The checklist is accessed by selecting the button to the right of the checklist field. You recorded checklist titles are displayed, to attach a checklist to a task highlight the entry and double click of select OK (F12) from the bottom of the list.
Checklists are made up of lines of text that are numbered; when a checklist is selected it becomes part of the task. The checks are displayed on the right hand of the task form when the complete option is selected. The individual checklist items can be ticked as completed by pointing and clicking in the checkbox next to the text. It is also possible to print the checklist by selecting the Checklist option from the bottom of the form.
Select the checklist option if you wish to print a checklist. It is also possible to make notes relating to the task in the text window located under the checklist
Equipment Maintenance Register, Creating Checklists: To create a new checklist go to the select a checklist display and perform the following:
1) Select New from the bottom of the list
2) The checklist details form is displayed, to add an item select Add
3) Type the line text into the checklist item box and save with OK(F12)
4) Repeat item 3 for each line of the checklist to save the checklist select OK(F12)
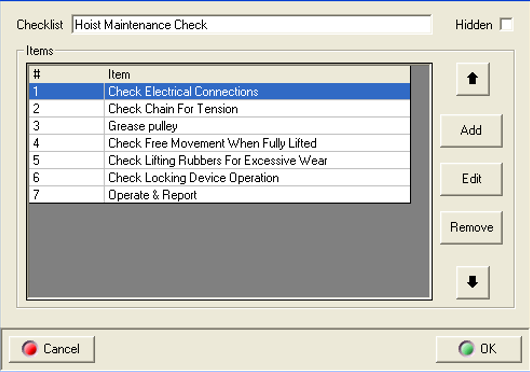
Checklists, Editing & Moving Text: Edit functions allow you to make changes to the checklist text by highlighting the line and double clicking or selecting edit (F2) from the bottom of the display. Make your changes to the text in the checklist item box and save using OK (F12).
It is also possible to re-order the line items by highlighting the check you wish to move and clicking on the up and down arrows to the right of the display.
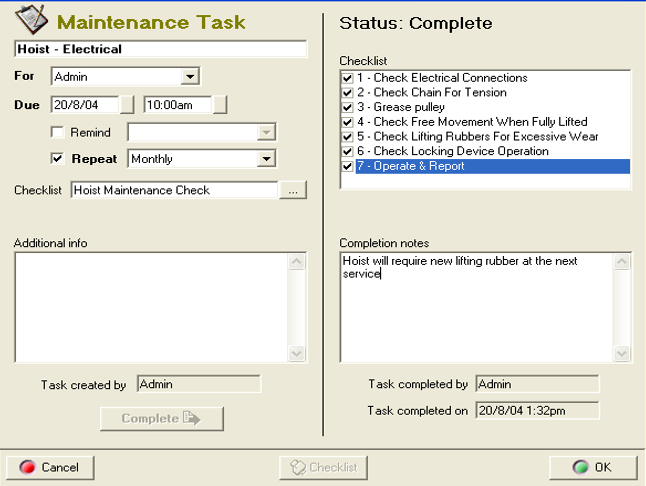
To delete a line highlight and select the remove function. To confirm completion of an item within a checklist point and click on the line a tick will be displayed in the checkbox. Enter your completion notes and save by selecting OK (F12). Note: The task will always be completed by the current logged on user, the date and time is recorded as the form is saved.
Tasks, Completing: To complete a task select the complete option from the bottom of the maintenance task form, checklist (if attached) and completion notes are now visible. Note: Tasks can be selected from either the Maintenance register or directly from the task manager. To open point and double click on the line entry. Maintenance tasks are identified in the task list on the left hand side of the task manager.
Task Reminders, Pop Ups: Repco authorised users can set tasks to display pop up reminders, these are messages that are displayed at a set time before a task is due (set from the task form).

There are four options available from the task reminder. Firstly you can reset the remind again period by pointing and clicking on the arrow to the right on the field and selecting a new time period from the list secondly you can select the snooze option that will remove the reminder from the screen for the time displayed in the remind again field. You can dismiss (cancel) the reminder by selecting the dismiss option. Finally if you wish to view / edit the task details select the details option.

Equipment Maintenance Register, Editing An Entry: To edit a task go the equipment maintenance register or task manager and select the task make the necessary changes to the task and save with OK (F12)
Equipment Maintenance Register, Deleting An Entry: The task reminder can be deleted from the task manager by pointing and highlighting the entry and selecting the delete key on your keyboard. If you wish to delete an entry from the Equipment Maintenance screen highlight and select the delete option from the bottom of the display
Overview: The incident register allows you to record of actions taken when an incident occurs, this could take the form of an employee warning, vehicle accident, client complaint, environmental issues or a client complaint. The register provides you with a detailed report and the ability to attach actions in the form of notes or tasks to an incident.
The incident register is linked to the task manager so you can setup reminders for tasks relating to specified incidents to ensuring they are performed. All entries in are date and time stamped, an incident can be finalised and a detailed report produced giving the incident details and a list of actions taken.
The module is extremely useful if you require an audit tool that document actions relating to an incident in a logical easily referenced format.
Incident Register, Accessing: To access the incident register select Activities from the top of the screen, point and click on the Incident Register option displayed on the bottom of the drop down menu. The main screen is displayed.
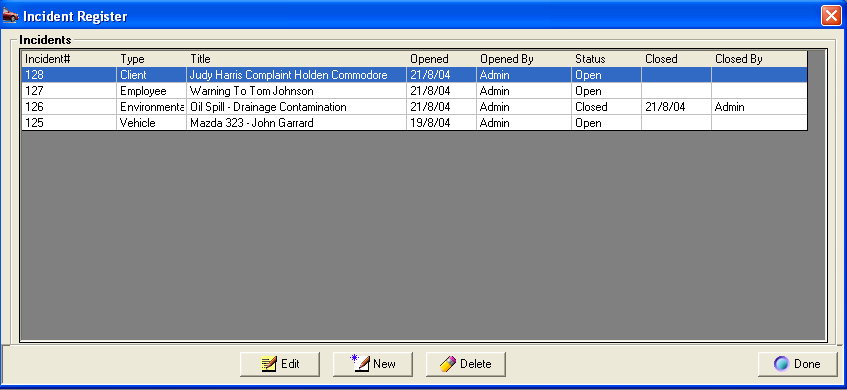
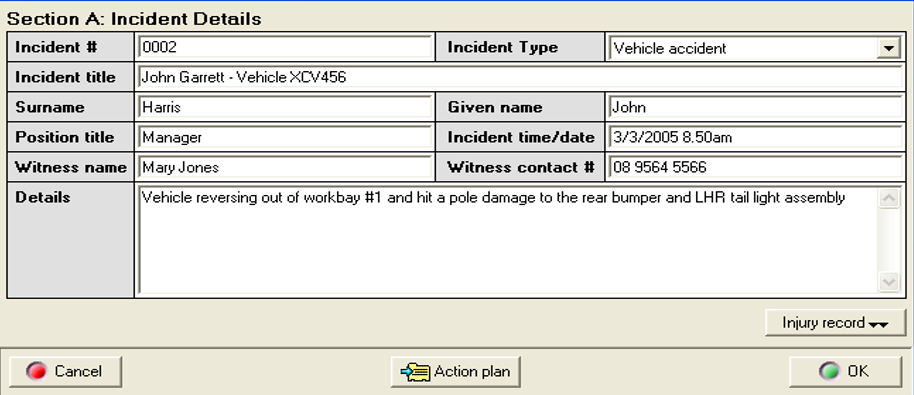
Incident, Creating a New Entry: To open a new incident click on the new option at the bottom of the display window, the incident report form will open. It is advisable that you complete all relevant details on this form; many of the options are checkboxes to select these items point at the box and mouse click a tick is displayed.
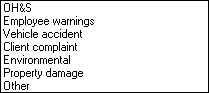
The incident type field contains a drop down pick list, to access point and click on the arrow to the right of the field. Make your selection by pointing and clicking on the option required, your choice is displayed in the incident type window. The incident type in displayed in the main register screen.
To save the form select OK (F12) from the bottom of the form. The incident will is displayed on your incident register screen with an open status. Selecting the action plan option will take you back to the incident summary from here you can create notes or a task.
Incident Register, Adding A Note: Point and click on the line item from the register, the incident summary form is in view, this form lists by date and time notes and tasks recorded against the incident to add a note select the Note: Clicking on the Action Plan button will open the incident summary from here you can enter notes and tasks.

Give your note a title, enter your text into the body of the form, select the arrow to the right of the contact method field, point and click on the contact type ie: Letter. Save your note by selecting OK (F12). The created by and created on fields will automatically display today’s date and time and the identity of the logged on user.
Incident Register, Adding A Task: Select the Task option from the bottom of the incident summary list, this action displays the task form.
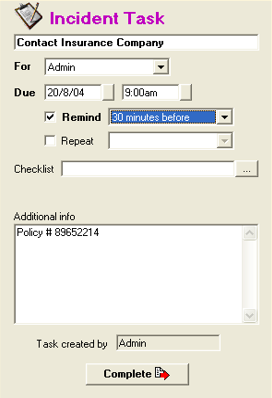
To select the person user type you wish to be reminded when the task is due point and click on the down arrow to the right of the for field. A list of users and user types is displayed in the drop down menu select the group or user by pointing and double clicking on your selection. Enter the due date into the Due field by clicking on the button to the right and selecting from the calendar displayed, next select a time from the table. If you wish to be reminded point and click in the check-box select the arrow to the right of the Remind field point and double click on your selection from the drop down menu. If you wish to repeat the task on a regular basis select the Repeat option, select the arrow to the right of the field and make your selection from the drop down menu.
To add a Checklist select the button to the right of the Checklist field. This action opens your list of checks to insert highlight the entry and confirm with OK (F12) the checklist title is now displayed in the checklist field. To create a new checklist select new from the bottom of the checklist display and add your line items, adjust order if required and save with OK (F12).
Incident Register, Completing A Task: To complete a task, selection can be made from either the Incident Summary list or task list from the task manager. Point and click on the line item, select the complete option, mark the individual checks completed (if attached) make your notes in the field provided, save with OK (F12).
Incident Register, Editing a Task or Note: Tasks or notes can be edited from the incident summary screen by pointing and clicking on the line item, executing the changes and saving with OK (F12). An incident task can also be accessed for editing from the task manager, again point and click on the line item, make your changes and save with OK (F12).
Incident Register, Deleting a Task or Note:To delete an item from the incident summary highlight the line item and select delete from the bottom of the display, confirm your intention when prompted. If you delete a task from the incident summary it will also be removed from the task manager. To delete a task from the task manager highlight and select the delete key on your keyboard, confirm your intent when prompted. The task will also be deleted from the Incident summary.
Incidence Register, Task Reminders:There are four options available from the task reminder. Firstly you can reset the remind again period by pointing and clicking on the arrow to the right on the field and selecting a new time period from the list. Secondly you can select the snooze option that will remove the reminder from the screen for the time displayed in the remind again field.
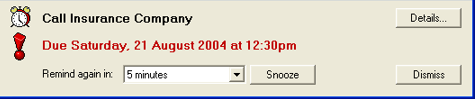
You can dismiss (cancel) the reminder by selecting the dismiss option. Finally if you wish to view / edit the task details select the details option.
Incident Register, Closing an Incident: When all notes and tasks are completed for a particular incident it is necessary to close the report. Highlight the incident; select the Close option from the bottom of the Incident Summary display, confirm your action by selecting yes from the close incident prompt.
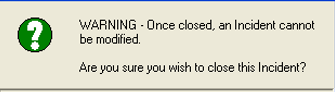
Note:Once closed no changes can be made to any of the documentation related to the incident.
Security: For a user to have access to the incident register the option incident register option must be selected in the security profile Incident Report, Printing: The incident report is printed from the Incident Summary screen. Highlight the incident you wish to report on and select the Print option from the bottom of the display.
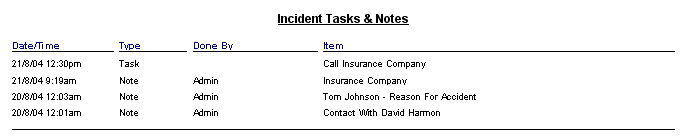
In addition to the original details entered when the incident was created a list of tasks and notes are printed.
Incident Register, Deleting An Incident: To delete an incident highlight the record from the Incident Register screen, select Delete from the bottom of the display, confirm your intention when prompted.
Overview: Automation allows authorised dealers to sell and redeem gift cards from Dynamic Rewards. The process allows for automated recording of gift card sales including a journal entry against the supplier’s account facilitating easy account reconciliation when payments are made. The user can also accept a gift card for total or partial payment of a services or parts, payments are allocated to a specific holding account for reconciliation and deposit purposes.
The process is linked via an internet portal to Dynamic Rewards database server with all transactions occurring in real time. The function allows for verification of a card by matching the unique barcode with a specified PIN. The design provides a seamless interface between the customer, repairer and gift card provider resulting in quick, easy accurate transaction postings.
To set-up your site as a Dynamic Rewards outlet, point and click on file \ Settings from the top of the mail screen. Select the on-line tab from the top of the display, click the Dynamic Rewards option located on the bottom left hand side. A second display is visible, select enable Dynamic Rewards for this database. Enter your merchant card number and merchant id. The accounts payable and accounts receivable details are entered automatically, it is suggested you accept these defaults, you can if you wish click on the buttons to the right of each field and select an alternate account.
Once you have completed the details select done, save your changes by clicking on OK (F11). Your database is now set to transact with Dynamic Rewards providing you have an internet connection.

You must set-up your database from the on-line settings menu before transacting with Dynamic Rewards. Ensure your merchant card and merchant identifications are correct as these are determine which account the debit and credits are posted too. Save your changes with done followed by OK (F12) from the settings display
Gift Cards, Selling: Selling a gift card requires you to go to a job, charge invoice or open a cash sale, you will notice that in the menu bar under the parts and labour section there is a gift card option, point and click on the button, a Dynamic Rewards window is displayed, plus a line item has been added to the form, the default sale price of a card is $50.00, if you wish to change this simply close the verification display, change the value of the sale in the price field, then click on the gift card option to complete the verification process.
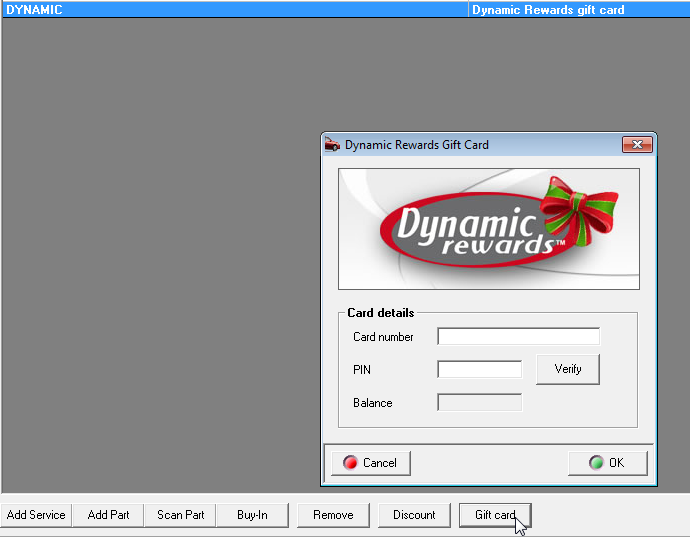
The card number and PIN can be free typed or scanned. If you are using a barcode scanner, point and click in the appropriate field before scanning. Once the card number and PIN have been entered select verify, on verification you will see a green tick against the verify option plus the balance of the account will be displayed. Select OK (F12) to exit the screen.
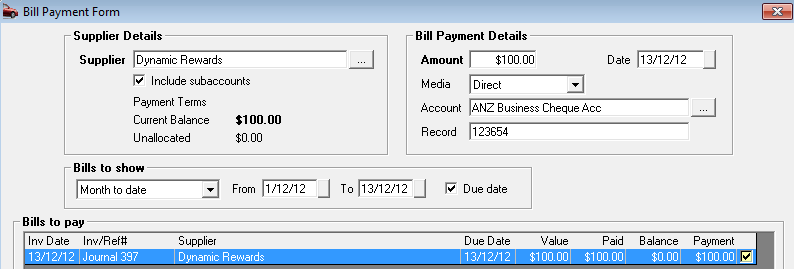
Gift Cards, Paying Dynamic Rewards: Dynamic Rewards will debit the merchants bank account based on the value and quantity of transactions posted. On receiving a statement go to Activities / Pay Bills, select Dynamic Rewards as your supplier, from here you can reconcile, choose your method of payment and enter the value.
Gift Cards, Receiving Payment: Create an invoice in the normal way, as you close the job / invoice select payment or process from activities / receive payment. From the payment receipts form enter the value to be paid from the gift card, allocate against sales, finally select media type gift card.
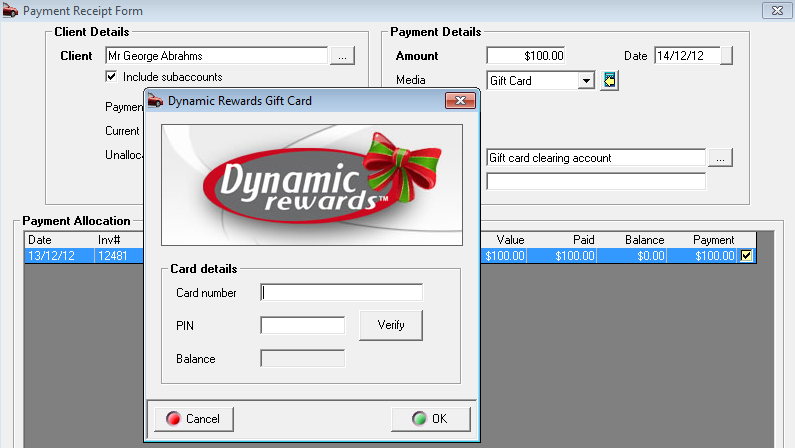
Type or scan the card number and PIN code into the form provided, select verify, if the sale is authorised you will see a green tick against the verify option plus a balance is recorded in the balance field. The receipt is recorded in your receipts screen and deposited to your Dynamic Payments Gift Card account, the account type is bank, which allows for deposits and withdrawals in the normal way. When receipts have been reconciled transfer the value to your appropriate bank account.