 To
access the supplier listings select this icon from the top menu bar
To
access the supplier listings select this icon from the top menu barOverview: Automation gives you the ability to manage your purchasing functions efficiently from raising a purchase order to delivery and finally supplier payment. The purchasing system is designed to allow for the receiving of parts into inventory or directly to a specific job card. From the purchasing module you can also allocated expenses to your chart of accounts. Automation provides you with a flexible system that allows for the conversion of an invoice to a credit note or even back into a purchase order with one mouse click.
Parts can be distributed to multiple jobs from a single invoice; you can even raise purchase orders directly from an open job card. When you need to process payment you have the flexibility of deducting funds from your trading account, credit card or even funds that you have not yet deposited. Supplier invoices can be processed by due date or invoice date, the choice is yours.
Automation has made what can be a confusing process easy to understand by providing you with a logical easy to follow practices to manage the important task of purchasing and creditor control.
Suppliers, Overview: Before you can purchase items or allocate expenses you need to enter a supplier, suppliers can be parts suppliers such as Repco or service provider which would include your accountant or electricity company etc. Automation allows you to create sub supplier accounts; this feature is extremely helpful if you are dealing with multiple suppliers through one buying group which you pay with one transaction.
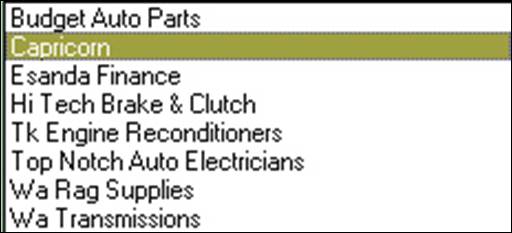
To
access the supplier listings select this icon from the top menu bar
Suppliers, Accessing: To open the supplier listing click on the supplier icon at the top of the screen. The supplier listing will automatically display when performing buying functions either from the purchasing screen or job card. To select a supplier when the list enter the supplier code into the search field, or alternatively change the search field by clicking on either the supplier, address, phone or fax field. The header text displays in blue indicating a new search field has been selected.
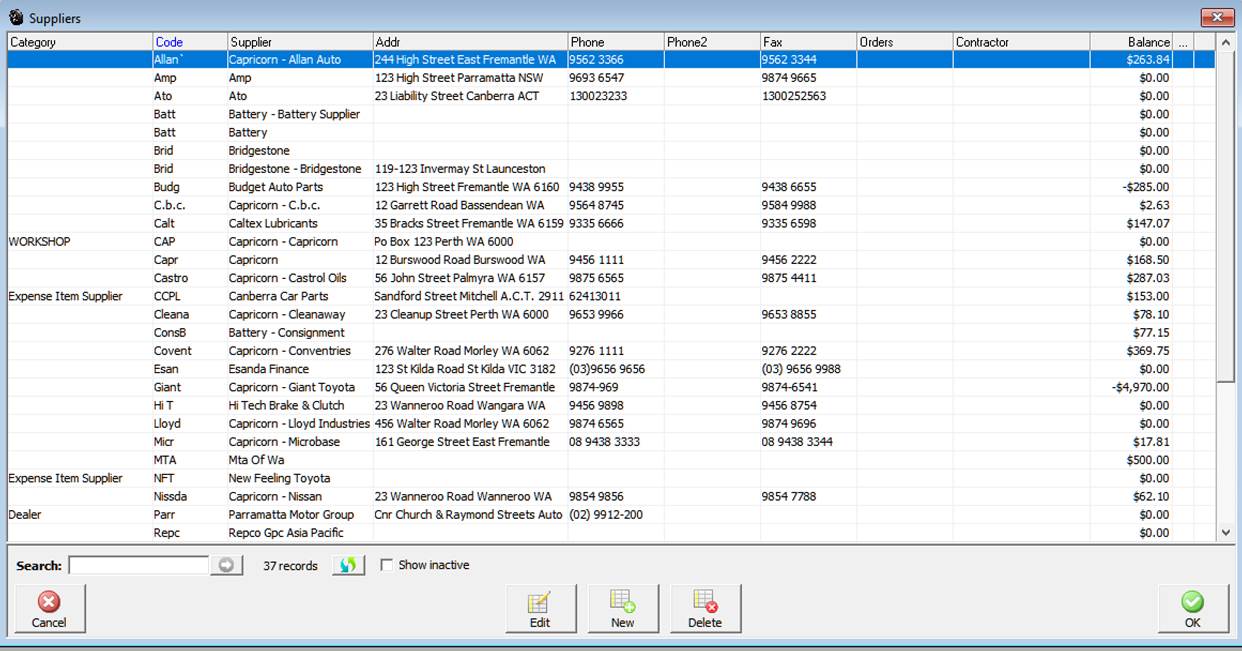
Suppliers, Viewing Details: You can view the supplier form by highlighting the record you wish to access point and double click or alternatively select edit from the supplier menu bar. If you wish to display hidden records point and click in the show hidden field, only previously hidden records are displayed in this mode.
Suppliers, Creating A New Record: From the supplier menu bar select new, a blank supplier form is displayed complete the following fields:

Supplier: Type the full name of the supplier
Code: Is automatically entered, based on the first 4 alphas or numeric of the supplier name – This can however be overwritten to a code of your choice
Parent: Allows you to select a master account
Suppliers, Creating a Sub-Account: the parent field needs to be selected, highlight the “parent” account from the drop down menu and click. The entry is now inserted into the “parent” field indicating the current record is a sub-account.
Category: Allows you to assign a supplier specific category: ie: Parts Supplier, Holden Parts etc.
Account: Enter the supplier account number into this field
Contact: The salesperson who you normally contact
ABN: Enter the supplier ABN
Phone, Fax, Phone 2 & Orders: Enter contact numbers
Website: Suppliers web site address
Email: Supplier’s email address
Email 2: Allows for a cc address to be recorded
Terms: Use the drop down menu to select the payment terms
Hidden: Select if you wish to hide an existing record from the supplier display
Address: Two line address field
Suburb: Enter the suburb and press enter – The state and postcode are automatically inserted
To save your entries select OK (F12).
History: Select this option if you wish to view the purchase history for a specific supplier.
Contractor Types: Automation provides you with the ability to enter and search by a contractor type, this is an extra field displayed in the supplier listing.
Bank Details Comments Tab: Allows you to record the bank details of a supplier for ABA file exports, included is a text area where you can enter notes relating to the supplier, when text is entered a note it icon is displayed at the end of the line in the supplier listing clicking on the icon will display text entered in the field.
Tasks Tab: Allows you to record tasks for a specific supplier.
Contractor Type, Searching: To search by contractor type point and click on the title of the field which will now display in blue. Enter the contractor type into the search field. If you wish to search for more than one contractor of a particular type point and click on the double arrow button to the right of the search field each record matching your entry will be selected from the supplier listing.
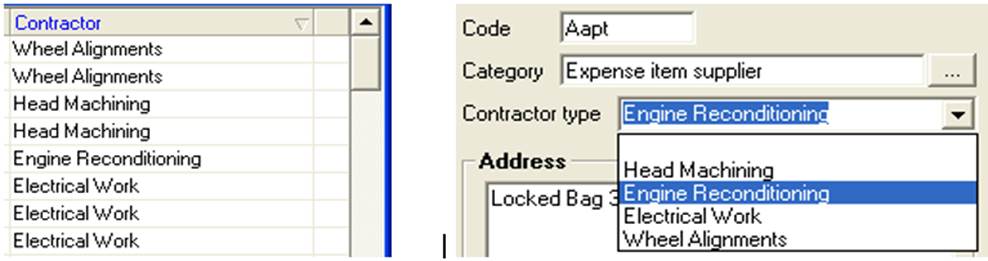
Contractor Type, Entering: The contractor type can is selected from the drop down list accessed from the contractor type field displayed on the supplier form (authorised Repco sites only). Select the down arrow button to the right of the field, type the first letter or scroll down to the type required point and double click and the entry is retained. Select OK (F12) from the bottom of the supplier form to save.
Supplier Billing Address: A billing address can be entered by selecting the billing address tab from the supplier form. The default is the set the same as the physical address. If you wish to enter an alternate, point and deselect the option from the billing address tab and complete the details in the field provided.
 Selecting
this icon from the top menu bar will open the purchasing module
Selecting
this icon from the top menu bar will open the purchasing module
Purchasing, Functions: The purchasing module allows you to view a list of Bills, Credits or purchase orders. The module is set to open displaying a bills list, to change the display select from the transaction type options. The screen also displays totals of each list giving you a transaction total, amount paid and an outstanding balance.
 Totals allow you view a summary of all transactions.
Transactions are able to be filtered by supplier including sub accounts and date range (bill date or due date); you can also search for a specific invoice number. Note: When choosing to filter by supplier or invoice number you must select the tick box above each selection.
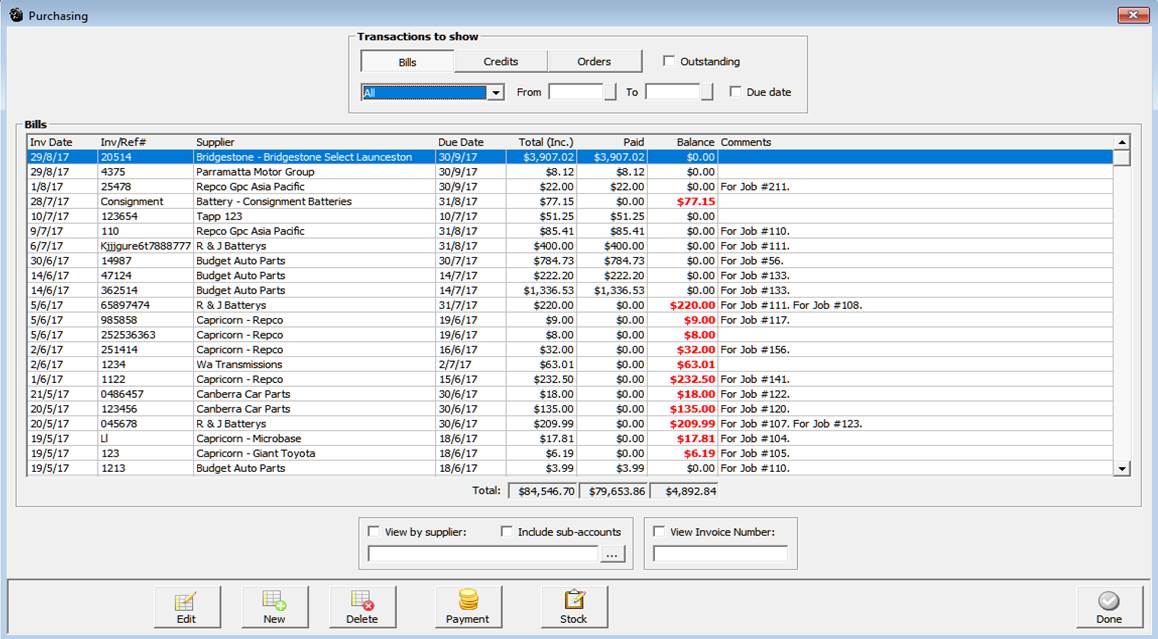
Purchasing, Selecting Transaction Types: Three types of transactions can be created, viewed or edited from the purchasing screen. To select click on the option required at the top of form under transactions to display
 Point and click on the option required.
Purchasing, Filtering By Date Range: Use the drop down menu top select an alternative period or alternatively free type into the from / to date fields or select the buttons to the right of each date field to select from a calendar. Transactions can also be filtered by due date, this feature can be extremely helpful when determining expenditure for a specified period.
Purchasing, Filtering By Supplier: Select the button to the right hand side of the supplier field, your supplier listing is displayed. Highlight the supplier you wish to select confirm with OK (F12) only transactions relating to the chosen supplier will be displayed. If you wish to display transaction for sub accounts select the tick box located above the supplier search field.
Purchasing, Filtering By Invoice Number: Enter the transaction number into the invoice field, tick the box placed above the field and only the required transaction will be in view.
Purchasing, Viewing Transaction Details: Point at the transaction you wish to view and double click or alternatively highlight the transaction and select edit from the bottom of the display.
Purchasing, Creating New Transactions: Select New from the bottom menu bar, depending on which transaction type is selected a blank bill, credit or purchase order will be in view.
Purchasing, Deleting: It is possible to delete transactions from purchasing, however items that have been allocated to closed job cards have to be deleted from the job card by re-opening.
Purchase Orders, Overview: You use a purchase order to communicate with a supplier when you want to order their goods or services.
When you use purchase orders to buy inventory items, Automation keeps track of the items you've ordered. At any time, you can see what is on order. When you receive items, check them against the purchase order. Automation allows you to convert the purchase order into a bill, if the ordered quantity was not delivered Automation will hold the remainder on back order, automatically updating the purchase order. Purchase orders are created from either the purchasing screen or job card. On receipt of goods the purchase order can be converted to an invoice. An additional feature of Automation is the ability to distribute parts out to multiple jobs when items ordered from job cards are received though the purchasing module.
Purchase Orders, Accessing: To view outstanding purchase orders select the purchasing icon from the top of the screen select the orders button from the top of the screen to display any outstanding orders. The date default is month to date, if you wish to display purchase orders created during another period select from the drop down menu or enter the from / to dates into the fields provided.

To view the details of a purchase order, highlight the record and double click alternatively select edit from the bottom menu bar. This action will open the purchase order displaying the components of the order. If the purchase order contains items ordered for a job you can select the job card button displayed in the lower menu bar to view the job.

The purchase order displays supplier, date, order number and items on order including a financial summary based on the previous cost.
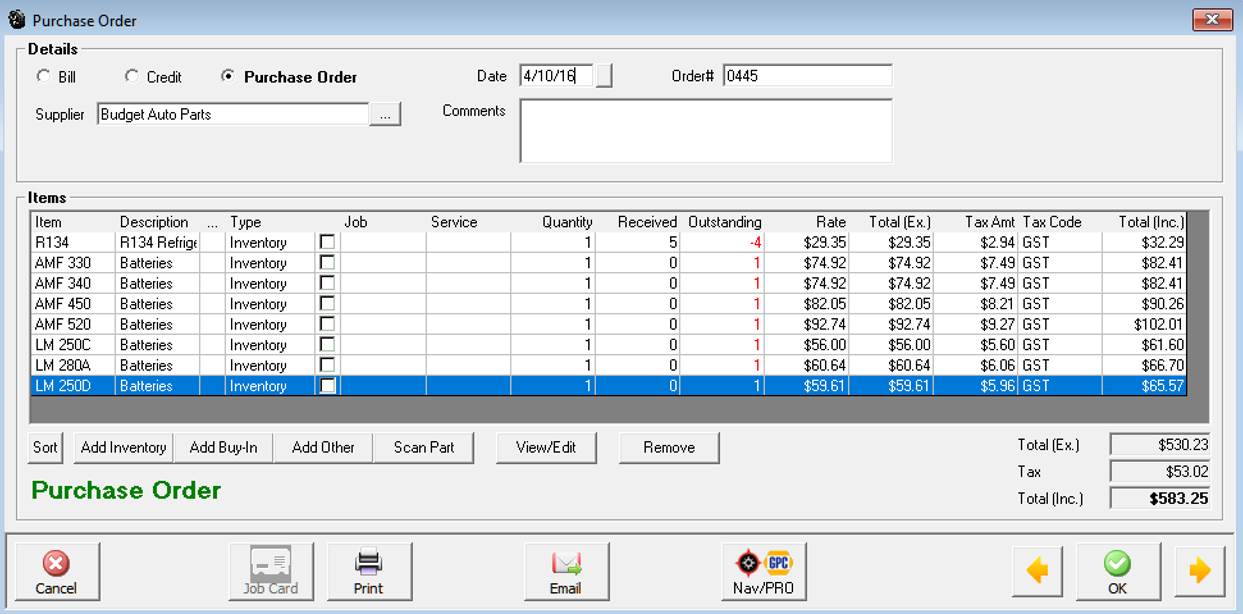
Purchase Orders, Creating: Select purchase orders from the transactions to view then select new, alternatively purchase orders can be created by selecting Activities / Create Purchase Order. Perform the following:
1) Select the supplier you are issuing the purchase order to
2) Overtype the purchase order number if you wish to customise
3) Select add inventory from the bottom of the purchase order form
4) Select the inventory items you wish to order – if you select a catalogue item you will be requested to convert to inventory – confirm with yes, complete selection with OK (F12)
5) Point to the quantity field and edit accordingly for each item
6) Save with OK (F12)
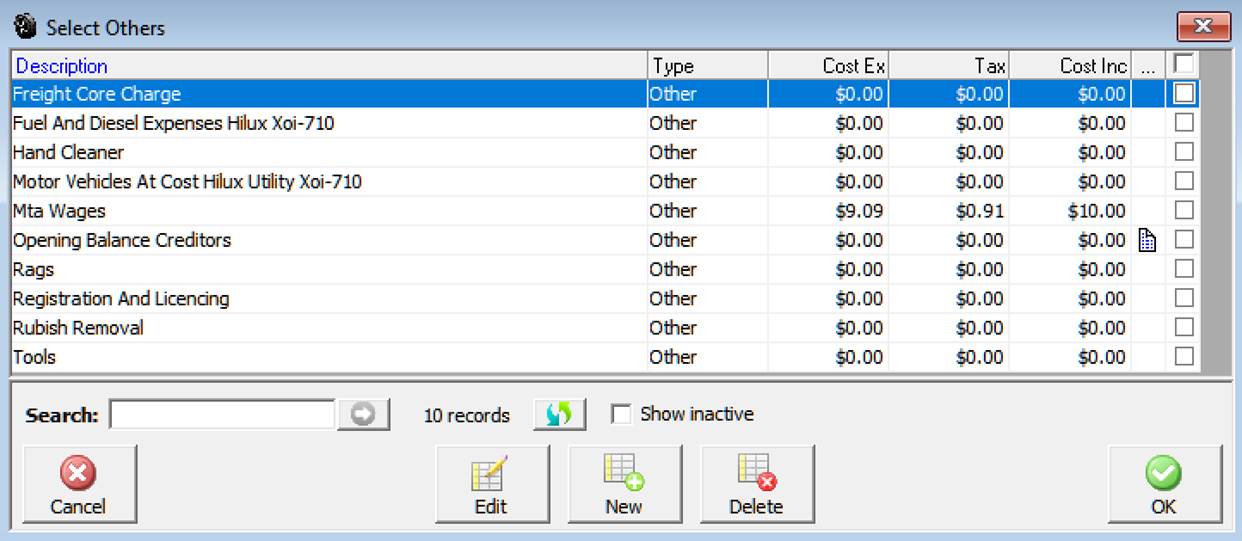
1) Select the supplier you are issuing the purchase order to
2) Overtype the purchase order number if you wish to customise
3) Select Add Other from the bottom of the purchase order form
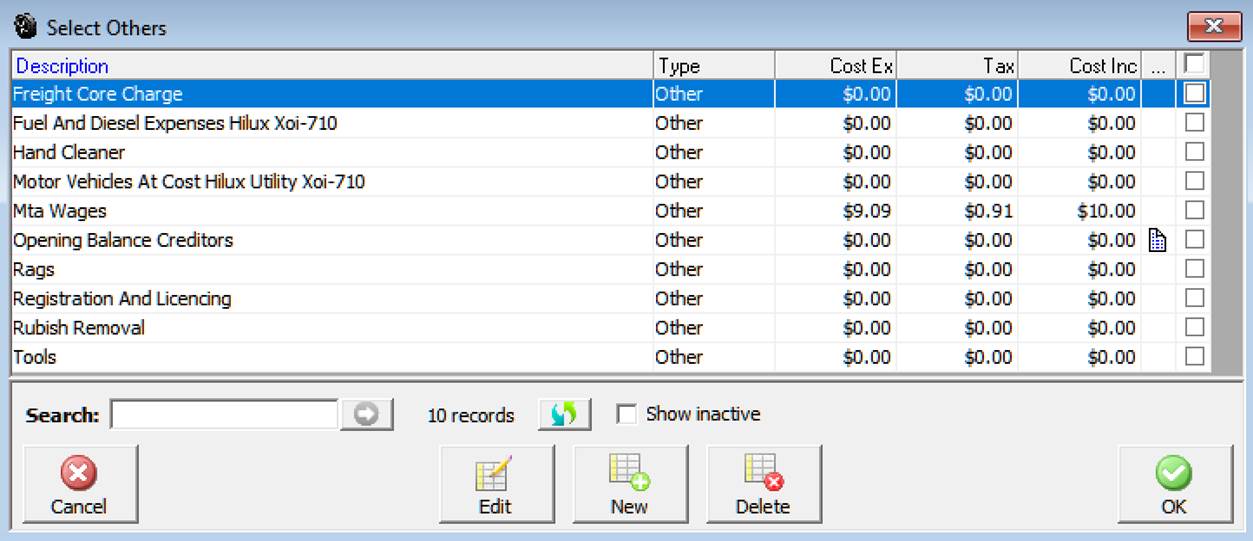
4) From the Add Other list tick the item / items required or create a new expense, complete selection with OK (F12)
5) Point to the quantity field and edit accordingly for each item
6) Save with OK (F12)
Purchase Orders, Creating Notes: Automation allows you to add notes to a line item that forms part of a bill, credit note or purchase order. To add a note point and click in the field identified with …located between the description and type fields. A text field is displayed type your comments and save using OK (F12). The text will be printed under the line item on your purchase order, if you wish to view text comments click on the note it icon displayed.
Purchase Orders, Creating from the Job Card: Purchase orders can be raised directly from an open job card. Items are listed as an order in the type field, to close a job you must first receive any items that you have on order.
1) Select an open job card
2) Highlight the service ordered parts are going to be allocated to
3) Select buy in from the selection row under the parts and labour window
4) Select the supplier from the list
5) Point the purchase order selection at the top of the form and click
 On selection the Form will display Purchase
Order in the lower left hand corner.
On selection the Form will display Purchase
Order in the lower left hand corner.
6) Overtype the order number if required (enter will automatically open the buy-in listing)
7) Select Buy-In from the bottom of the purchase order form
8) From the select a buy-in listing click on the item you wish to order (or create a new item by selecting new from the bottom menu bar). Confirm selection with OK (F12)
9) Edit the quantity field from the purchase order form
10) Save by selecting OK (F12)
11) The item is now listed on the job card displaying order in the type field
Purchase Orders, Editing: Select purchasing / purchase orders, highlight the purchase order you wish to edit, double click or select edit from the bottom menu bar of the purchasing screen. An open purchase order allows you to add or remove items and adjust quantities. It is also possible to change the cost price by double clicking on a line item in the purchase order and editing the cost field. To save changes select OK (F12).
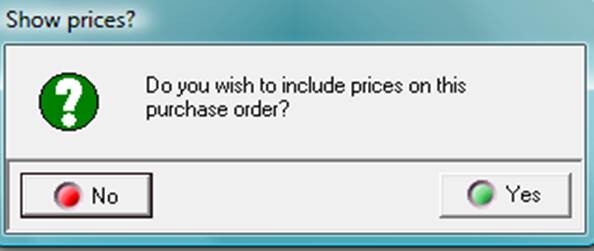
Purchase Orders, Printing: Select the print option from the bottom of the purchase order, you will be prompted to include or exclude the previous costs. To include select yes, selecting no will exclude the costs.
Purchase Orders, Emailing: You can email purchase orders to the supplier by selecting the email option at the bottom of the order form. A confirmation message is displayed when the email is successfully dispatched.
Purchase Orders, Deleting: Items on order can be removed either from the purchase order listing or an open job card
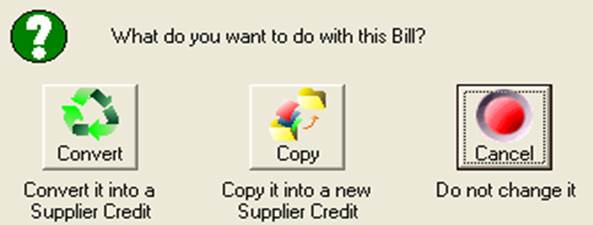
Purchase Orders, Receiving Parts: Parts are received by selecting the Purchasing icon from the top menu bar, point and click on Purchase Orders and perform the following:
1) Point and click on the purchase order you wish to process
2) Edit the PO to list items as displayed on the supplier invoice
3) Point to the Bill selection at the top of form and click - a selection message is displayed

4) Select either convert or copy
5) Enter the invoice number (This will vary from the PO number)
6) The form is now converted to a bill
7) Select OK (F12) to save
Convert To Bill: Converts all items on the order to a bill deleting the purchase order.
Copy to A New Bill: Creates a bill without deleting the purchase order.
Raise A Credit: Takes you to a credit note with the item already inserted
Cancel: Cancels the conversion
If you wish to allocate a purchase to a job, point the checkbox in the line item, select the open job and service you wish to assign the part to. The same procedure applies to buy-ins.
Sort: on selection will sort the parts by part number
Previous & Next: Will scroll you through previous invoices or allow you to create a new invoice for the same supplier
Stock, Re-ordering Items below Minimum Quantity: Automation allows you to create a stock order for items that are below minimum quantity. The order can be filtered by category and supplier, if a supplier is selected only items below minimum that were previously purchased from the supplier will populate the new stock order, selecting categories allows you to be select the type of parts you wish to order from the chosen supplier.
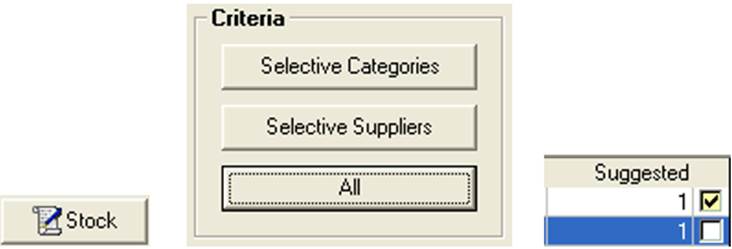
To initiate the stock order select the stock button from the bottom of the purchasing screen Selecting OK (F12)
Select from the criteria options whether you wish to raise the order by supplier, categories or all.
Selecting categories will display a list, to include a category in the order point and click in the check box at the end of the line on completing your selection select OK (F12). The supplier option allows you to select multiple suppliers and raise an order to a new single supplier. The all selection will display all items that are below minimum levels including a suggested order quantity. If you have recently setup your inventory it is suggested you use the all option as you may not have any purchase history by supplier.
Selecting the option from the bottom of the stock listing will open a new order form with the option to select a supplier, highlight the supplier you wish to purchase from, select OK (F12) from the bottom of the supplier listing. Make the necessary adjustment to quantities from the order form and save by selecting OK (F12). The purchase order can be converted to bill in the normal way once the stock arrives.
Use the check boxes at the end of the line to exclude an item from the order. Pointing and clicking will clear the check box. Note you can’t change quantities to order from this screen these adjustments need to be performed from the order form.
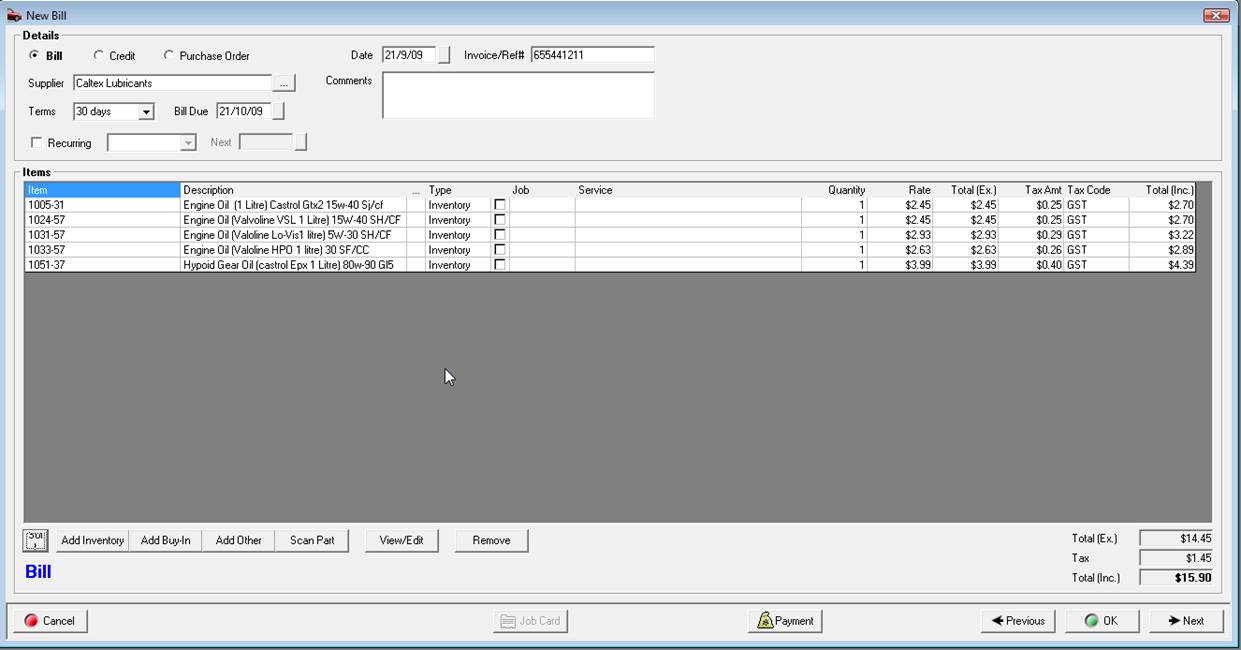
Receiving Inventory, Overview: Automation allows you to receive inventory and enter the supplier bill in one integrated operation automatically updating your accounts payable account (creditors). Catalogue items can easily be converted to inventory during processing. Quantity and value on hand is updated as invoices are entered, it is also easy to edit a received invoice if adjustments are required after posting.
Receiving Inventory, Processing: To receive inventory open the purchasing module by either selecting Activities / Enter Bill – Receive Items or select purchasing and new from the bottom menu bar of the display and perform the following:
1) Select a supplier from the listing
2) Enter the invoice number (or reference)
3) Select Add Inventory from the bottom of the bill form
4) Select items received from the parts listing (convert catalogue items to inventory) – OK (F12)
5) Edit quantity and values (note: All financial fields can be edited)
6) Check tax codes (click in the tax field and select from the drop down menu to change)
7) Ensure the bill total equals the supplier invoice total
8) Process by selecting OK (F12)
Receiving Inventory, Converting Catalogue Items To Inventory: Occasionally you may list an item as a catalogue part (non-inventory) and decide to carry stock Automation allows you to convert a catalogue part to an inventory item as you enter the items received, Simply tick a catalogue part and you will be prompted to convert to inventory to complete the process select Yes from the message box.
Receiving Inventory, Editing A Bill: Automation allows you to edit a bill from the purchasing module. Select a bill from the purchasing screen, edit the quantity or financial fields as required and save with OK (F12). If payment has been allocated to the bill you will need to edit accordingly from the bill payment screen, unallocated payments are indicated by a red cross against the transaction.
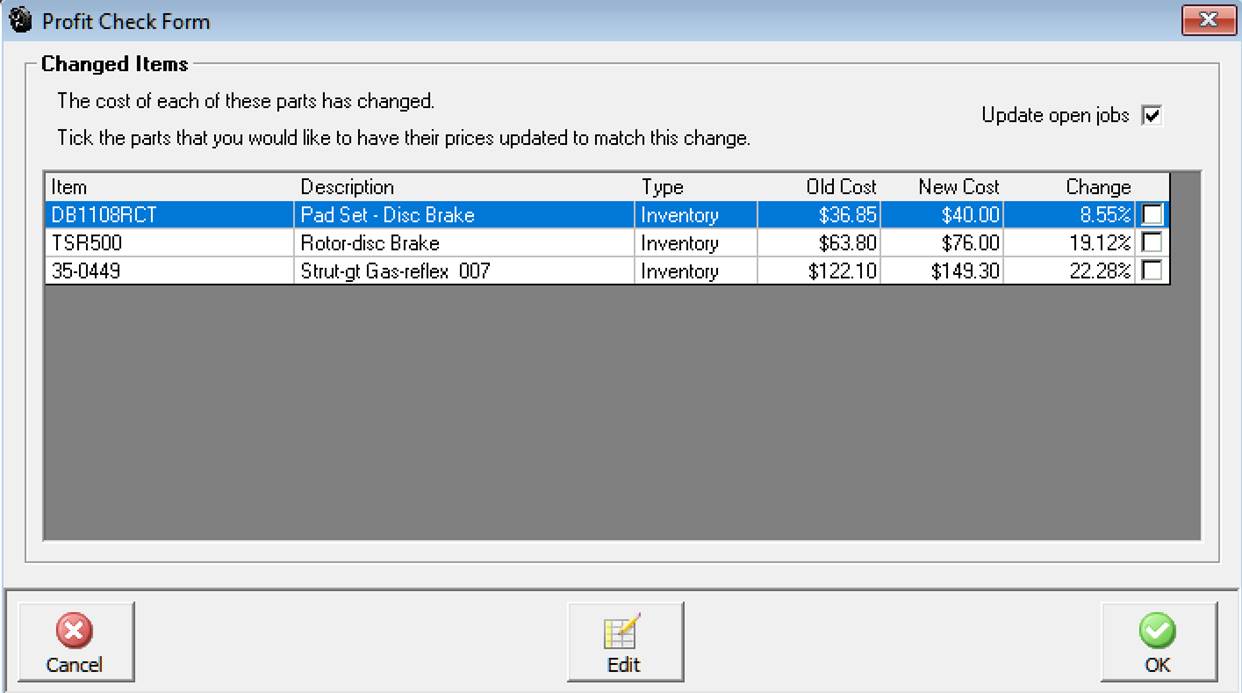
Receiving Inventory, Profit Check: When entering inventory Automation checks current against previous cost and prompts to increase selling prices according the previous profit margins set for retail, trade and wholesale. If you wish to adjust the selling price according to the percentage increase or decrease point and click in the appropriate check box at the end of each line item. Alternatively highlight a record select edit or double click to open the part form, make the necessary changes and save with OK. Do not tick the check box if you change prices manually.
Receiving Inventory, Deleting A Bill: You can select a bill from the purchasing screen click on the delete button located at the bottom of the display. Confirm your action by selecting the yes option from the warning message. Note: If payments have been received you will need to adjust these accordingly from the bill payment screen. You are not allowed to delete a bill with a reconciled payment allocated; adjustments in this case will have to be performed via a journal entry.
Receiving Job Parts, Overview: Automation has a unique buy-in feature available from the job card allowing for entry of items purchased for a particular job to be entered directly onto the job form. The buy-in features also allows for easy reference of purchase details from either an open or closed job. You have the option to select previous parts allocated to other jobs, saving time when allocating specific items.
Receiving Job Parts, Processing: Go to an open job card and perform the following:
1) Highlight the service you are going to allocate the buy-in part to
2) Select buy-in from the row of options located below the parts & labour window
3) Highlight a supplier from the list – select OK (F12)
4) Enter the supplier invoice number – Press enter
5) Select an item from the buy-in list or add a new item by selecting new
6) Confirm selection with OK (F12)
7) Edit the line item if required
8) Select Ok (F12) to save
Receiving Job Parts, Creating a New Item: To add a new buy-in to the list select new from the bottom of the buy-in list and complete the following fields displayed on the Part Form / Buy-in:
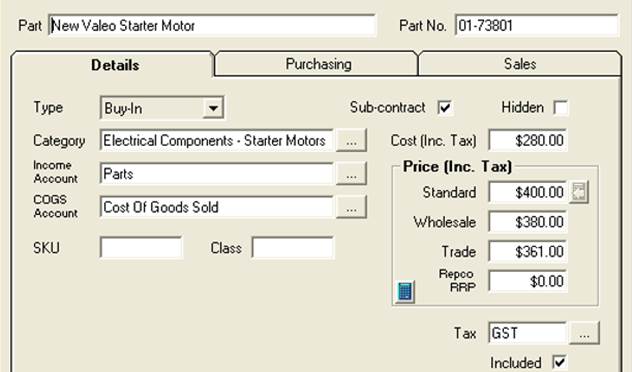
Selecting new from the menu bar of the select buy-in listing opens the part form in buy-in mode. Complete the fields and save OK (F12) the new item is automatically entered into the list and flagged for insertion to the job card.
Part: Description of the item
Part No: Manufacturers reference
Type: Auto select – Buy-in
Category: Use the button to the right and select from the category list
Income Account: Default account
COGS Account: Default Account
SKU: Stock Reference
Class: Stock Grouping
Sub-Contract: Select if item is sub-contracted, the job summary report will display a total value for sub-contracted work sold.
Cost: Inc or Ex
Price: Enter or select the calculator option
Repco RRP: Repco recommended price
Tax: Default tax codes to change make a selection from the list
Included: Cost & Price includes or excludes tax
Buy-ins, Viewing History: To view the purchasing history of an item allocated to a job go an open or closed job card. Point and double mouse click on the item you wish to view, from the part / buy-in form select the purchasing or sales tab.

Purchasing history for an individual item can be accessed from the part form be selecting the purchasing tab
Buy-Ins, Removing from the Job Card: To delete a buy-in from a job card highlight the entry and select the remove button – confirm your choice in the message box by selecting yes.
Parts, Allocating to a Job from a Bill: Automation allows you to allocate parts from directly from the bill to a selected open job. Items that can be allocated include buy-ins and inventory. To allocate a part to a job, bring the part onto the bill in the normal way by selecting the inventory or buy-in option (if you wish to attach to a job) Inventory items selected will be added to the job however there will be no link between the bill and the item added to the job card from purchasing.
Point and click in the job column adjacent to the part you wish to add, a drop down menu allows you to select the job you wish to allocate the part to, point and click on the appropriate job number, the record is added to the line item. Next move across to the service field again clicking in the cell will allow you to allocate the part to a service that is listed on the job card. Note: When allocating a part to a job through purchasing you must select a service allocation to finalise the transaction.

Supplier Credits, Overview: Supplier credit notes can be created from either the purchasing module or job card. Supplier credits are listed as debit entries in the payment form, allowing you to reconcile your supplier statement and process payment accurately.
Supplier Credits, Inventory Credits: Open the credit form by selecting Activities / Supplier Credit or from Purchasing / Credits / New and perform the following:
1) Select the supplier
2) Enter the credit note number – if this is pending enter TBA
3) Select Add Inventory from the bottom of the form
4) Select the item or items you wish to add to the credit – confirm selections with OK (F12)
5) Adjust the quantity and financials to equal the supplier credit note
6) Save OK (F12)
Alternatively a bill can be selected and converted or copied to a credit note
1) Select the bill you wish to convert from the bill listing, open by double clicking
2) Select credit from the radio buttons at the top of screen
3) From the options selection choose convert or copy
4) Edit line items on the credit if required
5) Save OK (F12)
Note: If you do not want to create a credit for all items on the bill copy to a credit note and delete the items that are not being returned for credit. You can also adjust the quantity by pointing and clicking in the quantity field of the line item.
Convert To Credit: Converts all items on the bill to a credit deleting the original bill.
Copy to A New Credit: Creates a credit without deleting the original bill.
Cancel: Cancels the conversion
Buy-ins, Creating Credits: Credits can be raised from the job card; options include raising a credit, deleting the item from your records or placing the buy-in into inventory. Perform the following:
1) Open a job card (you are unable to delete buy-ins from closed job cards)
2) Highlight the buy-in you wish to remove
3) Select remove from selections under the parts and labour window
4) Select remove from original bill, place into inventory or raise a credit

Remove: Completely erases the item from the original bill
Place into Inventory: Converts a buy-in to an inventory item
Raise A Credit: Creates a credit Note
Cancel: Cancels the options
Supplier Credits, Viewing: Supplier credits can be viewed from the Purchasing / Credits screen. The date range for the list automatically defaults to month to date, it is possible to select another period from the drop menu or enter the from / to dates in the appropriate fields. You also have the option to sort by supplier and invoice number. View the details of a credit note by highlighting from the list and selecting edit or pointing at the transaction and double clicking.
Supplier Credits, Editing: Select the required entry from the Purchasing / Credits list. To edit the details of a credit note highlight from the list and select edit or point at the transaction and double click. Make the required changes and save with OK (F12).
Supplier Credits, Deleting: Highlight the required entry from the Purchasing / Credits list and select delete from the bottom of the display accept the delete action. Note: It is not possible to delete a credit not that is contained within payment reconciliation; adjustments will have to be made via a journal entry.
Credits, Creating Notes: Automation allows you to add notes to a line item that forms part of a bill, credit note or purchase order. To add a note point and click in the field identified with …located between the description and type fields. A text field is displayed type your comments and save using OK (F12). The text will be printed under the line item on your credit note, if you wish to view text comments click on the note it icon displayed.
Credits, Emailing: You can email credits to the supplier by selecting the email option at the bottom of the credit form. A confirmation message is displayed when the email is successfully dispatched.
Expense & Other Purchases, Overview: Expenses include the costs you incur to operate your business, these can include items such as phone and electricity, accountant’s fees, travel and vehicle expenses. Fixed assets are capital items that are usually depreciated over a period of time. In Automation expenses, fixed assets and other purchases (excluding stock or job parts) are entered through the purchasing module and allocated to the required expense or fixed asset account.
Expense & Other Purchases, Entering: To enter a new item open the purchasing module by either selecting Activities / Enter Bill – Receive Items or select purchasing and new from the bottom menu bar of the display and perform the following:
1) Select the supplier
2) Enter the invoice or reference number
3) Select Add other from the bottom left hand side of the display
4) From the select expenses list. Flag the item or items required, alternatively add a new item
5) Confirm your selection with OK (F12)
6) Edit details from the bill form as required
7) Save with OK (F12)
Note: It is possible to edit the value of any expense entered onto the bill form by pointing and clicking in the appropriate field.
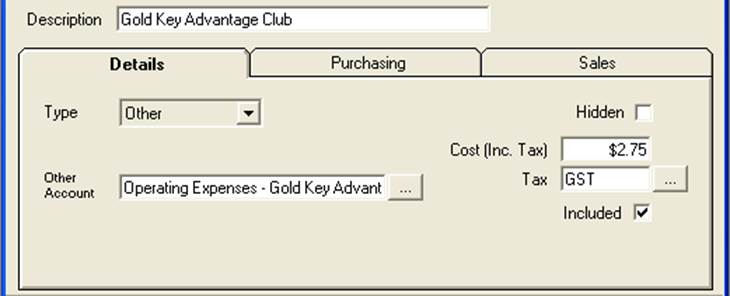
Purchases, Adding to Listing: Select new from the buttons at the bottom of the select expenses display complete the following fields:
Description: ie: Fuel, accounting fees, rent and stationery
Type: Default – Other
Expense Account: Select the button to view the chart of accounts, highlight the required account or create a new expense account.
Hidden: Select if you wish to remove the expense from the listing
Cost: Inc / Ex tax
Tax: Default account displayed, select the button to choose an alternative
Included: Inc / Ex tax
Purchases, Viewing Item History: Select the history tab from the item form to view the transaction history.
Purchases, Viewing: Expense and fixed asset purchases can be viewed from the Purchasing screen. The date range for the list automatically defaults to month to date, it is possible to select another period from the drop menu or enter the from / to dates in the appropriate fields. You also have the option to sort by supplier and invoice number. View the details of an expense by highlighting from the list and selecting edit or pointing at the transaction and double clicking.
Purchases, Editing: Select the required entry from the Purchasing list. To edit the details of an expense purchases highlight from the list and select edit or point at the transaction and double click. Make the required changes and save with OK (F12).
Purchases, Deleting: Highlight the required entry from the Purchasing / bills list and select delete from the bottom of the display accept the delete action.
Note: It is not possible to delete an expense purchase that is contained within payment reconciliations; adjustments will have to be made via a journal entry.
Purchases, Crediting: To create an expense purchase credit follow the same steps as supplier Inventory credits, creating.
Creditors, Overview: A major component of successful financial management is keeping track of your creditors (money you owe). Automation allows you to process payment directly from the purchasing module or through the bill payments option. When payment is processed you have the flexibility of nominating which account the funds are to be deducted from. Once a bill has been processed it is easy to track payments from purchasing, bill payments or general ledger. Automation handles tax and superannuation payments differently to normal supplier invoices. Essentially you can display a summary of amounts owing for any period and process payment to include any tax payable account.
Creditors, Viewing Bills: There are two ways to view outstanding supplier invoices, the purchasing screen and by selecting Activities / Pay Bills from the top of the screen.
Purchasing Screen – The screen displays invoices for the all suppliers in the current month it is possible to filter transactions by date range, supplier, due date, outstanding and invoice.
Date Range: The screen is set to automatically display transactions for the month to date. It is possible to select another period by clicking on the button to the right of the month to date field, from the drop down menu point and click on the period you require. You can also select the - from to dates - by either typing into the fields at the top of form in DD/MM/YY format or selecting the button to the right of the - from / to - boxes and double clicking on the date required. Today’s date is highlighted in red, to move between months select the arrows at the top of the calendar form.
Supplier: Select the button to the right hand side of the supplier field, your supplier listing is displayed. Highlight the supplier you wish to select confirm with OK (F12) only transactions relating to the chosen supplier will be displayed. If you wish to display transaction for sub accounts select the tick box located above the supplier search field.
Due Date: This function is used in conjunction with the date range, select the period or enter to / from dates, select due date; only invoices that are due for payment are displayed. From the top of the screen select the due date checkbox, invoices that are due for payment in that date range are displayed. Further filtering is possible by selecting view by supplier.
Outstanding: Selecting outstanding displays only invoices with outstanding balances, transactions include invoices that are part paid.
Invoice Number: Enter the transaction number into the invoice field; tick the box placed above the field and only the required transaction will be in view.
Activities / Pay Bills – Displays all outstanding bills for an individual supplier giving you the opportunity to process payment. To select a supplier click on the button to the right of the supplier field, from the supplier listings highlight the required record and confirm with OK (F12). Filters include the ability to display outstanding invoices by date range including due date.
Supplier, Viewing Sub Accounts: It is possible to include invoices allocated to sub-accounts, select the include sub accounts option under the supplier field. Invoice received or due in the date range for each supplier sub account is now in view.
Creditors, Viewing Bill Details: From the purchasing screen point at the transaction you wish to view and double click or alternatively highlight the transaction and select edit from the bottom of the display. Note: It is not possible to view invoice details from the bill payment form
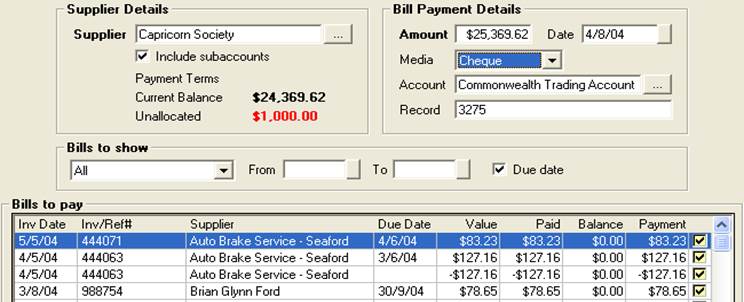
Bill Payment, Overview: Bill payments are processed through the bill payments form. The Form can be accessed from the purchasing module, bill payments or the activities menu. When you pay a bill the accounts payable account balance is reduced by the same value as your payment account. Automation gives you the ability to pay bills from any bank or asset account (ie: Undeposited funds).
Bill Payment, Purchasing Module: To pay a bill from the purchasing module highlight the transaction and select the payment button at the bottom of the screen.
 Selecting
payments opens the bill payment form
Selecting
payments opens the bill payment form
The bill payment form opens displaying just the invoice that was highlighted with the outstanding amount automatically entered into the amount field. To process payment for a single account complete the details in the details section of the form.
Bill Payments, Viewing: It is possible to view payments from bill payments module. Viewing payments from the bill payments screen requires you to point and double click on the transaction or highlighting the payment, selecting edit (F2) from the bottom of the screen, details of the payment are displayed in the bill payment form. You can also filter transactions by type to view supplier or payroll liability payments, click on the arrow to the right of the type’s field, point and double click on your selection.

Bill Payments, Allocating Payment: A green tick is displayed in the allocated column of the bill payments screen indicating the payment has been allocated in full. If a payment is not allocated correctly a red cross is displayed. It is possible to view unallocated payments only by selecting the unallocated option at the top of the screen. You will need to select a new period if you wish to view transactions pre the current month. An unallocated payment may exist due to a paid invoice being deleted from the system or overpayment has been processed leaving unallocated credits on the suppliers account. It is possible to edit a payment to correct the allocation only if the payment does not form part of a reconciled transaction.
Bill Payments, Editing: Open the bill payment form from either the purchasing or bill payments display. It is now possible to select or de-select payment allocating by clicking in the selection field aligned to the transaction, you can also alter the payment amount and account posting from bill payments section of the form. To save your changes select OK (F12).

Bill Payments, Selecting Date: The bill payments screen is set to automatically display transactions for the month to date. It is possible to select another period by clicking on the button to the right of the month to date field, from the drop down menu point and click on the period you require. You can also select the - from to dates - by either typing into the fields at the top of form in DD/MM/YY format or selecting the button to the right of the - from / to - boxes and double clicking on the date required. Today’s date is highlighted in red, to move between months select the arrows at the top of the calendar form.
Bill Payments, Deleting: Payments can be deleted from the bill payments form by highlighting the record you wish to remove and selecting delete from the bottom of the screen, confirm the deletion from the warning message. When a payment is deleted from the system paid invoices are reversed to outstanding. The supplier total amount due will increase by the amount you deleted. It is not possible to delete a payment if it forms part of a reconciled transaction.
Bill Payments, Processing Credits: Credits are displayed in the bills to pay section of the bill payment form with the amount id brackets ie: ($89.60) when selected the amount owing displayed in the bill payment details will decrease.
Bill Payments, Paying From Undeposited Funds: When processing payment it is possible to pay from undeposited funds, the transaction is listed as a negative amount in the receipts display ie: ($110.00). Indicating this money which would normally be cash is missing from your undeposited funds.
Bill Payments, Unallocated Payments: Automation allows you to delete paid or unpaid bills providing the payment does not form part of a reconciled transaction. If payments are allocated to a bill selecting delete displays a message box warning that payments have been processed. Continuing will leave the amounts unallocated, unallocated payments will also be created when paying a supplier in advance. When opening the bill payment form if unallocated credits exist for the supplier you will notice a payment button with a red cross.
 Selecting
this button from the payment form allows you to view unallocated payments
for the supplier from the bill payments screen. To process an unallocated
payment highlight the line item and double click or select edit (F2) from
the bottom of the bill payments screen.
Selecting
this button from the payment form allows you to view unallocated payments
for the supplier from the bill payments screen. To process an unallocated
payment highlight the line item and double click or select edit (F2) from
the bottom of the bill payments screen.

The bill payment form will open, select the date range you wish to display and allocate the payment to invoices by clicking in the box at the end of the line item, save your allocations with OK (F12).
Overview: Automation allows the user to identify a supplier bill as a recurring transaction, it is possible to then store the record and batch run the transactions when payment date is due. This feature allows you to record the payment frequency and next payment date.
Recurring Transactions, Adding: To add a recurring transaction, open a new bill add the item in the normal way, before closing the bill point and click on the recurring transaction option located in the top left hand side of the header, a tick is displayed, point and click on the button to the right of the frequency field, make a selection from the drop down menu. Move across to the next field select the button to the right, from the calendar point and double click on the next payment date, your choice will display in the field. Save or pay the bill in the normal way.

Recurring Transactions, Processing: To process recurring transactions, select Activities / Recurring Journals & Bills, from the recurring bills screen point and select the transactions you wish to create, complete the process by select OK (F12).

The bills are posted to your purchasing screen dated the next rec. date, the list will automatically refresh to display the next payment date.
Recurring Transactions, Editing & Deleting: To edit or delete a transaction select the appropriate option from the bottom of the recurring bills display.
On-Line Payments: Automation can generate an aba file for export to your bank to process single or multiple payments to your suppliers. If you wish to use this feature open file / settings / accounts and complete your bank details including your UID (Unique identity) this can be obtained from your bank.
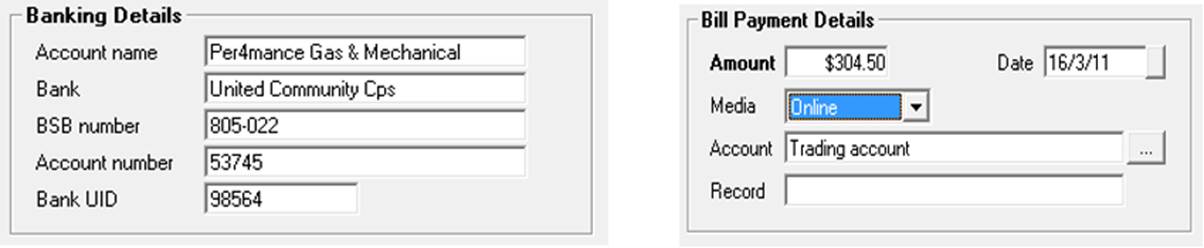
Before processing on-line payments you must complete your trading account details by selecting settings from the file menu and clicking on the accounts tab.
To create an aba file perform the following:
1) Go to bill payments via Accounts / bill payments, open the bill payment form for your chosen supplier, select the bills you wish to pay, select from the payment media on-line and the account you want the payment to be deducted from (usually your trading account)
2) From the bill payments list point and click in the check box at the end of the line item you wish to export, select export from the bottom of the display, you are presented with the option to select the destination folder (choose a location that is easy for you to access when exporting to your bank ie: C:\ABA)
Finalise payment by selecting OK (F12) return to the bill payments list you will notice on the right hand side of the transaction list you have the ability to select a payment for export, the transaction can be easily identified by the payment media recorded, remember you can use the view option at the top of screen to display on-line payment transactions only. Before moving to the next step ensure you have the suppliers bank details recorded on the supplier form. Confirmation your aba file has been created and saved
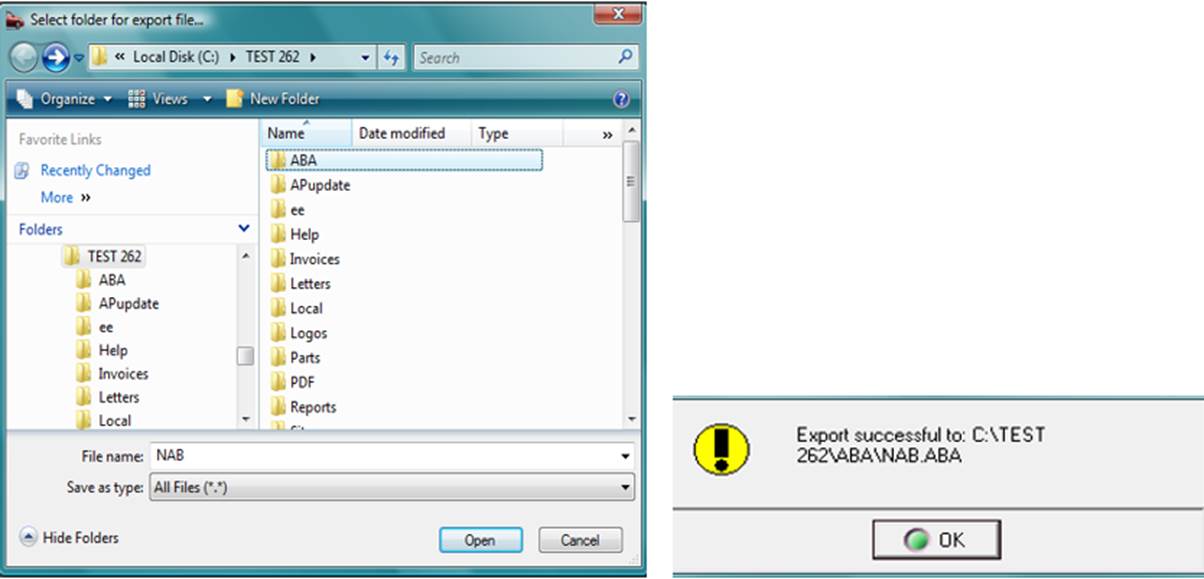
Automation will overwrite the previous file if the same name and location are chosen, you can re-select exported records to create a new aba export however be sure you do not duplicate payment exports to your bank. A green tick is displayed in the exported column when a payment has been added to an aba file, it is advisable to take note of this as you process an export.
Capricorn Reconciliation, Overview: Automation Premium has an automated reconciliation feature for operators that have a trading relationship with the Capricorn Society. To access this feature you need to firstly attach suppliers to the master Capricorn account, enter all purchases from Capricorn suppliers, download your statement from the Capricorn web site and finally run the reconciliation feature.
Capricorn Reconciliation, Supplier Setup: All Capricorn suppliers need to be setup as sub accounts of Capricorn, plus you must enter the supplier code onto the supplier form as the reconciliation feature uses this field to match purchases. To setup a Capricorn supplier perform the following:
1) Select suppliers from the screen icons or pick list option
2) From the bottom of the supplier listing select new
3) Enter the supplier name, select the arrow to the right of the parent field
4) Select Capricorn from the drop down list
5) Complete the details on the supplier form
6) Enter the Capricorn supplier reference number, complete by selecting OK (F12).
Note: You are unable to save a Capricorn sub supplier form without the unique supplier number.
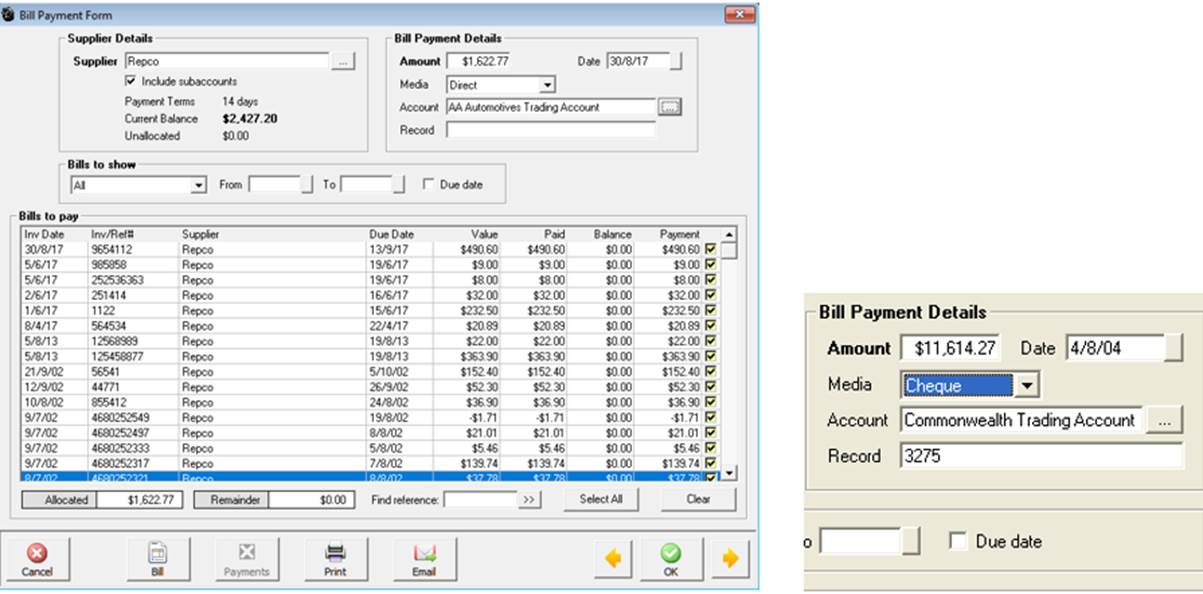
Bill Payments, Form Layout: The bill payment form is split into these areas:
Supplier Details: Supplier, Payment Terms, Current Balance
Bill Payment Details: Amount, Date, Media, Account, Record
Bills To Show: Period, Date Selection & Due Date
Bills To Pay: Invoice Date, Due Date, Value, Paid Balance & Current Payment
Find Reference: To locate an outstanding bill by invoice number type into this field and click on the double arrow option to the right.
Select All: When processing multiple bills select all allows you to flag all invoices displayed for payment.
Clear: Clears all selections
Print: Prints a remittance advice
Previous & Next : The previous and next options at the bottom of the form to locate previous entries, if you wish to create more than one bill payment using the next option will open a blank transaction form.
To select the media use the drop down menu, highlight the required type double click and it is displayed in the media field. If you select cheque your trading account and next cheque number is automatically entered into the account and record field. You also have the option of selecting a bank or fixed asset account such as undeposited funds to make a payment from. To view available accounts select the button to the right of the account field. After completing the details select OK (F12) to process the payment for the original invoice selected from the purchasing screen
Bill Payments, Purchasing Selecting Multiple Bills: Selecting payment from the purchasing module only displays the highlighted invoice, it is however possible to display all invoices owing and flag for payment by selecting all from the bills to show menu. As you select the outstanding invoice the value in the amount field will increase, unflagging a value will decrease the amount you are paying.
Bill Payments, Editing Existing Bills: If you wish to edit an existing bill from the bill payments form, point and double click on the line item, the original bill is now in view, change the value in the bill form and select OK (F12). Automation will return you to the bill payment form, the previous bills selected for payment will remain flagged.
Bill Payments, Adding Bills: As you reconcile your supplier statement you may find that bills have not been posted, if this is the case select the bill option at the bottom of the bill payment form, this action will open a new bill for the supplier. Enter the details in the normal way and save with OK, you will be returned to the bill payment form with all selected items still flagged for payment.
Bill Payments, Activities Menu: to open the bill payments form from the activities menu select the pay bill option. At the bill payment form select the button to the right hand side of the supplier field, highlight the supplier you are processing payments for, confirm your selection with OK (F12) the supplier name is now displayed in the supplier field then perform the following:
1) If you want to display all outstanding invoices by date (not due date) point click on due date
2) Select the invoices you wish to pay – Select All to flag all invoices displayed
3) Enter the payment media from the drop down menu
4) Select the account
5) Enter a record number (sequential based on your last entry is displayed)
6) Process payment by selecting OK (F12)
Remittance Advice, Printing: If you wish to enclose a remittance advice with your payment select the print button located on the lower menu bar of the form. The layout of this report allows you to insert into a window faced DL envelope.

Remittance Advice, Emailing: To email a remittance advice firstly ensure there is an email address recorded in the supplier form, select the bills and payment media, point and click on the email option, confirm your selection and the form is emailed. You can check when a remittance was emailed by selecting the email option which displays a green tick, you also have the ability to resend from this message screen.
Bill Payments, Quick Pay Method: You can process payment for a single bill from the bill form by selecting the payments button from the lower menu bar of the screen, this option will save the bill and open the bill payment form with the supplier invoice ticked for payment in one action. The operator enters the payment method and account clicks OK (F12) and the bill is recorded in purchasing as paid.
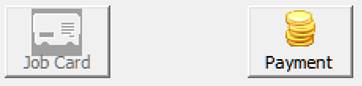 To quick pay select payment from the
bill form.
To quick pay select payment from the
bill form.
Bill Payments, Processing: You also have the option to process a bill payment directly from the bill payments screen. To access bill payments select the accounts icon from the top of screen, click on the bill payments option to view the display. Select new from the bottom of the bill payments screen. The bill payment form is now in view; select the supplier and process invoices as required. Confirm the transaction with OK (F12) from the bill payment form.
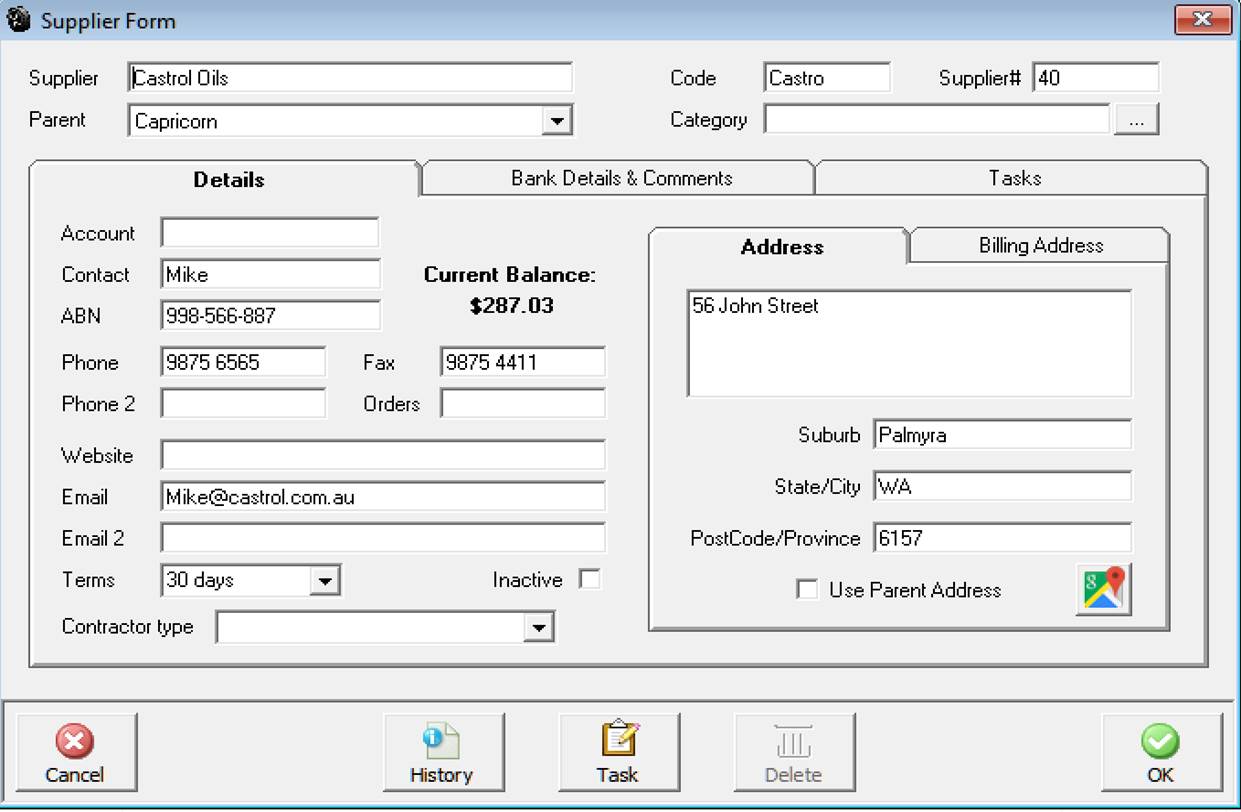
The Capricorn # and supplier id must be entered onto the supplier form for the reconciliation process to function correctly.
Capricorn, Reconciling Purchases: For the reconciliation feature to function correctly you must enter your purchases including the supplier and invoice number. Processes you need to follow are:
1) Download your Capricorn statement from the web site – You can connect to www.capricorn.com.au directly from the On-Line menu functions
2) Save the file, we suggest you create a Capricorn directory on your local machine
3) Select the Capricorn Reconciliation feature from the On-Line menu
4) “Initialising Capricorn Reconciliation” message box and an open Capricorn Export File selection box are now in view
5) Point and double click on the file named intmemb.csv, the reconciliation process will initialise
6) A status box indicates progress
7) When complete the Capricorn reconciliation is in view
8) Most items should be ticked for payment. Others may have red crosses and comments in the notes field
9) Correct the non-matching items & re-run the reconciliation by selecting the re-do option from the bottom of the screen
10) When all items reconcile select payment from the bottom menu bar, from the payment form select the payment media and confirm with OK (F12)
Capricorn, Reconciliation Display: The reconciliation screen will display all matched items with a green tick in the match column. This indicates that the items are flagged for payment, the other items that have a red cross in the match column refer to invoices that have not been found, values do not match or the invoice dates do not match. You have a “drill down” option to correct values or dates, pointing at the line item and double clicking will open the original purchase entry for editing.
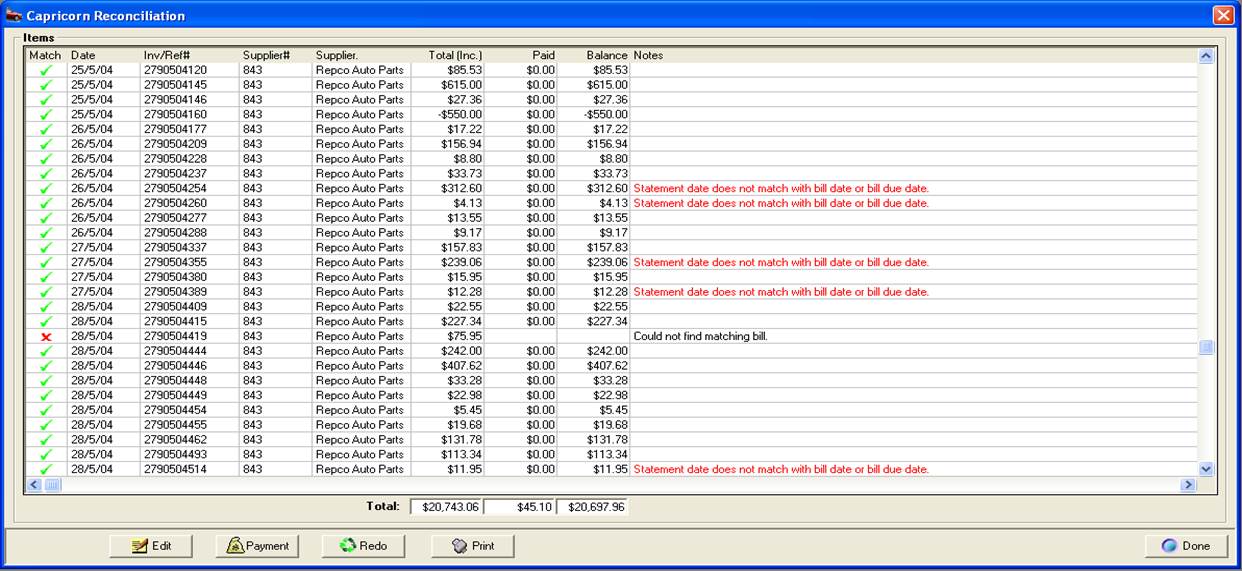
Capricorn, Correcting Purchases: Automation Premium allows you to access and correct bills from the reconciliation screen providing a match has been made between supplier and invoice number. To open the original purchase point and double click on the line item, your original bill is in view, change the date or invoice value and save. Repeat this process for other bills displaying a discrepancy then rerun the report by selecting redo from the bottom of the reconciliation screen.
Capricorn, Processing Payment: Select payment from the bottom of the reconciliation screen, all line items displaying a green tick in the match column are flagged for payment. To process select the media type, enter a payment or cheque number and complete the transaction by selecting OK (F12).
From the bill payment form you can deselect items for payment if required. Selecting clear will deselect all items, clicking on a flagged line item deselects the single payment. The total payment is displayed in the amount and allocated field at the bottom of the screen
Overview: Automation has a unique cost centre tracking feature. The option allows an organisation to assign purchases to a specified cost centre including details of the authorised user. The purchase transaction history will display the totals assigned to each account and cost centre by supplier invoice. The report can be exported in Excel format for import into various accounting or administration applications.
Cost Centre Tracking, Setup: Cost centre tracking is not a standard program default hence the option needs to be initialised from the settings screen. Once this is done two new fields are displayed on the bill and credit form Cost Centre and Authorised user, the settings defaults are automatically entered however these can be changed according to the entry requirements.
To setup cost centre tracking perform the following:
1) Open program settings – File / Settings – Click on the configuration tab, select manage users
2) When you have completed entering your authorised users click on the program options tab, tick track cost centre
3) To save your changes in settings select OK (F12) from the bottom of the settings display, cost centre tracking is now activated.
It is important that you apply account numbers to the posting accounts in your chart of accounts as these are recorded in the purchase transaction summary report.

To access a list of authorised users you must first enter the details into the manage users list. It is not essential to establish security, however there is an option that allows admin to set permissions for users to be able to authorise purchase transactions. If this is not set it is assumed that all users have authority to process purchases.
To select a default cost centre click on the button to the right of the field, a list is displayed; highlight the required record and select OK (F12), the title is entered in the default cost centre field. To create a new record select new from the bottom of the list.

A new account is setup on the cost centre details form. Type the name of the cost centre followed by the cost centre number (a value MUST be entered in the Centre No. field as this is printed on the purchase transaction summary report. Save your entry with OK (F12).


To add new accounts or account numbers and tax codes please refer to the setting up your accounts section of this manual.
Cost Centre Tracking, Processing A Bill or Credit: Bills and credits are processed in the normal way, except when cost tracking is set two new fields are displayed on the bill or credit screen. It is mandatory for these to be completed otherwise the transaction will not proceed. The data displayed in the authorised user and cost centre field is accessed from the records entered in the program default settings.

If you wish to change the cost centre and / or authorised person select the button to the right of the field, from the list highlight the record you wish to display and complete with OK (F12).
Purchase Transaction Summary Report: The purchase transaction report can be run by all or selected suppliers (single or multiple) information includes the invoice, account posting and cost centre details.
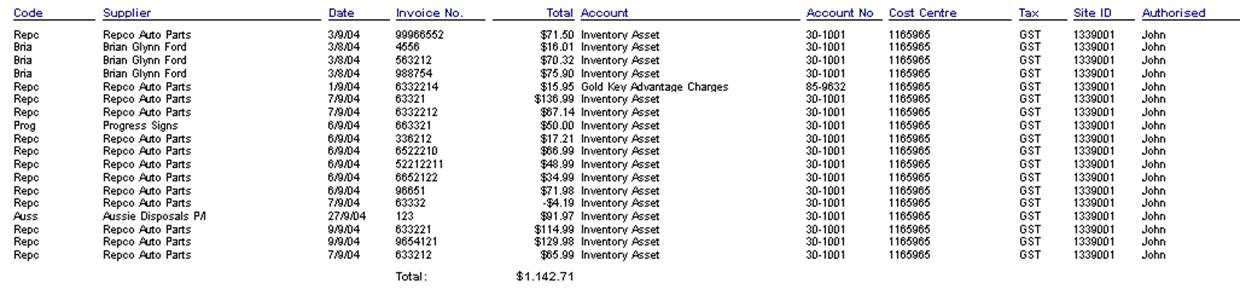
To display, print or export this report perform the following:
Display: Select reports from the top of the screen point and click on purchase reports, select the transaction summary report from the sub menu. Choose whether you wish to display all suppliers or selected, to select suppliers from the list point and click in the checkbox at the end of the line

If selecting suppliers confirm your choices with OK (F12). Next you need to enter the date range or period you wish to report on. Select OK and the report will display.
Print:
To print the report
select the print icon located on the top left hand side of the report
display 
Export:
To report the report
select the export icon located on the top left hand side of the display 
Select from the list the export type required ie: Excel, nominate the folder you wish this to be saved to, select OK, name the report and select save.
Tax, Payments Overview: Automation allows you to setup multiple tax accounts, when you create tax accounts as sub-accounts of tax payable you are able to process payment by selecting the total owing according to a “cut off” date. For instance you may wish to process payment of GST for the last quarter in January, in this instance you need to select December 31st. as you up to date. The chart of accounts lists three default tax accounts, GST, PAYG Instalments and PAYG Withholding. Automation processes tax payments differently to other current liability accounts by only displaying a total when allocating payment. Details of tax owing can be viewed from other areas of the program.
Tax, Default Accounts: The chart of accounts has three default accounts displayed as sub accounts of tax payable, it is possible to process payment for these accounts through the pay tax liability feature.

GST: Liability or credit calculated on sales and purchases on an accrual basis excluding income from work in progress, GST rate is entered in settings.
PAYG Installments: Based on the value entered in the program settings multiplied by the turnover (excluding tax) for the payment period.
PAYG Withholding: Tax deducted from wages or salaries paid for the selected period.
Tax, Processing Payment: Before processing a tax payment ensure the total value of the sub-accounts are correct, for instance you may wish to create another account such as disallowed vehicle expenses. Before processing you may wish to make a journal entry to this account, ensuring the amount you are paying is correct. Depending on the level of reporting required you may find it easier to simply set up another sub-account titled tax adjustment and make an entry into the notes field when processing journals to keep track of the various entries.
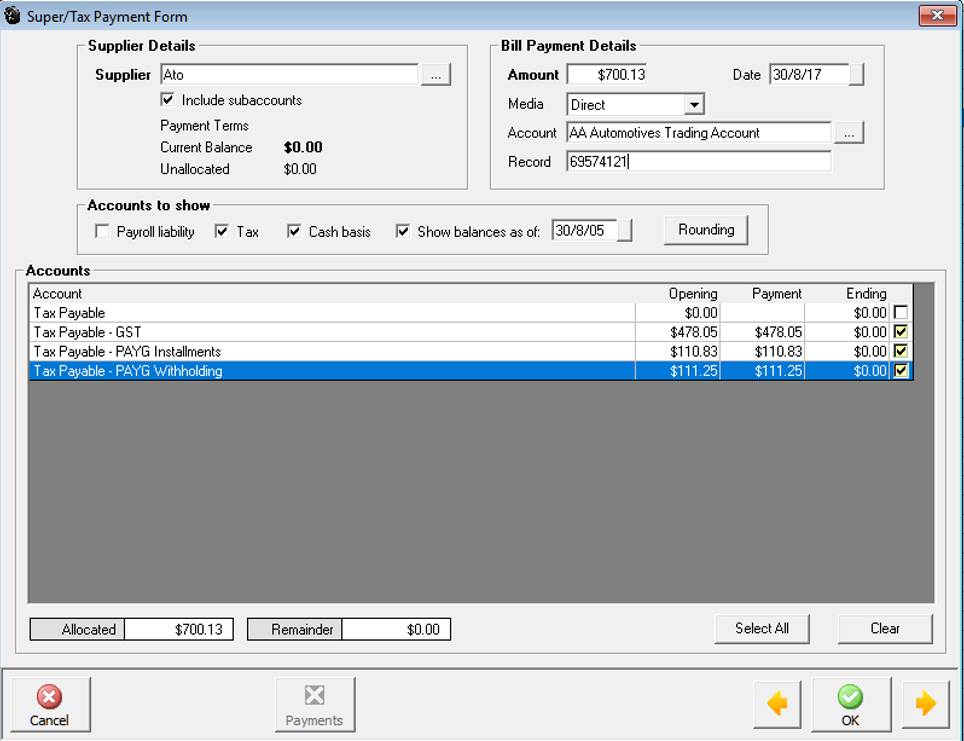
From the Tax payment form select the button to the right of the supplier field, highlight the payee from the supplier listing ie: Australian Taxation Office and confirm with OK (F12). Next select the show balances as of date by clicking on the button to the right of the date field select your “cut off” date from the calendar. Click on select all. The total amount is entered in the amount field, select the payment media, account and edit the record if required. Confirm the tax payment by selecting OK (F12).
Tax, Paying Cash or Accrual: Values displayed on the super / tax payable form automatically default to accrual. If you wish to pay your GST and PAYG installments on a cash basis select the cash option located above the accounts window. Data will instantly change to reflect amounts owed based on actual payments and receipts for the selected date range ie: Last payment date to the date entered in the show balances as of. Note: You must decide whether to process payment on a cash or accrual basis.
If you try to change your accounting method a box will prompt whether you wish to continue. It is possible to accept a change however you need to be aware of the implications of swapping from cash to accrual or visa versa. It is suggested you seek direction from your financial adviser on which method is the most effective for your business.

Tax, Editing Payments: Open bill payments from the accounts icon, highlight the record you wish to edit open the tax payment form by double clicking on the transaction or selecting edit (F2) from the bottom of the display. It is now possible to select or de-select payment allocations by clicking in the selection field aligned to the transaction, you can also alter the payment amount and account posting from the accounts section of the form. To save your changes select OK (F12).
Tax, Deleting Payments: Payments can be deleted from the bill payments display by highlighting the record you wish to remove and selecting delete from the bottom of the screen, confirm the deletion at the warning message. When a payment is deleted tax payments are reversed. It is not possible to delete a payment if it forms part of a reconciled transaction.
Tax, Viewing Tax Payments: Go to the bill payments screen, select the entity you pay tax to from the supplier list by selecting the button to the right of the supplier field and click the view by supplier option. Next select the period or enter the date range for the transaction you wish to view. To view the details of a transaction double click on the transaction or select edit (F2) from the bottom of the display.
Tax, Locking Transactions: Automation allows you to lock transactions to a specified date, it is suggested that once you have completed your BAS and made payment (process the last day of the reconciled period this will display all values as zero) that you lock transactions to the last date of the tax period. To set the locking date, go into File/Settings/Configuration, tick the enable lock checkbox, and next select a date from the calendar by clicking on the button to the right of the date field. You can disable or change the date at any time, save your settings with OK (F12).
