Parts
& Inventory, Overview:
Automation Premium has the ability to sell parts as catalogue or inventory
items. Catalogue items have no stock control and as such no record flows
through to quantity on hand., The cost price for catalogue items can be
edited from the parts listing, job card or invoice. Cost and retail for
non-inventory items (catalogue) are posted to cost of goods sold, income
and an other current assets account titled non-inventory purchases.
It
is suggested the operator take full advantage of the powerful inventory
management functions of Automation Premium which including category management,
stock take reporting by category or location. To ensure inventory management
is a breeze we have included pricing and inventory management utilities
that allow for global price changes and automatic conversion of catalogue
items to inventory.
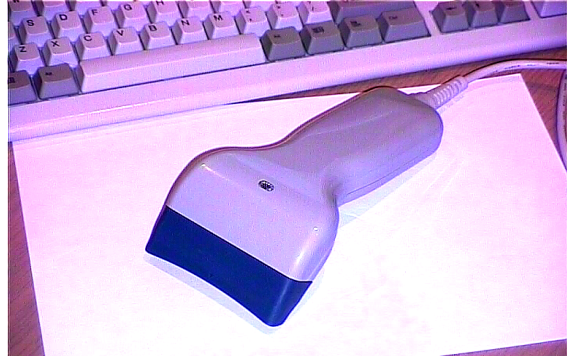
This
chapter also explains how you can save time by attaching a key board wedge
scanner giving you the ability to scan barcodes and enter items straight
to the invoice or job card without touching the keyboard.
Parts
Listing, Searching:
The
default search field is part number, if you wish to search by this field
type your query into the search field, the cursor will move to the record.
It is also possible to search by any field in the listing, to change the
search simply point at the header record and select the text will change
to blue indicating a change of search field. You can search the
list by keyword, for instance locating an item containing the word wiper
in the part field requires entry to the search field, selecting the double
arrows to the right of the search field will scroll through all part description
containing the word wiper regardless of position.
Parts
Listing, Searching By Barcode:
To
search by barcode select scan from the bottom of the screen, the scan
entry field is displayed, scan the part required and the cursor will locate
the item.
Parts
Listing, Filtering:
Selecting the check boxes at the bottom of the display window to view
catalogue, inventory or buy-ins.
Category
Management:
Categories
and sub categories can be setup by selecting lists / categories. It is
good practice to add a category to each inventory, catalogue or service
item as many functions and reports within Automation are category based.
For instance adding a category to an item gives the operator an opportunity
to track sales and profitability for a defined group of parts or perform
a stock take by single or multiple categories.
Category
Management, Adding New Categories:
From
the top of the screen select lists / categories, or view from the part
and services form. Select new from the bottom of the list, your category
form is now in view. To enter a new category or sub category type your
entry into the category field i.e.: Batteries, spark plugs, electrical
etc. It is also possible to create sub categories, for instance you may
stock two types of batteries Exide and Century if you wish to track sales
and run re-order reports by supplier setup two sub categories by attaching
the Exide and Century entries to the master category batteries. Select
parts, services or supplier as a grouping.
Category
Management, Deleting Categories:
The
system will not allow you to delete categories that have been assigned
to items by selecting the delete function at the bottom of the listing.
However if you wish to not list a category it can be hidden from view
by selecting the hidden option on the category form. Essentially this
option retains the category for data integrity purposes even though it
can no longer be accessed from the main screen
Default
Markup, Setting:
Automation allows you to set a default markup for parts by category, the
default markup can then be applied to the part form automatically calculating
a standard retail bases on cost price or the recommended Repco retail
price. To activate this feature perform the following:
1) Open
the category listing by selecting lists from the top of the screen
point and click on the category option in the drop down menu.
2) Point
and double click on the category you
wish to set the markup for, the category detail form is displayed.
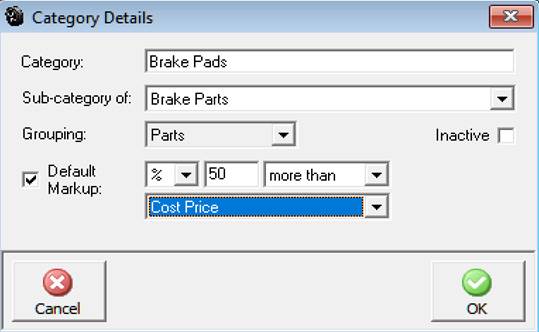
3) Point
and click on the default markup checkbox, you can now enter values
into the corresponding fields.
4) Select
the arrow to the right of the first field, select the $ or %
sign, enter the value into the next field, click on the arrow of
the third field, select more than or less than (less than should
only be used if setting by Repco RRP) finally select the calculation criteria
either Cost or Repco RRP, save with OK (F12).
Default
Markup, Applying To The Part Form:
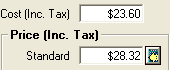
If a markup has been set for a category attached to an item entered onto
the part form an arrow is visible next to the standard price field. To
calculate the sell price using the default markup enter your cost or Repco
RRP (into the appropriate field) next point and click on the arrow, the
sell price is automatically inserted.
To
reference your markup settings go to the category list the value and calculation
criteria is displayed in the right hand column.

Catalogue
Parts, Creating:
To
create a new catalogue item open the parts listing and select new from
the bottom of the display. This action opens the part form which has three
tabulated choices details and purchasing and sales. Details contain the
item setup data, purchasing information including supplier and invoice
number, this choice does not apply to catalogue items as there is no purchasing
history. Sales detail the sales history including client and invoice number.
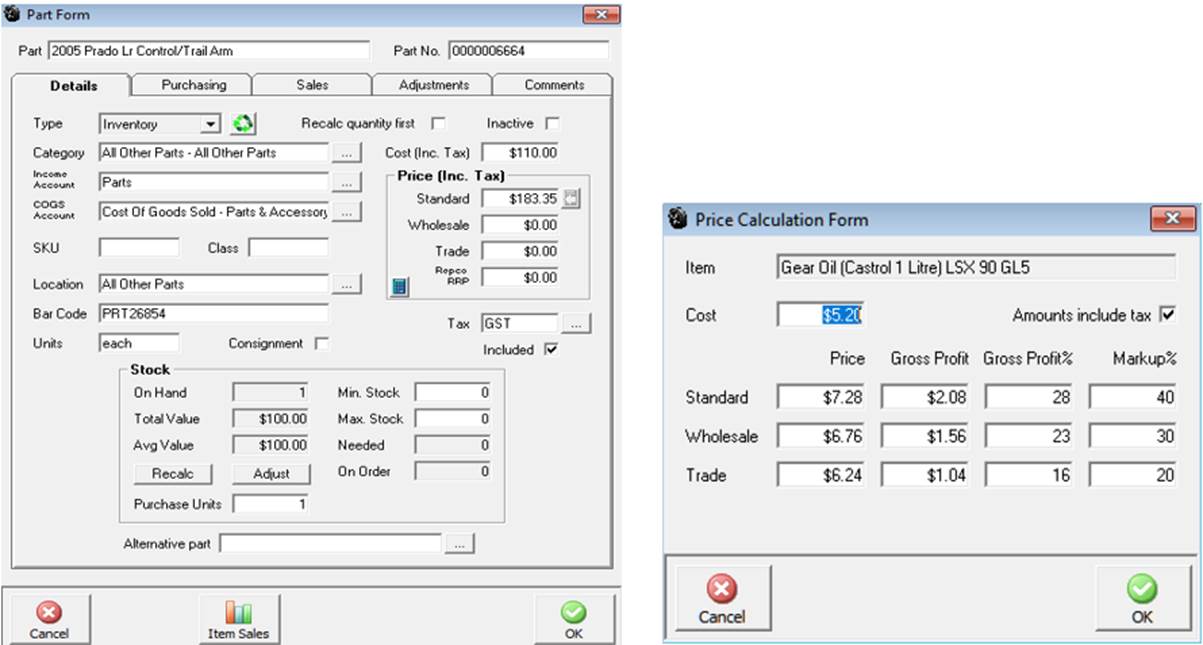
Using
the Calculator is an easy way to calculate gross profit or markup margins
for retail, wholesale and trade prices.
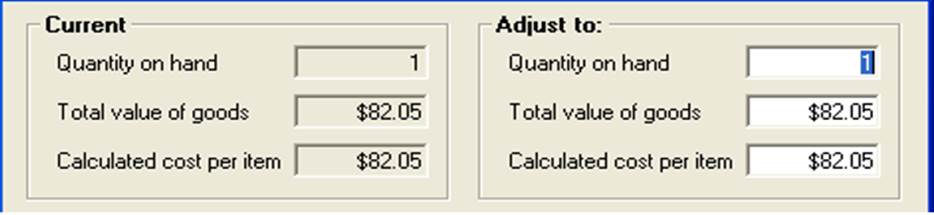
Part
Form, Calculate function: Allows
you to automatically calculate selling prices and or profit margins including
or excluding tax based on cost or percentage. Enter one value into the
price, gross profit, gross profit% or markup field press tab and all fields
will be calculated. The form defaults to include tax, if you wish to exclude
de-select the amounts included in the tax cell.
Part
Form, Fields:
Consist of the following:
Part:
Enter
the part description
Part
No.
Manufacturer’s part number
Type:Include: Each
has unique use within the system.
Catalog:
Assigned
to items that have no stock control. Note: Automation Premium is
based on double entry accounting principles; as such it is not possible
to record single sided entries. The chart of accounts contains a default
non-inventory purchases other current asset which records the cost
of all catalogue items, the operator will have to transfer funds from
this account to compensate for the cost of these items.
Inventory:
Stock
levels are recorded for inventory items, values are posted to current
assets as inventory on hand. It is also possible to raise purchase orders
for inventory items and receive items through the purchasing function.
Buy-In:
Special
category of inventory item relating to parts that are purchased for individual
jobs or invoices.
Other:
This
option is used to classify expenses and other transactions ie: Telephone,
accounting, rent etc.
Category:
Ability
to assign an item to a category, selecting the button to the right of
the field displays a list, highlight the entry required and select OK
(F12) from the bottom of the category list will insert the category to
the part form.
Income
Account: Selecting
the button to the right allows for the posting of sales to another income
account. Default income account is parts unless you wish to track income
separately for this item it is not necessary to change the posting.
COGS
Account: The default
for all parts is Cost Of Goods Sold, however new COGS accounts can be
attached to individual parts by selecting the button to the right of the
field, creating a new account and attaching the selection to the form.
SKU:
Stock
look up reference
Class:
Gives
the operator the ability to enter classes for specific items
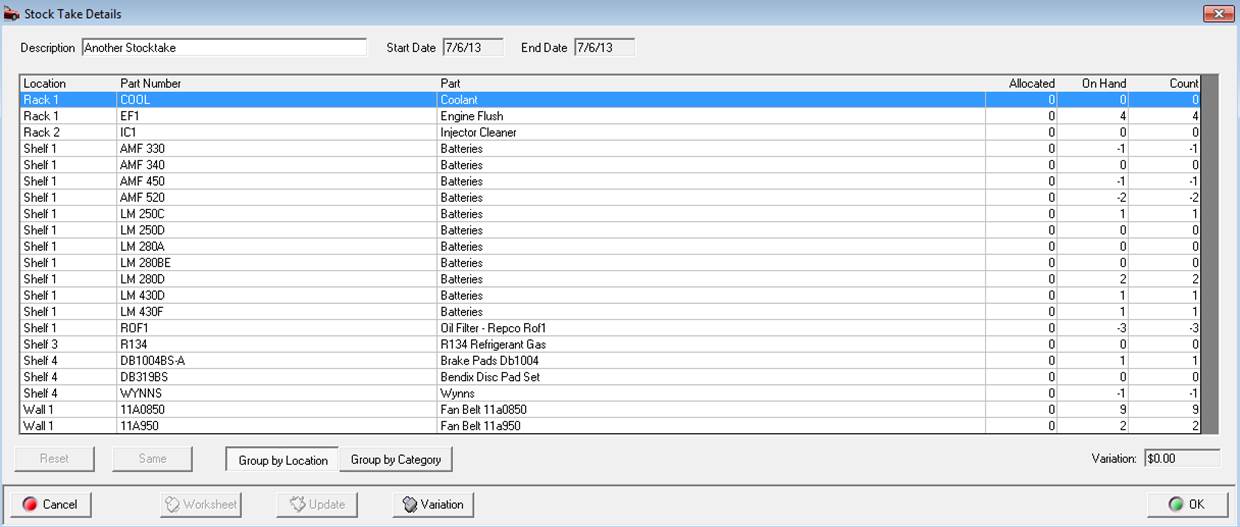
Location:
Allows
you to record the location of a particular item, ie: Shelf 1, Bin 44 etc.
Automation Premium allows for stock takes to be performed by item location.
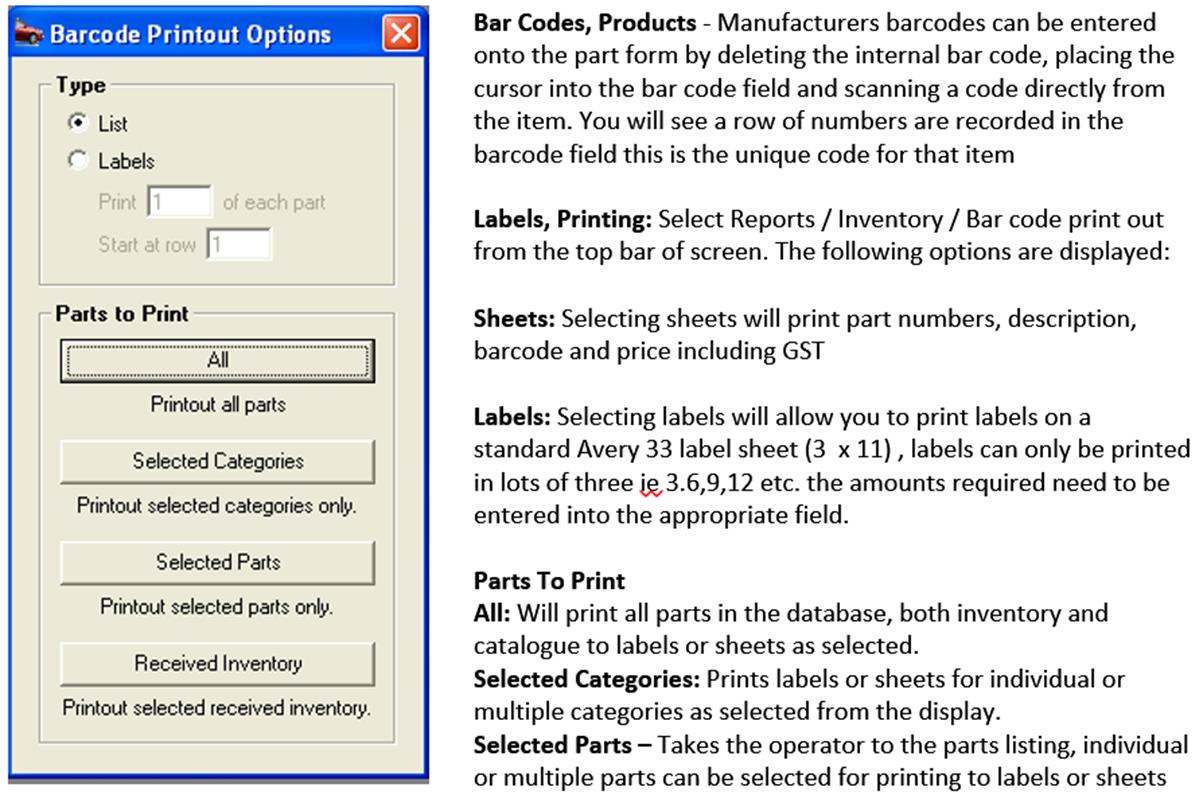
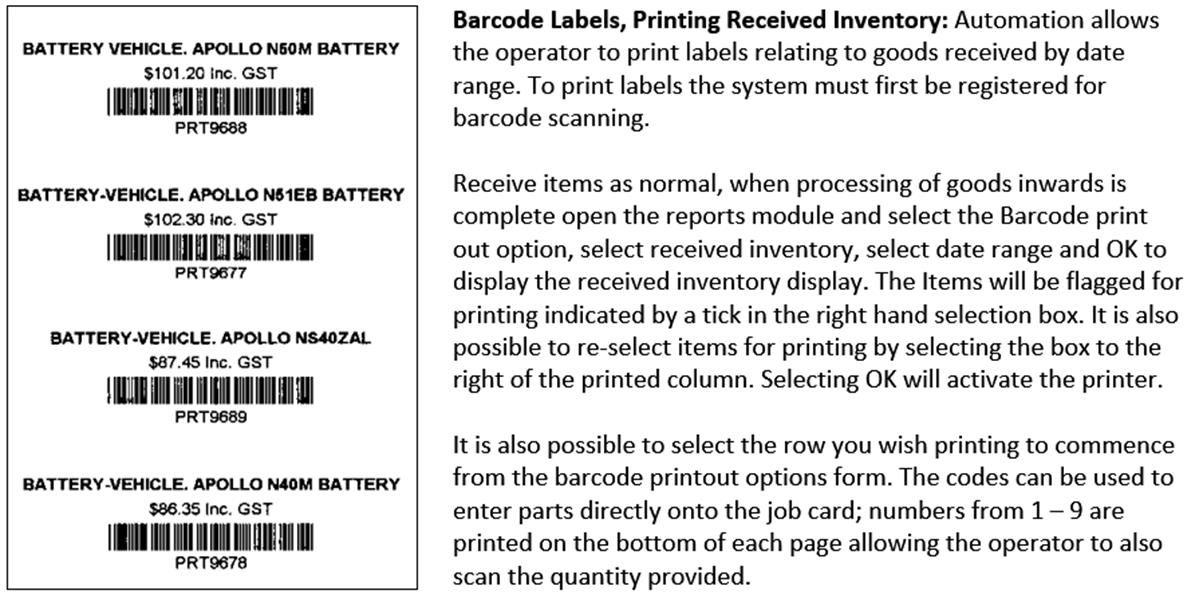
Bar
Code: Automation
generates a default bar code when the module is registered for use. Alternatively
manufacturer’s bar codes can be scanned directly into this field. Addition
of a hand scanner allows for items to be scanned directly onto the job
card or invoice.
Units:
Defaults
to each, however this is a free typing field and is easily customised
ie: Litre, pair etc.
Hidden:
Select
if you wish to no longer include the item in the parts list.
Cost:
What
you paid for the item (based on unit cost).
Price:
Standard,
wholesale, trade Automation allows you to record three price levels.
Tax:
Displays
default tax code, selecting the right hand button allow for entry of a
new tax code.
Included:
Default
is tax included this can be de-selected to present data excluding tax.
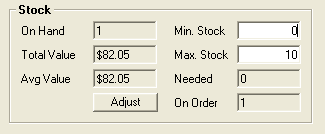
Min.
Stock: Enter
the minimum quantity you wish to carry on hand
Max.
Stock: Enter
the maximum quantity you wish to stock
Alternative
Part: If
you wish to use an alternate when this item is out of stock select the
button to the right of the alternative part field and select the item
from your parts list, click OK (F12) from the bottom of the parts display
and the part number is entered into the field.

Quantity
First Calculation: This
option t when set to true will divide the retail price into the total
for the line item and record the quantity sold rather than changing the
unit price of the item. Example: Part Retail $1.45 item is entered
onto an invoice operator changes the total value to $14.50 the quantity
sold = 10 which is displayed on the invoice / job form.
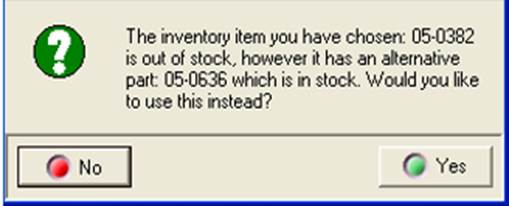
If
you apply an inventory item to a job or invoice that has an alternate
part attached and the selection is out of stock although there is stock
of the alternate part on hand a prompt will advise you to apply the alternate
part. Selecting no will paste the original selection to the job card /
invoice
When
creating a catalogue item ensure the type box contains the catalog selection,
when all fields are complete select OK (F12) from the bottom of the part
form to save.
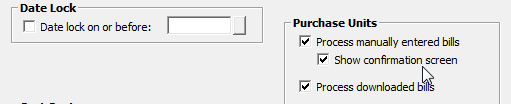
Unit
Purchases, Site Settings: To
enable this feature you need to access the switches in site settings.
Select File / Site Settings / Database Settings over on the right hand
side of the display you will see a purchase unit option, select process
manually entered bills, if you are using Repco invoice retrieval tick
process downloaded bills, if you wish to be prompted select the show confirmation
screen. Save your site settings with OK (F12).
Unit
Purchases, Part Form: once
your parameters are set in site setting you will need to open the part
form for the item you wish the calculation to apply to.

Move
down to the field below stock and enter you purchase units into the purchase
units field, save your changes with OK (F12).
Unit
Purchases, Applying The Formula: On
your supplier bill leave the quantity as 1 and change the total price
to the cost of the 1 unit (i.e. 205 litres oil) on completing the 1 x
unit purchase price a confirmation screen will display your reseller unit
value, selecting OK will now divide the unit price by the resell units
entering 205 units @ 2.73 plus tax (in this example), the profit checker
will still compare previous cost to new cost and display a percentage
change which you can accept or decline.
Parts
Listing, Displaying Hidden Parts: Point
at the show hidden tick box located at the bottom of the list and mouse
click. Only hidden parts will be displayed. If you wish to display a part
that has been previously hidden, highlight the item and select edit, point
at the hidden selection and mouse click save you selection by selecting
OK(F12).
Parts
Comments Tab:
A
text area where you can enter notes relating to the supplier, when text
is entered a note it icon is displayed at the end of the line in the supplier
listing clicking on the icon will display text entered in the field
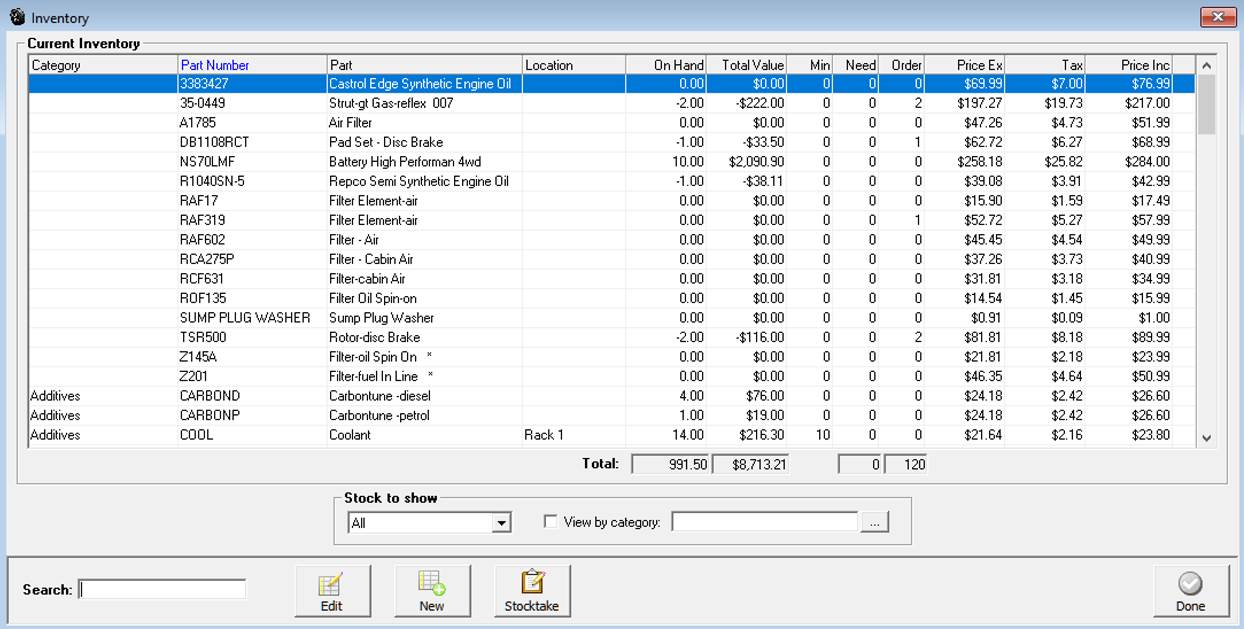
Inventory
Items, Viewing Listing:
Inventory
can be viewed from the parts listing or by selecting Activities / Inventory
from the top menu bar. The inventory screen provides filtering of records
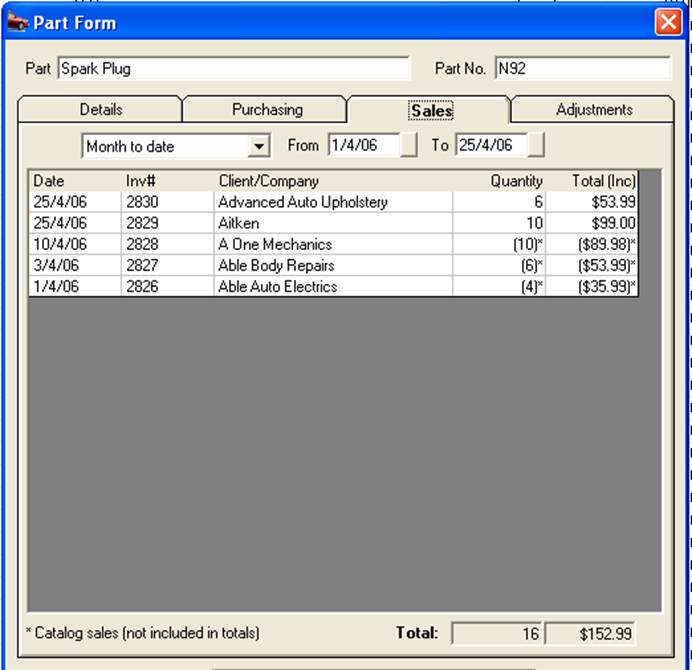
Inventory
History, Filtering: The
history display allows the operator to view transactions over a specified
date range or period. To view by period select the button to the right
of the field displaying month to date, point and click on the period required
from the drop down menu. The data may take a few seconds to load if there
are lots of transactions. Alternatively a specific date range
can be entered in the from / to date field at the top of the display.
Dollar values include tax. It is possible to drill down to the invoice
or job card from the sales list by pointing and clicking on the transaction.
To drill down to the supplier’s bill, click on the purchasing tab – point
and double click on the line open, the bill is in view. Note: Catalogue
items are not included in the sales totals; they are however displayed
in brackets flagged with an asterisk.
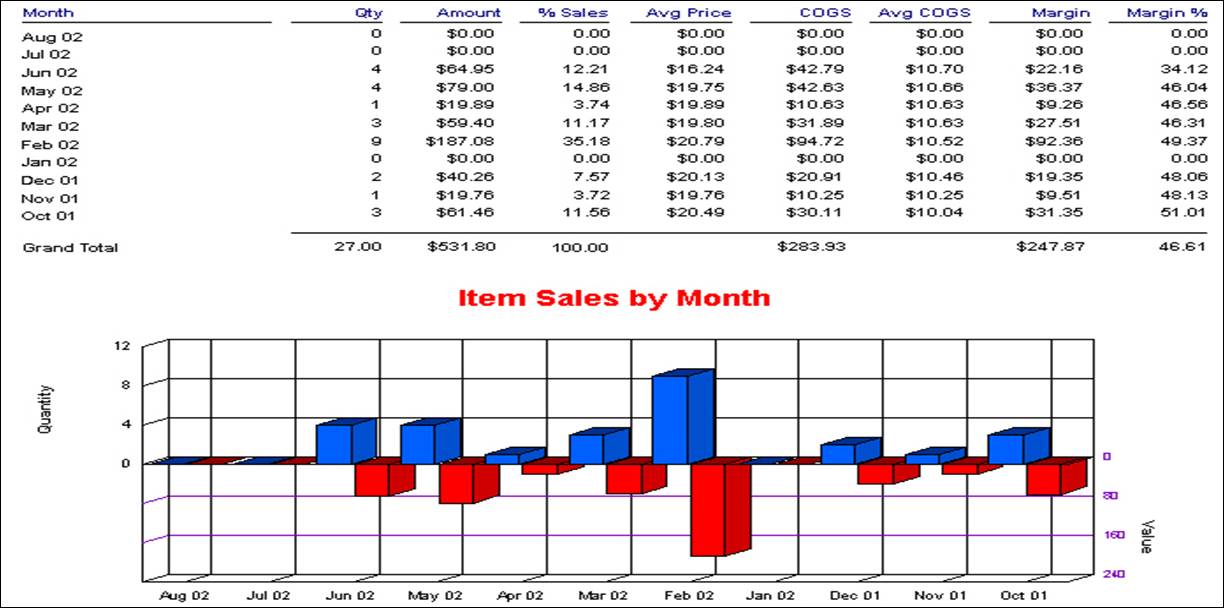
Inventory
History, Item Sales: From
the part form you can view the sales performance of an item over the past
12 months in both statistical and graphic formats. To run this report
select Item sales from the bottom of the part form.
 Selecting this icon from the bottom
of the form displays the last 12 months sales data
Selecting this icon from the bottom
of the form displays the last 12 months sales data
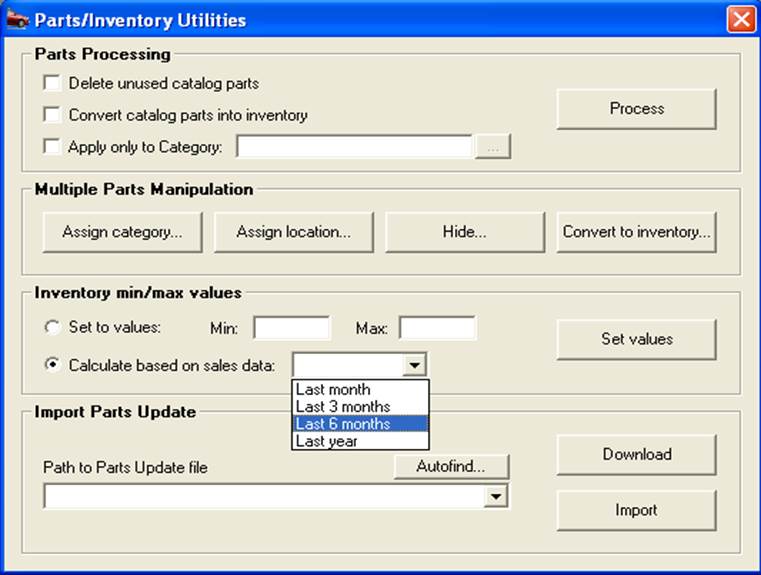
The
parts / inventory utility allows the operator to delete unwanted parts
from the listing and convert remaining parts to inventory either globally
or by category. There is also an option that allows for the
Import
of parts from either the working directory C:\Program Automation Client,
alternate drive or the internet.
Inventory
Utility, Parts Processing:
To
access the parts / inventory utility select Activities / Parts & Inventory
Utility from the top of the screen. The utility is now in view, from this
screen the operator can perform the following:
1) Delete
unused parts
2) Convert
non-inventory parts to inventory
3) Select
either function by category
4) Calculate
Minimums and maximum stock holdings
5) Import
a parts update file
Deleting
Unused Parts:
Point
and flag the delete unused parts box, to delete all unused parts select
process. If you only wish to delete specific items these can be selected
by flagging apply to category box and choosing a category. It is only
possible to choose one category per process, select OK from the category
display and select process from the utility screen. Note:
The data cannot be recovered; items already used will remain in the parts
listing
Inventory
Utility, Converting Parts to Inventory:
Point
and flag the convert non-inventory into inventory, to make all parts inventory
select process. If you only wish to add specific items these can be selected
by flagging the apply to category box and choosing a category. It is only
possible to choose one category per process, select OK from the category
display, and select process from the utility screen. Note:
Inventory and buy-ins cannot be deleted from the database, they can however
be hidden from view by selecting the hidden option on the part form.
Inventory
Utility, Apply Changes to a Category:
Allows the operator to apply any of the
above processes to one category only.
Assign
Category To Parts: This
utility allows the operator to assign multiple parts to a category. Select
assign category to parts, the category listing is in view. Select the
category you wish to assign, confirm with OK, from the parts listing highlight
the items you wish to assign and press the enter key or select OK to flag
items in the parts listing. Once all items to be assigned are flagged
select OK to complete the task a message box will confirm the process
has been successful.
Remove
Parts From Parts Pick List:
To
maintain data integrity Automation Premium does not allow for deletion
from the parts listing of items allocated to jobs. However this feature
allows the operator to no longer display unwanted items in the parts listing.
To remove items select the option and flag items for removal from the
parts listing and confirm with OK.
Assign
Location: Use this
option to assign stock locations to individual parts. To assign locations
to items select the option and flag single or multiple items from the
parts listing and confirm with OK.
Convert
To Inventory: Select
this option to convert catalogue items to inventory, single or multiple
items from the parts listing and confirm with OK
This
feature allows you to set the minimum and maximum quantities for inventory
items in 2 ways
1) Manually
–
Enter the minimum and maximum values to be applied to all inventory items
2) Calculate
Based On Sales – Select
the period from the drop down menu you wish to use to calculate the min
/ max quantities. Automation will calculate the average monthly sales
of each inventory item. The monthly sales volume will be entered into
the maximum field a corresponding value of 50% of the maximum value will
be placed into the minimum field.
To
re-calculate the values select the set values option from the Parts /
Inventory Utility
Download:
This
function allows for updating of the parts file from the Microbase FTP
server, the price file directory is set in the control variables. This
setting will vary between organisations and individual users. To update
the price file via Internet select download, from the parts update screen
select download now. You will now be connected to the server via your
Internet server; the required file will be imported into your program
updating your price file.
Import:
Parts
listings can be imported via the parts update function. Copy the Parts.Mdb
file into the working directory or a floppy disk, select auto find. The
file name and location is displayed in the path to parts update file field,
select import to append the parts file.
The
pricing utility allows you to change prices by category or sub category
for catalogue, inventory and services. Options allow
for the input of three price point changes standard, trade and wholesale.
Trade and wholesale can be based on either of the other price points or
cost price of the item.
Essentially
using the pricing utility will save time when updating price points and
allows the operator to determine trade and wholesale rates by using any
of the three prices already recorded. Price changes can be entered as
either a percentage or dollar amount.
Price
Utility, Accessing:
To
access the utility select Activities / Pricing utility from the top menu
bar. The display comprises of two sections:
1) Prices
to adjust
2) Apply
to
Price
Utility, Applying price points by dollar value:
To
change prices by a dollar value select the button to the right hand side
of the % field from the pick list select the $ sign, this will now be
displayed in the box to the left. Repeat this for each price point you
wish to change. Enter the values into the second column, select the price
point by flagging adjust Standard, adjust Trade and adjust wholesale.
Price
Utility, Applying price points by percentage:
At
the pricing utility display enter the percentage increase into the first
column, indicate which price points you wish to change. Select less than
/ more than from the pick lists in the third column, next select the value
on which the price changes will apply in the fourth column. Finally you
need to indicate which class or class / category the price changes are
to be applied to. You can select a category / sub category from the prick
list at the bottom of the form. If you are changing prices for a specific
category flag parts, to apply a global change to all parts select parts
only and not category. The same formula applies to services. To execute
select the adjust button on the bottom left hand side of the display.
Price
Utility, Applying Prices Based on Cost: The
utility also allows you to calculate retail, wholesale and trade-selling
prices based on cost. To adjust prices for a category or class select
cost price from the drop down menu. Enter the markup percentage (excluding
tax) or dollar value into each price field, select the category and /
or class and click on the adjust button.
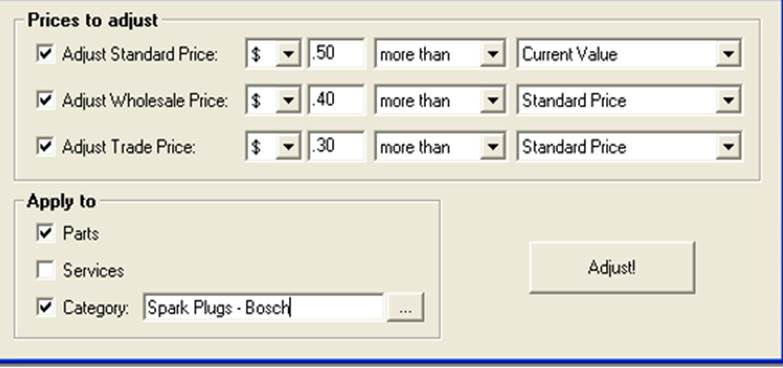
Example
1.0
Price
Point Changes:Standard,
Trade, Wholesale
Amount:
.50
Standard, .40 Trade, .30 Wholesale
Increase
/ Decrease:Increase
Changes
based on:Standard
– Current value / Trade and wholesale on standard price
Applied
to: Parts,
spark plugs / Bosch spark plugs
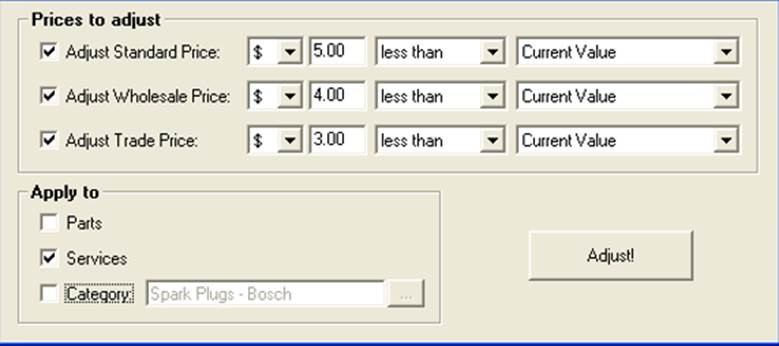
Price
Point Changes:Standard,
Trade, Wholesale
Amount:
$5.00
Standard, $4.00 Trade, $3.00 Wholesale
Increase
/ Decrease:Decrease
Changes
based on:Standard,
Trade and wholesale
Applied
to: All
services
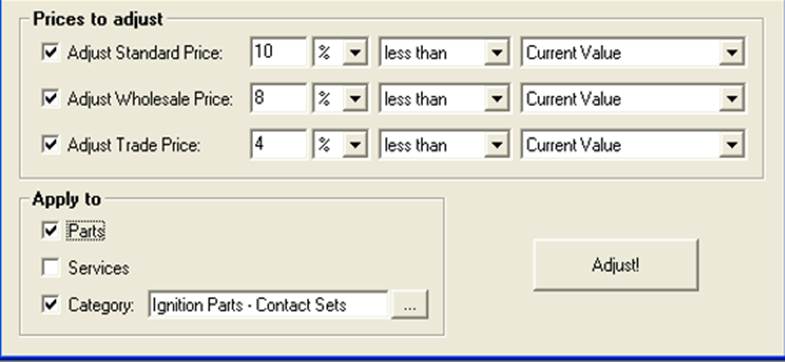
Example
3.0
Price
Point Changes:Standard,
Trade, Wholesale
Amount:
10%
Standard, 8% Trade, 4% Wholesale
Increase
/ Decrease:Decrease
Changes
based on:Standard
– Current value, Trade and wholesale – Standard Price
Applied
to: Parts
– Category Ignition parts / Contact sets
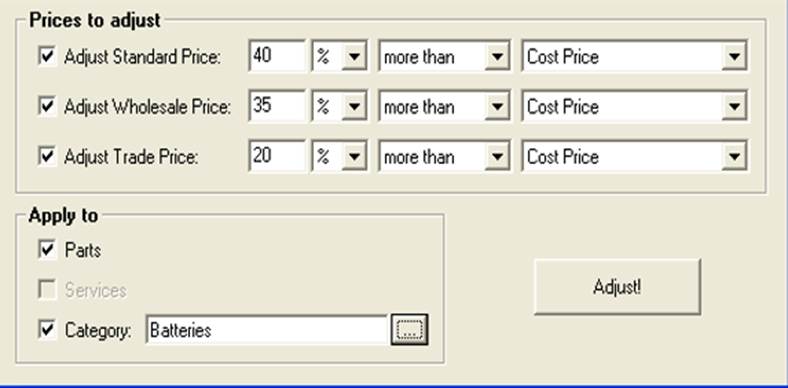
Example
4.0
Price
Point Changes:Standard,
Trade, Wholesale
Amount:
40%
Standard, 35% Wholesale, 20% Trade
Increase
/ Decrease:Increase
Changes
based on: Cost price
of items assigned to the batteries category.
Applied
to: Batteries
Price
Points, Viewing: Price
points can be viewed from the part or service form, it is also possible
to edit individual parts or services from these displays.
Overview:
Automation
allows the user to rebuild an item from current inventory or as a buy-in,
the rebuilt item is then held in stock for sale in the same way as inventory.
Labour can be added to the rebuilt item, the cost of the item is the total
value of labour (at retail rate) plus the cost of the items. Gross profit
on these items is calculated by subtracting the cost (parts & labour)
from the sell price. Rebuilt items will be displayed in the inventory
valuation report in the same way as normal inventory. Parts and labour
used to create a rebuilt item can be copied to a new form if required.
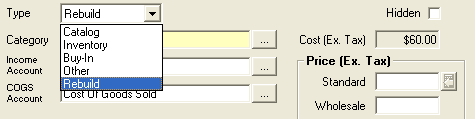
Rebuilt
Parts, Creating:
To create a rebuilt part select the parts listing, from the bottom of
the display select new (Insert) from the type field drop down menu select
rebuild
The
format of the part form will now change to allow for the addition of labour
and inventory items
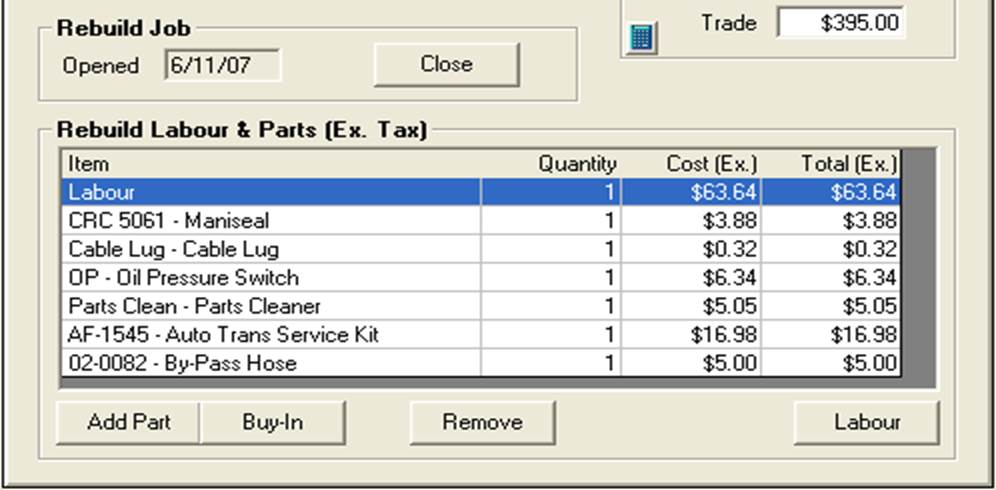
To
add labour point and click in the quantity field and change the value,
you can also edit the hourly charge by clicking in the cost field and
overtyping the standard rate displayed. It is also possible to allocate
the charged labour to a single or multiple technicians by selecting the
labour option located under the rebuild labour & parts section of
the part form. Select the add option to add inventory items to the rebuild.
Note: Only inventory items can be added to a rebuild, if
you are buying parts in specifically for a rebuild item purchase them
as inventory then add them to the rebuild.
Rebuilds
can be held open the same as charge and vehicle invoices, access to open
rebuilds is available from both the diary (in week view) and the sales
screen. You can also open a rebuild job from the parts listing by pointing
and clicking on the line item.

The
quantity of parts added to rebuilds are recorded in the allocation column
of the parts listing, when a rebuild item is completed it must be closed
using the close option located above the labour and parts grid of the
part form. When a rebuild job is closed the inventory items are subtracted
from the stock on hand.
The
cost of a rebuilt item is determined by the cost of the inventory items
and labour value added to the part. The rebuild item can be priced in
the same way as inventory items, the gross profit on an item is calculated
by subtracting the cost from the retail / wholesale or trade sell excluding
GST. To close a rebuild select the close option from the rebuild form.
Rebuilds,
Re-Opening and deleting:
Rebuilt parts that require editing can be re-opened the same as job cards,
to reopen a rebuilt job item go to the part form click on re-open, confirm
your action by selecting yes from the warning message. Edit the form as
required then re-close by selecting the close option.

To
delete a rebuild the job must be reopened, highlight the item from the
parts listing; select the delete option at the bottom of the list. To
view rebuilds in the parts listing point and click on the rebuild option
at the bottom of the list

Rebuilds,
Copying Parts & Labour:
To
copy a rebuild “kit” from a previous job perform the following:
1) Open
a new rebuild item
2) Select
the copy option from the bottom menu bar
3) From
the list of rebuilds highlight the item you wish to copy from
4) Select
the OK (F12) button from the bottom of the parts listing
5) The
parts and labour from the highlighted item have been copied to the new
rebuild

Use
the copy option to copy parts and labour between rebuilds
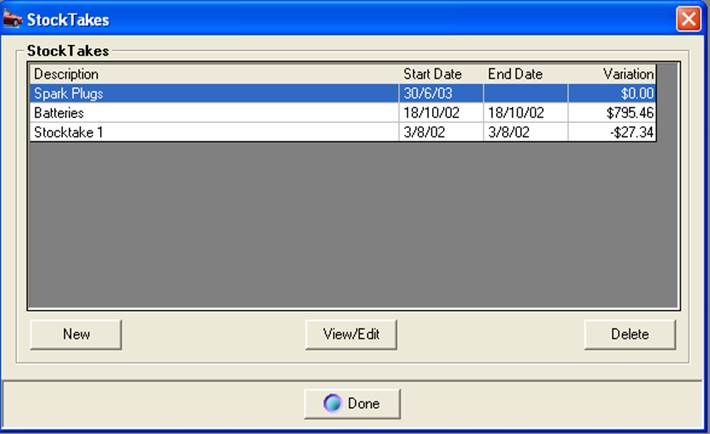
Inventory
& Stock Take Reports
Reports,
Inventory Accessing:
Select
Reports / Inventory from the top menu bar, available reports include:
Inventory
Valuation Summary
Inventory
Stock Status
Reorder
Report
Price
List
Reports,
Inventory Valuation Summary: This
report displays stock on hand by category, if you wish to show all categories
select all, to select a single or multiple categories choose selective.
Selective allows you to tick the categories required; all will print all
categories. The information contained in this report gives you a detailed
view of stock on hand with sub totals for each category choice and a grand
total of all columns.
Reports,
Inventory Stock Status: Allows
you to view quantities of stock on hand plus minimum stocks, quantities
required for jobs and items on order. The last supplier is also displayed
in the preferred supplier column.
Reorder
Report:
Provides
a list of items by supplier that are below minimum, suggesting quantities
that bring levels back up to maximum.
Price
List: Prints
a price list of parts by category including Tax if applicable.
Overview:
Automation
allows you to check the stock of a single item on hand at other nominated
sites (Remote Group) directly from the local parts listing. For this feature
to work both local and remote machines must be connected to the internet
(Broadband Preferred). All sites in the group must have performed a replication
to the Microbase server, and finally the option must be selected in settings
/ Configuration.
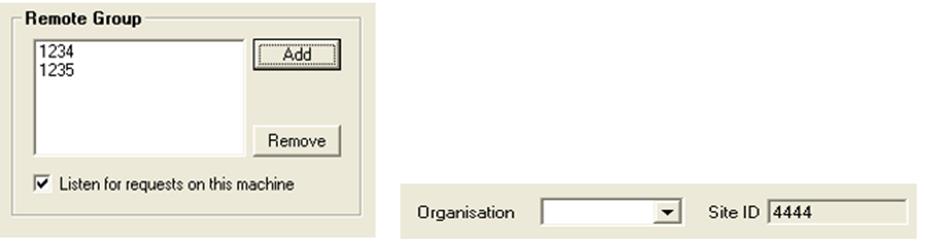
Set-Up:
1.
Ensure your site is set-up with a unique identifier – Microbase personnel
will perform this for you on installation, you can check your site id.
In File / Settings.
2. To
set-up the sites you wish to communicate with select add from the remote
group section of the form. Enter the unique site id, finally ensure that
one of the machines (if you are on a network) has the listen for requests
option selected. The machine MUST have access to the internet.
If you wish to remove a location highlight the site id. And click on remove
3.
Save the new settings with OK (F12)
Performing
A Parts Inquiry
Parts
inquiries are performed from the parts listing, select the item you wish
to run an inquiry for and mouse click on the inquiry button located at
the bottom of the parts listing.

Your
site will now communicate via your internet connection with the other
sites in your group and display the stock available. If a site in the
group is not connected to the internet the status field will display an
off line message.
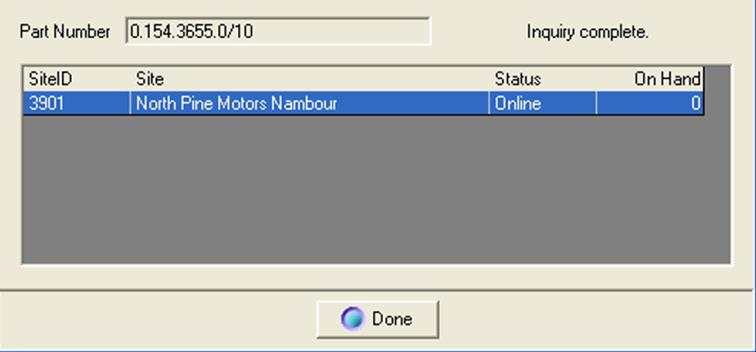
The
results of your query will be returned within 5 – 10 seconds (depending
on the speed of your internet connection) If you are querying multiple
locations the quantities on hand will be listed for each site. To cancel
the task select done from the bottom of the part inquiry form
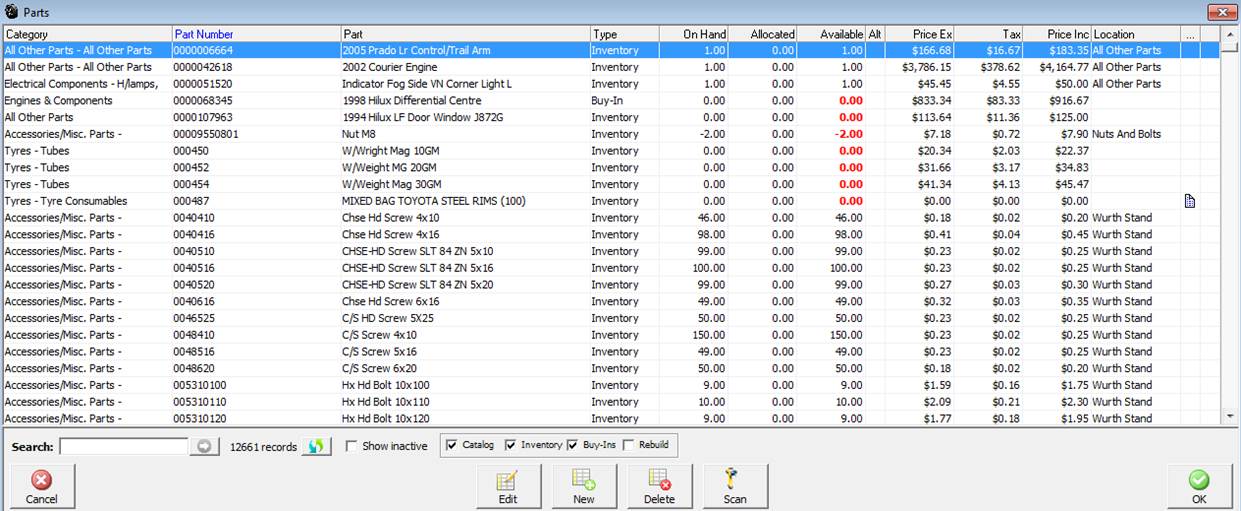
 Select
this button from the top of the screen to view the parts listing, alternatively
select Lists/Parts. The parts listing can also be opened from the job
card, invoice or service form. The display includes an allocated and available
field, the values displayed relate to inventory items only. Allocated
quantities record the total items allocated to open jobs, invoices or
cash sales.
Select
this button from the top of the screen to view the parts listing, alternatively
select Lists/Parts. The parts listing can also be opened from the job
card, invoice or service form. The display includes an allocated and available
field, the values displayed relate to inventory items only. Allocated
quantities record the total items allocated to open jobs, invoices or
cash sales.