Diary, Overview: The Automation diary allows you to view job status and technician labour allocations on daily or seven day basis. Information includes customer name, job status, start and finish times. For easy reference the job status field is colour coded. The diary can be used to log current jobs or future bookings; the 7 day view also displays a grid showing all invoices and cash sales. To view job, invoice or labour allocation details the operator simply mouse clicks on the record displayed.
Diary, Opening: To open the diary screen select the diary icon from the top menu bar
The diary is accessible from all screens that display the top menu bar
The diary screen can be viewed in 3 modes:
Jobs & bookings – 1 day view
Jobs, bookings and open invoices – 7 day job view
Technician labour allocation – 1 day view
Diary, View Selection: There are 6 control buttons on the top left hand bar of the diary screen that allow you to change the view.
Diary, change a view: point at the required selection and left-hand mouse click
1 = 1 day view
2 = 7 day jobs & bookings view including open invoices
3 = Jobs & Bookings
4 = Technicians Time Allocations / Clocked technicians times
5 = Task Manager
Select whether you wish to view jobs or technicians allocations using button 3 for jobs, bookings & invoices or button 4 to view labour allocations, button 5 displays the clocked times, 6 accesses the task manager. Selecting button 1 displays one day selecting button 2 shows 7 days and open invoices in all modes.
You can also choose to view by job status plus loan car status by using the checkboxes in the appropriate tables. To the right it is possible to only view jobs allocated to a specified service adviser, clicking on the button to the right of this option will allow you to select from a drop down list.
Diary, Changing Days: To the right of the view selection are your date selection controls, you can select a date using the button to the right of the date field. From the calendar point and double click on the date required your selection will be entered into this field with the diary screen displaying records for the chosen date. It is also possible to manually enter a date by highlighting the current day field, selecting delete then typing the date you wish to move to in a DD/MM/YY format.

Positioned to the right of the date field are the date selection buttons
1 = Back one week
2 = Back one day
3 = Always selects today
4 = Forward one day
5 = Forward one week
Refresh Option: The diary screen is refreshed each time the screen is closed and re-opened if you wish to refresh the screen without closing select the refresh option the to the right of the data selection. Select option flagged 6 to refresh the diary screen
Multiple selections will move the date forward or backwards a week or a day at a time depending on the control in use.
Date & Time Display-The current time and date is displayed in the top right hand corner of the diary screen
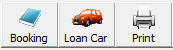
Booking Function: To the right of the date controls is the booking selection, to open the booking form point and mouse click. To enter a booking and create a job card select this button from the diary screen

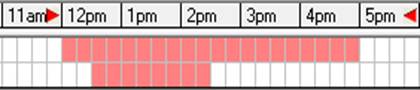
Jobs & Bookings, Day View: Records client and vehicle information representing the booking, work in progress or completed job by a time line in cells representing 15 minute time slots from 6.00am – 8.00pm. The time line changes colour according to job status.

If you wish to filter jobs by time point and left hand mouse click on the header of the start time cell, point and right hand mouse click on the finish time cell header – only jobs within the selected time frame are displayed in the diary list.
Colour |
Job Status |
When a job is closed the time line remains on the diary screen for the time the work in progress time although the colour will change to green indicating work completed. Work in progress moves forward to the next day and is indicated by a pink or red bar depending on job status. |
Blue |
Booking only |
|
Light Red |
Work in progress within allocated time |
|
Dark Red |
Work in progress outside of allocated time |
|
Green |
Work completed |
|
Brown |
Loan car booking |
Diary, Accessing Records from the Grid: It is possible to open records by clicking in specific fields from the diary screen’s day view – pointing and double mouse clicking will display the following:
Area |
Form Displayed |
|
The diary screen allows you to record when a vehicle has been delivered back to the client. Point and mouse click in the Col (collected) column a green tick is displayed. when a vehicle has been flagged as collected hovering the cursor over the entry will display the time the entry was made. Note: It is only possible to tick closed job records. |
Client Name |
Client Form |
||
Vehicle Registration |
Vehicle Form |
||
Make & Model |
Vehicle Form |
||
Job # |
Job Card |
||
Booking Line |
Booking Form |
en forms are accessed via the diary grid they can be
edited in the same way as if they were opened from the client or vehicle listing. To display changes made to these records you will need to refresh the diary screen (change screens and then re-open the diary screen). To display services simply point at the service field
Jobs & Bookings, Week View: In this mode the operator can view 7 days of jobs and bookings plus open invoices are displayed in the eighth grid.

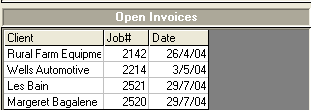
Invoice Grid Week View: The eighth grid displays open invoices and cash sales information includes client, job number and the opening date. Once an invoice or cash sale is closed it will automatically be removed from the open invoice display
View an invoice:Point at the required record and left hand mouse click.
Deleting Bookings: It is possible to delete bookings from the diary screen in day view only: highlight the record and select the delete button. Note: You can only delete bookings it is not possible to delete work in progress or closed jobs from the diary screen.
Booking Sheets, Printing: It is possible to print single or multiple booking sheets, information includes client, vehicle details, service history, and vehicle availability including work authorisation. Booking sheets are printed from the sales screen. Create the booking in the normal way, select the sales icon from the top of the screen, use the drop down menu at the top of form to select booking. Click in the check box to select records you wish to print booking sheets for. To initiate the print run select print from the bottom of the sales screen.

To print the job / booking status for the day select the print function located at the top of the diary display.
Bookings, Creating: Bookings can be created from three areas: Diary Screen, Client Listing and Vehicle Listing.
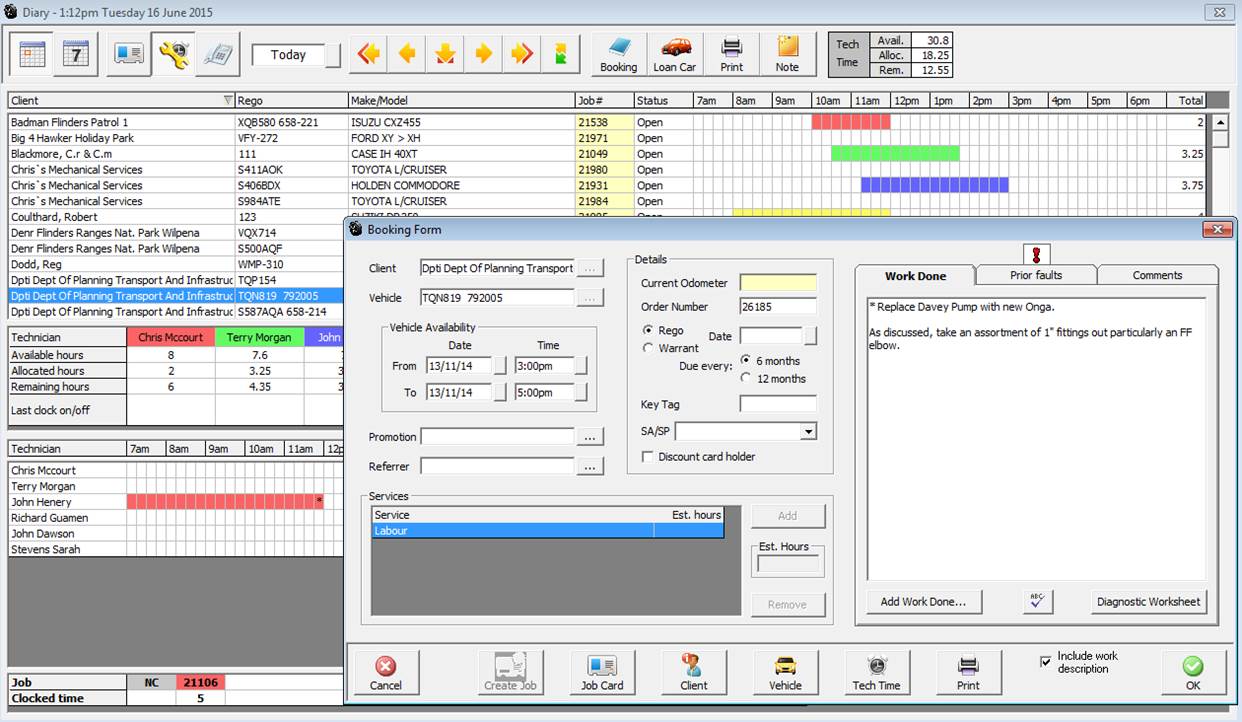
Selection will open the booking form, which contains information on the client, vehicle, services required and the period of availability. It is also possible to allocate technicians to a job from the booking form. To create bookings follow these steps:
1) Select create a booking either by client or vehicle.
2) If the client does not exist open a client form by selecting new and enter the details.
3) Select the vehicle or enter details if the client is new or if you are creating a booking for an additional vehicle
4) Select the service or services required
5) Update the odometer if necessary – vehicles with a service history
6) Select the start and finish times
7) Enter all other details as required ie: order number, WOF or registration check
8) Work to be done if applicable
9) Technicians time allocation
10) OK (F12) to save the booking on the diary
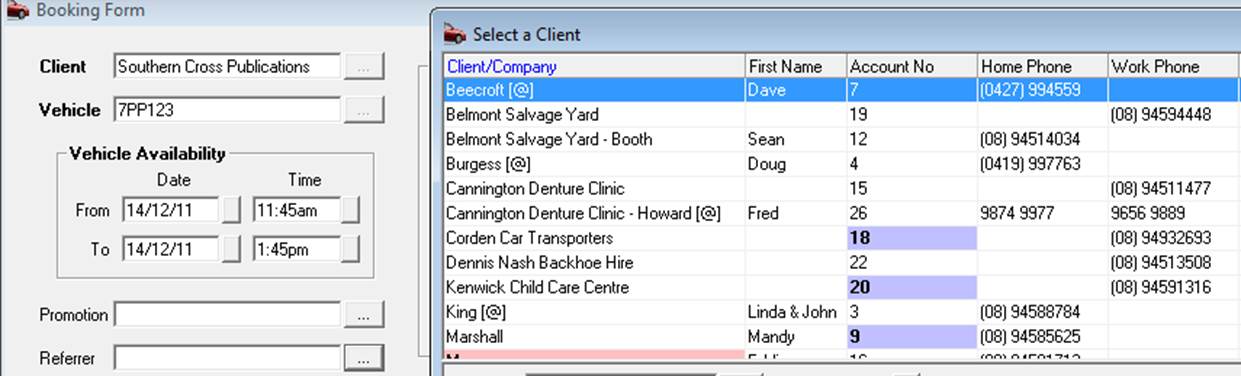
Selecting The Client: Type the customer or company name into the client field, click on the client field button you will now see the client is highlighted in the client listing. If the client does not exist click on insert new and add the details, remember you must click on OK to save any new information.
Vehicle
Selecting The Vehicle: Select the vehicle from the list. If no vehicles exist or you wish to add a new vehicle select insert – New and enter vehicle details as previously described. Select the vehicle you wish to work on by moving the cursor with the arrow keys or clicking. Select OK (F12) – You are now prompted to select a service from the listing.
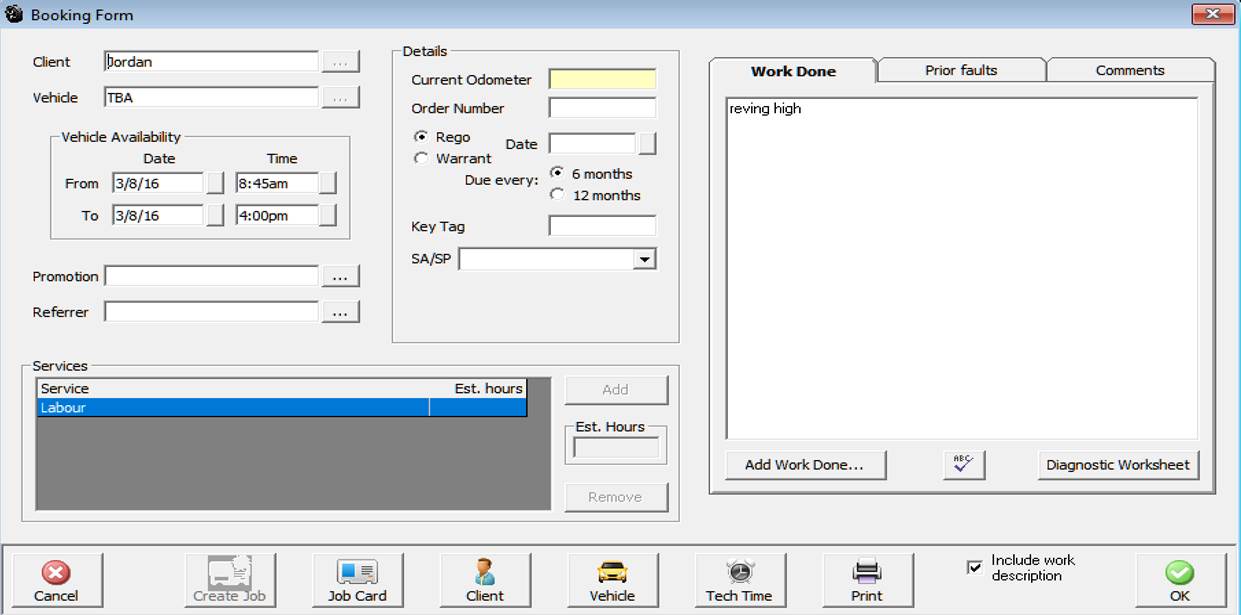
Vehicle Faults:If vehicle faults were reported on the prior invoice they will display in the booking form with a red exclamation mark above the tab header
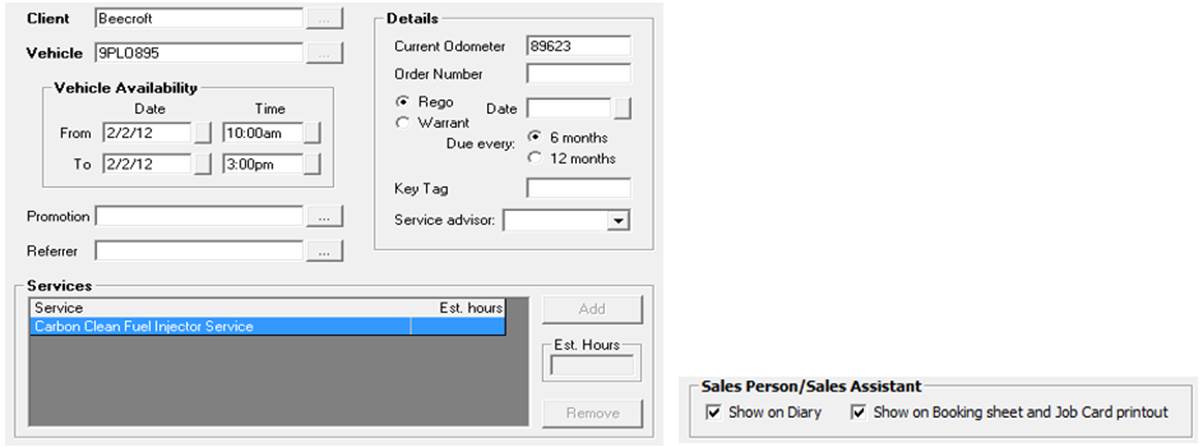
Service Advisor:Select the button to the right of the field, from the drop down list of employees point and double click on the entry. The record flows through to the job card. You can also show the service advisor on the diary screen, to create the column go to File / Site Settings / Local select the show on diary under the Sales Person / Sales Assistance heading. If you wish to display the service advisor on the job card and booking sheet printout select the option.
Service Advisor, Adding: To record the service advisor click on the down arrow symbol to the right of the service advisor field, highlight the record and double click. The service advisor details are now displayed. Note that the service advisor must be recorded in the employee list.
Work Descriptions:The booking form defaults to print work descriptions, if work descriptions are not required on your hard copy point and click on the check box next to include work descriptions.
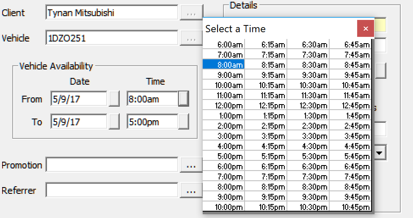
Vehicle Availability: The diary represents in graphical form time the vehicle is actually available. The time line is blue when entered as a booking, changing to light red once a job card has been created indicating work is in progress within the original allocated time block. If this time is exceeded the time bar will change every 15 minutes displaying in bright red indicating the nominated time has been exceeded. To use this function select start using the pick list select a start date and time, repeat the process to record a finish date and time.
Allocating Technicians Time: Select Tech Time option enter the technician’s name, if you wish to set up a new technician select the field button to view the list. Select Insert – New and complete the fields select OK to save. Allocate time using the same method as vehicle availability; the chosen time is represented by a blue line in the Technician Time Allocation field at the bottom of the diary screen.
Order Number: Enter orders number if required, this will be printed on the invoice and statement.
Key Tag: This is a free typing reference field that can be used to record the key tag number issued to a vehicle, duplicate entries are not allowed on open jobs.
Warrant Registration Due: Select the month by clicking on the selection button to the right of the month field, next select the year using the same process.
Odometer: Update the odometer reading (not necessary if this is a new vehicle)
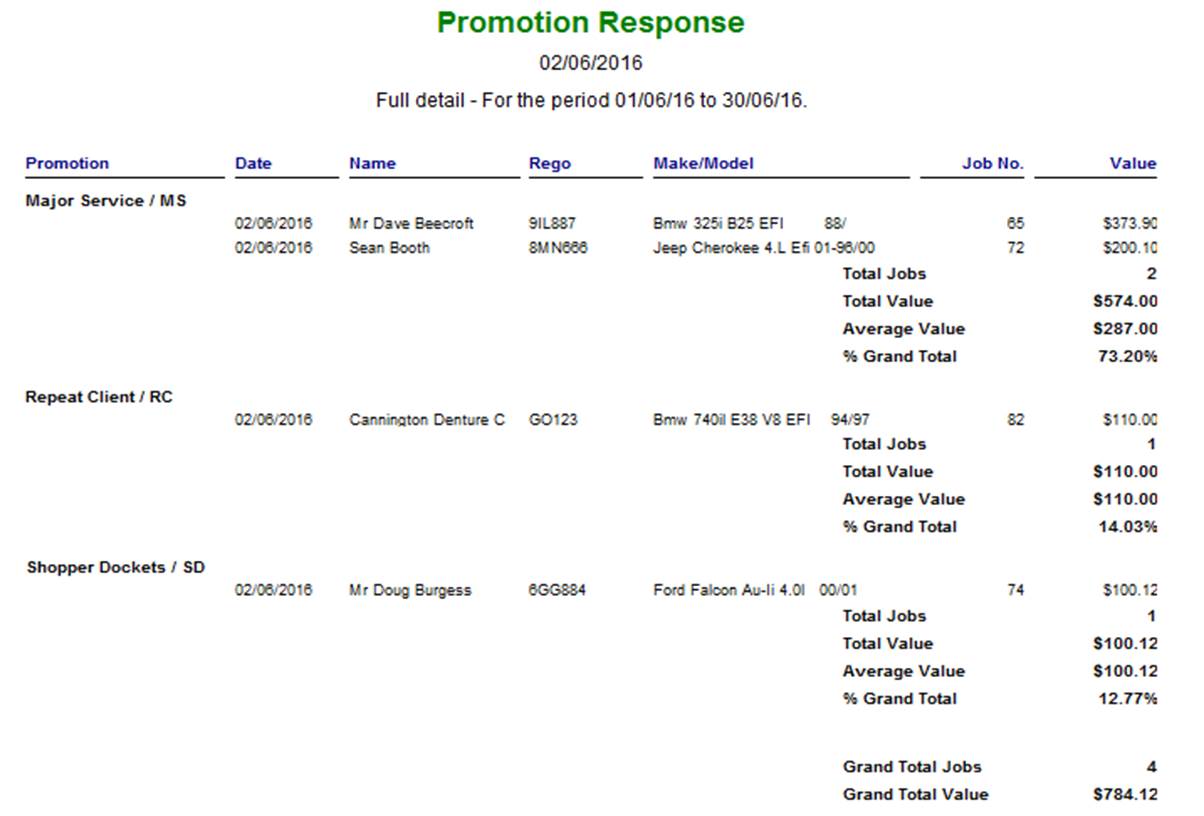
Reporting, Promotion: To report on how clients came to hear of you select the button to the right of the field, select the promotion type from the drop down menu. Select the retain promotion in general settings if you wish to retain the promotion for the next booking.
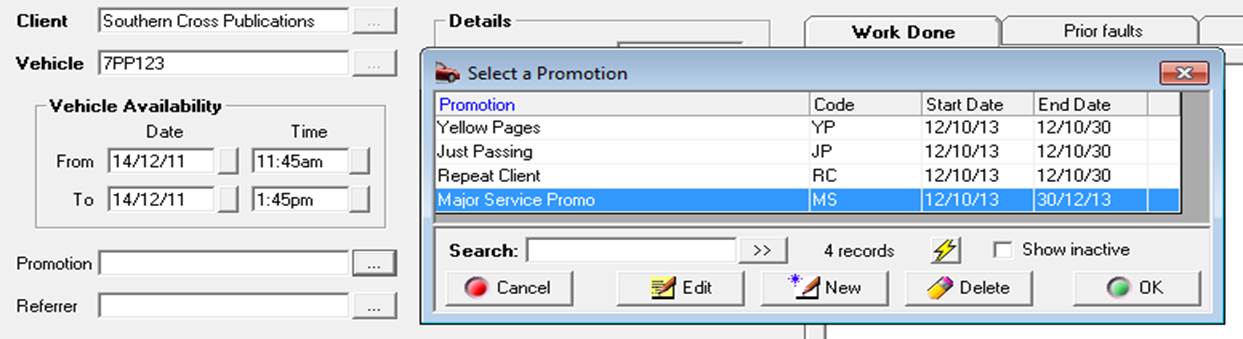
Retain Previous Promotions, Settings
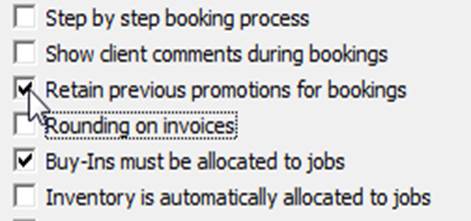
Automation allows for the retention of the initial promotion selection, using this option will allow you to track the total sales achieved from any selected promotion over a given period of time regardless of what service is performed for the client. The promotions response report has expanded filters that allow you to view the performance of single or multiple services in detail or summary format.
To turn on the retention feature open file / site settings / general settings you will see a new selection titled Retain Previous Promotions for Bookings select the box to the right, a tick is displayed.
Referrer: To select a referrer, point and double click on the button to the right of the field, select the referrer from the client list and double click on the record.
Work Done: This field allows you to make notes on work that is required; any text entered here will be inserted into the work done section of the job card when it is created. Note: that you can also access the work done comments pick list and insert line items.
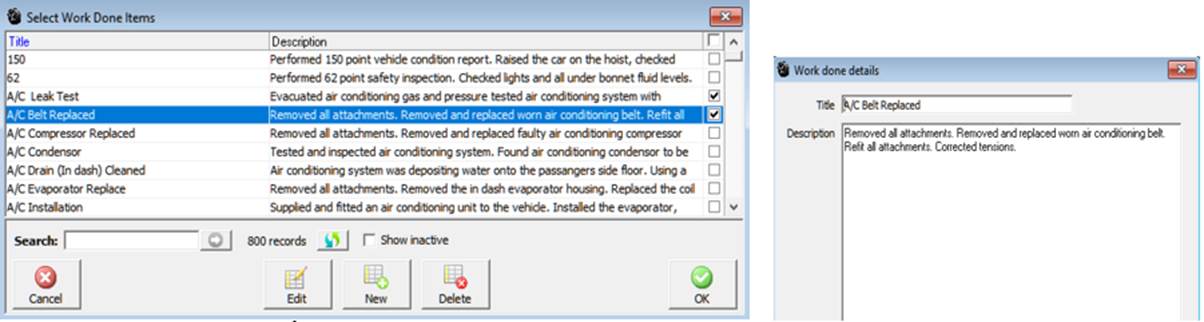
Work Done, Text Selection: This Automation feature allows the operator to store commonly used work description for retrieval by code. The function will dramatically reduce the amount of time it takes to enter text into this area. A list of all work descriptions can be printed from the reports module by selecting work done list from the other reports section.
Work Done, Spell Checker: Automation has an in-built spell check function for the work text field. To check and correct spelling first type into the text field, next select the ABC button located on the bottom right of each field. If there is a spelling mistake a window is displayed listing suggested replacements
Bookings, Entering Work Descriptions – Select work to be done from the booking form the list is now displayed, select new from the bottom of the data window. A work done details form allows you to enter a code and the required lines of text. Codes can be alpha or numeric or a combination of both. To save the new text, select OK (F12).
Work descriptions can also be added from the diary screen by selecting the pick lists from the top menu bar of the diary screen point and click on work descriptions this will open the text field. Alternatively pressing F12 from the diary screen will take the operator directly to the work description listing.
Bookings, Selecting work descriptions: type the text or arrow to the required entry, your cursor will now highlight the text line to paste this onto the booking form press enter or mouse click on the line a tick will appear in the box to the right.
Multiple entries can be made from this screen. If a mistake is made and you wish to un-flag an entry, point at the line and mouse click or arrow up / down to place your cursor on the line and press enter. The tick is now no longer displayed indicting the line will not be pasted to the booking form and ultimately to the job card.
Bookings, Comments: It is possible to record special instructions in the comments section of the booking form. Point and click on the comments tab, type your notes into the comments field. Jobs with notes are identified in the diary screen with a note it icon. Pointing and double clicking on the icon opens the comments field.

Bookings, Saving: Check all information is correct then select OK (F12) from the booking form. A blue bar in the Jobs and bookings section now represents the booking with any time allocated to a technician showing in the bottom section also in blue.
Bookings, Viewing: Double click on the line item or press enter all information entered is now visible.
Bookings, Editing: Open the booking by pointing at the entry on the diary screen, select the field you wish to edit and save. If the odometer has been entered incorrectly editing the value from the booking form will change the entry on the job card header.
Bookings, Printing: It is possible to print a booking form by selecting the print option at the bottom of the form. Booking forms can be printed from a booking or an open job.

Bookings, Viewing Client & Vehicle Details: You can view and edit client and vehicle details from the booking form by selecting the client or vehicle buttons on the right hand side of the form. To view a transaction histories select Client and click on the history tab.
Booking Sheets, Printing: It is possible to print single or multiple booking sheets, information includes client, vehicle details, service history, and vehicle availability plus work authorisation. Booking sheets are printed from the sales screen. Create the booking in the normal way, select the sales icon from the top of the screen, and use the drop down menu at the top of form to select a booking. Click in the check box to select records you wish to print booking sheets for. To initiate the print run select print from the bottom of the sales screen.
Bookings, Step through Process: It is possible to select a step through process to manage bookings. To activate this function you will need to access File / Settings / Program Options and select the step by step booking process option

Save your setting by selecting OK (F12). The step through process is now activated when selecting the booking option from the diary screen.
Sort Options:From the diary screen, jobs can be sorted by client name, vehicle registration or job number, to sort by either of these fields point and double click on the column header record.
Short Cut Keys: Use C to select clients or V when creating a booking via the registration number.
Bookings, Estimates: If the vehicle has any outstanding estimates a selection is displayed, selecting one of these options allows you to convert the estimate into a booking or directly into a job.
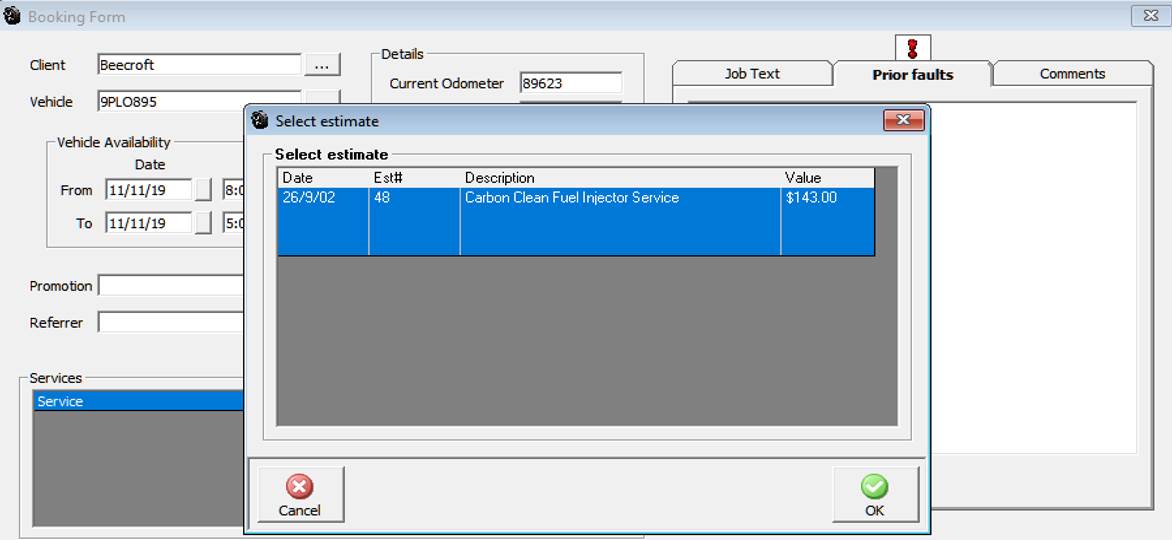
To convert the estimate simply highlight the entry from the list and select OK (F12) you will then be given an option to convert to either a booking or a job card.
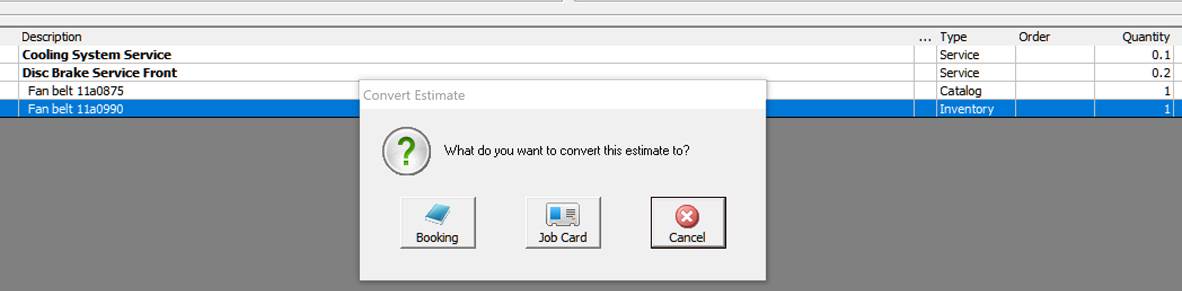
Point and double click on your selection and proceed to either create a booing or a job card directly.
Bookings, Buy-Ins: Automation allows you to allocate parts purchased as buy-ins to a booking, now when you delete a booking which has buy-ins allocated a prompt will list the supplier invoices presenting the opportunity to raise credits or change the part type to inventory.
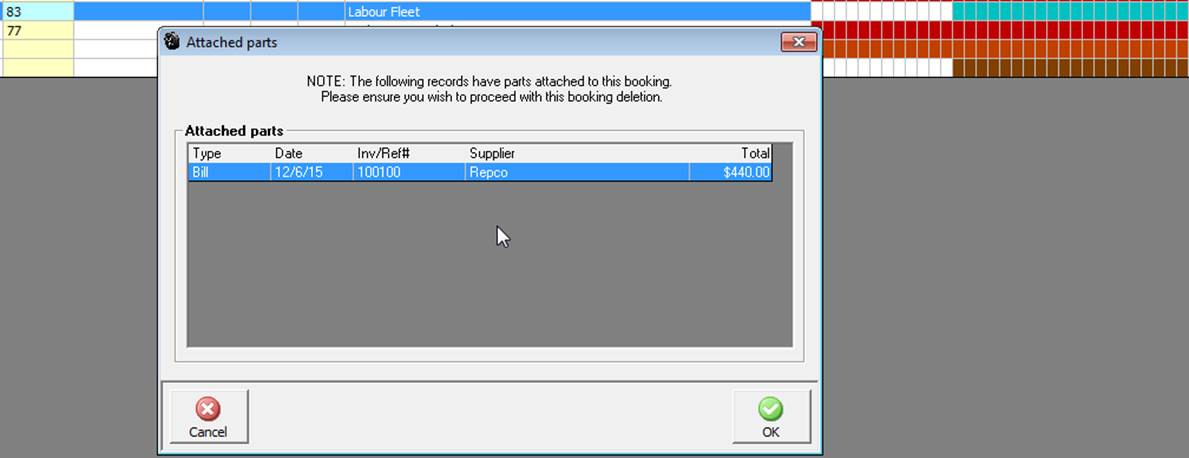
To access the original bill simply, point and double click on the line item, if you wish to raise a credit select the radio button at the top of form, to place the item into inventory, open the part form. Click on the type converter to the right of the type field.
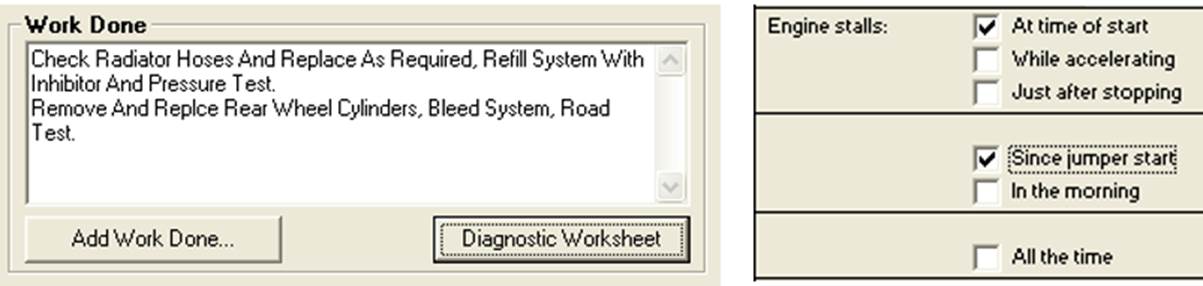
Diagnostic Worksheet: The diagnostic worksheet is formatted so the service adviser can record specific problems a client maybe experiencing, the report can then be printed and attached to the job card for the technicians reference.
Diagnostic Worksheet, Accessing & Printing: The diagnostic worksheet form can be accessed from the option displayed under the work to be done section of the booking form. To print the diagnostic worksheets select the print button at the bottom of the display.
Jobs, On Hold Option
A selection is available from the top of the diary screen titled on hold, if you do not wish to view jobs that are on hold simply deselect the option.

Jobs, Placing A Job On Hold: To flag a job as on hold select the note cell from the diary screen to the service description column you will see on the job comments form there are two options one flagging the job for closure the other allows you to place the job on hold.
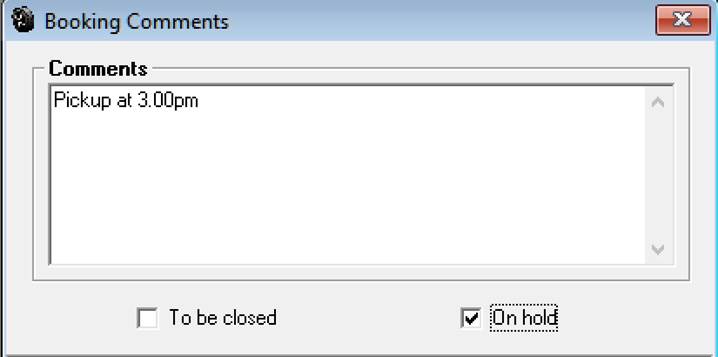
Your selections can be reversed by reopening the booking comments form and deselecting your to be closed or on hold options.
Bookings Displaying Vehicle Comments: The user has the ability to display vehicle comments as you complete the booking either in selection or step by step mode.
Site Settings, Selecting Vehicle Comments Option: Go to File / Site Settings / Database Settings. From the list of available options select show vehicle comments during bookings.

As you complete the booking vehicle comments are displayed on screen, this option can be selected for both selection or step by step booking options.
Loan Car, Entering: To add a loan car to the database, select the loan car icon from the diary screen, select the button to the right of the loan car field, choose new from the bottom of the select a loan car form, enter the registration and current odometer reading, the make and model can be selected from your database by pointing and clicking on the arrow to the right of the field.
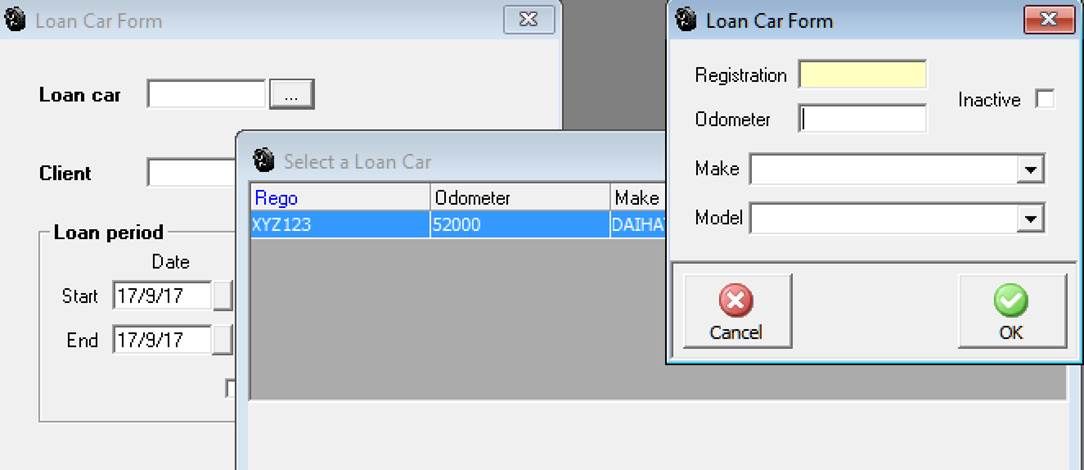
Loan Car, Recording: Automation allows you to record loan car bookings directly onto the diary screen, to use this function you will first need to record details of the loan cars. Select Lists / Loan Cars from the top of the screen. Select New from the bottom of the list – add the vehicle details, selecting the make and model from the drop down list.
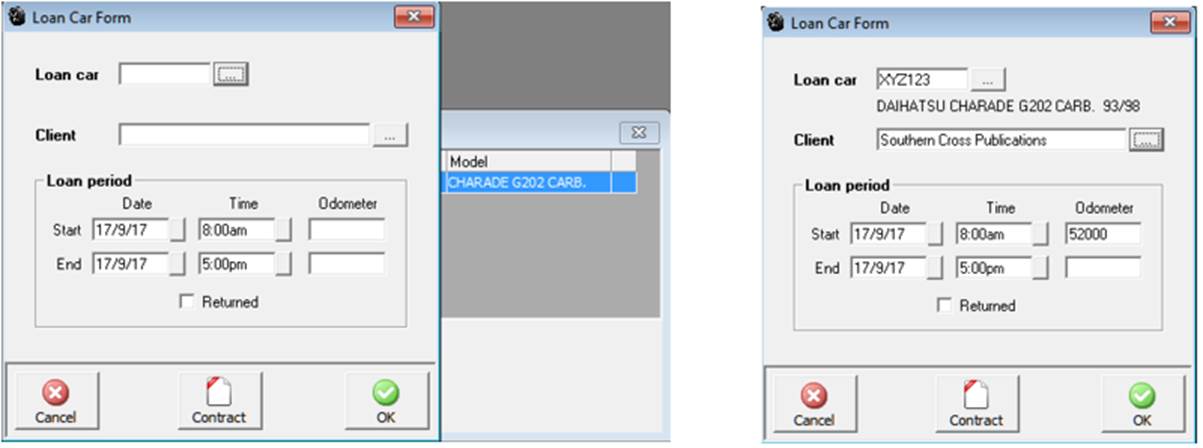
Save the loan car details by selecting OK (F12). To allocate a loan car to a client select the loan car option located at the top of the diary grid.
 On
selection you are prompted to enter the loan car details from a drop down
list, plus select the client by clicking on the down arrow to the right
of the client field. Finally you are required to enter the time and dates
the loan car is required by the customer.
On
selection you are prompted to enter the loan car details from a drop down
list, plus select the client by clicking on the down arrow to the right
of the client field. Finally you are required to enter the time and dates
the loan car is required by the customer.
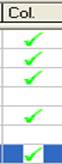
To save the details select OK (F12). The loan car allocation is represented on the diary screen by a light brown line extending across the time cells selected. It is also possible to record that the loan car has been returned by double clicking on the time line and selecting the returned option on the loan car form. A green tick is displayed in the Col. Column.
Deleting- To delete a loan car allocation from the diary screen, simply highlight the entry you wish to delete and select delete from your keyboard.
Loan Car, Contract Printing: To print the loan contract for your client click on the contract option from the loan
car form, it is suggested you print 2 copies one for the client and retain the other for your records.
Loan Car, Contract Editing: you to edit the terms and conditions of the loan contract, to access the standard text open the settings option from the file menu, click on the fifth tab titled loan car, edit text as required and save by selecting OK(F12).
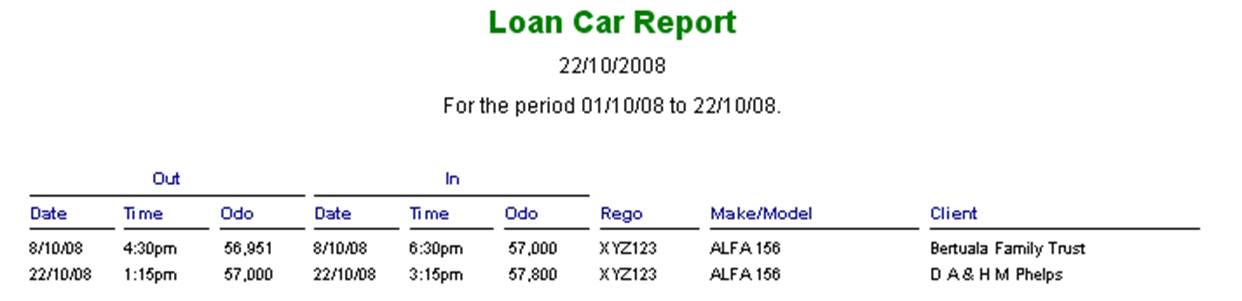
Loan Car Movements Report: On the return of a loan car you will be prompted to record the kilometers on the vehicle. A loan car report can be accessed from Reports / Other Reports; the format details loan car movements over a selected date range.
Notes, Loan Car Bookings– Point and click in the note field from the diary screen to add a note to a loan car allocation, click OK from the loan comments screen and a note it icon will be displayed in the note column. To view or modify a note point and click on the icon, to save any changes select the OK (F12) option from the bottom of the text entry scree
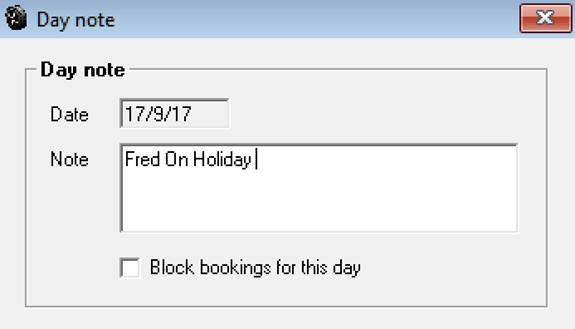
The operator has the ability to record a day note on the diary screen; an added function of this feature is the ability to block bookings for a selected day. To make a day note select the note option from the display above the main diary grid, type your note into the text field, if you wish to block bookings for the day select the option at the bottom of the form. To enter a note for another day, select the day from the diary options first, if you try to enter bookings for a blocked day a message is displayed informing you that you cannot proceed.
 Select
this option to enter a day note or block bookings for the day.
Select
this option to enter a day note or block bookings for the day.
Labour
Labour Allocation, Overview: Automation Premium allows the operator to allocate labour resources to specific jobs. The allocations are displayed on the technician’s diary screen by day only. The technician’s time allocations are color coded and displayed in the time grid
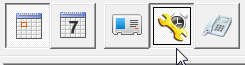
Labour Allocation, Viewing: To display the technicians allocation screen point and click on the icon to the right of the job view at the top of the diary screen.
Select the clock / spanner icon to open the technician’s allocation / clocked screen
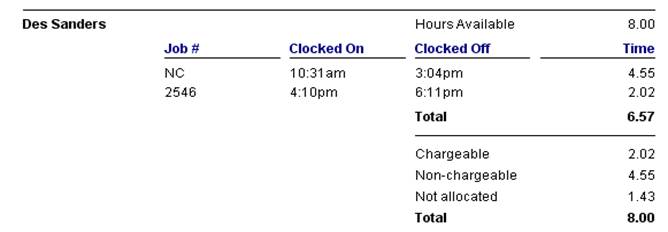
The screen displays the client’s name, registration make and model, labour allocated colour coded (by technician) in 15-minute time cells including job status. The grid at the bottom of this section displays the colour allocated to each technician, total hours available for the day, allocated and remaining hours. The display also shows total hours allocated by job and technician. The screen displays job status plus a list of all jobs to be done can be viewed by hovering the pointer over the job number.
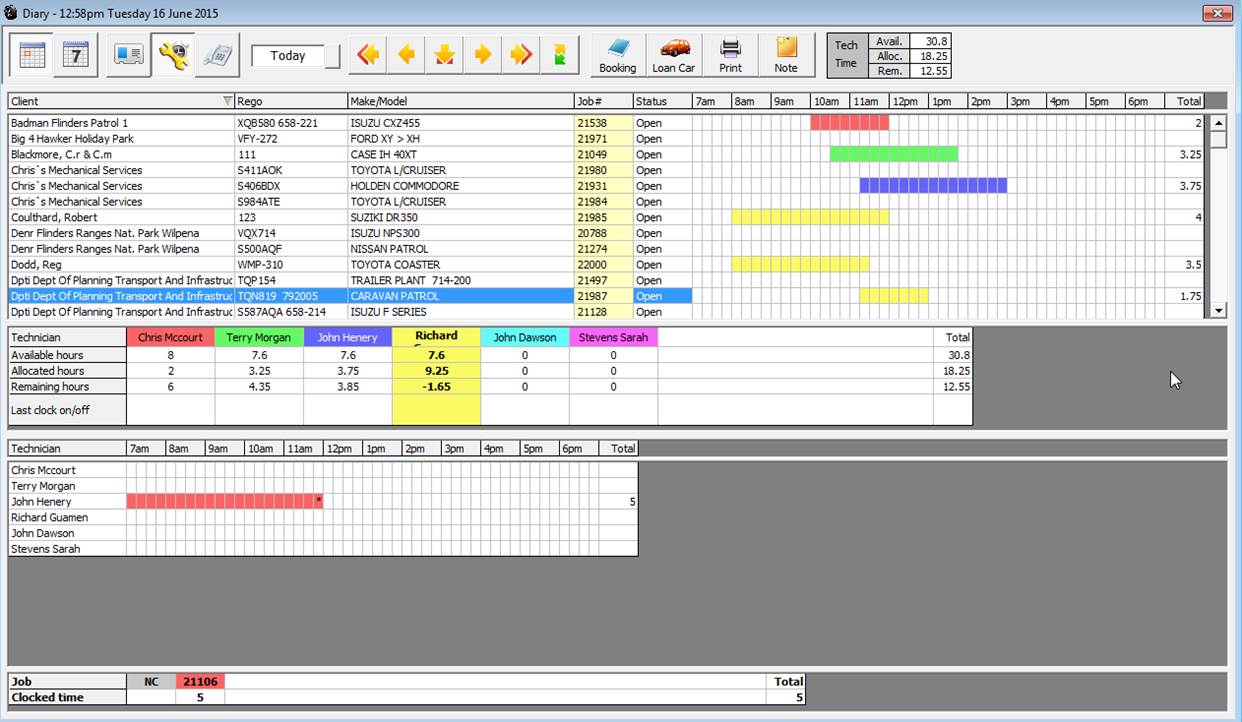
Labour Allocation, Available Hours: Available hours per day need to be recorded in the employee form. To enter this value, select lists / employees, point and double click on the record you wish to edit and enter the daily hours available in the daily hour’s field, save your changes with OK (F12). This value will now display on the technician’s allocation screen. To change the size of each section by moving the separator bar up or down, point at the bar, hold down the left mouse button and move up or down.

It is possible to change the daily hour available default value from the labour allocation screen, point and double click on the technician at the bottom of the display an available hour’s message box is displayed showing the default value.
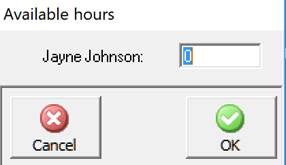
To change the available hours for a technician highlight the value and overtype. The total hours available for technicians will adjust + / - depending on the entry
Labour Allocation, Adding: To allocate a technician to a job, point at the name field (each technician has a unique colour displayed in this field) and left hand mouse click, the grid will highlight. Move your mouse pointer to the time cells you wish to allocate, hold down the left hand mouse button and drag across the line. When the appropriate time cells are completed release the mouse button. The time cells will now display the colour of the technician you allocated. To delete allocations, repeat the same process holding down the right hand mouse button instead of the left, this action will clear the time cells.
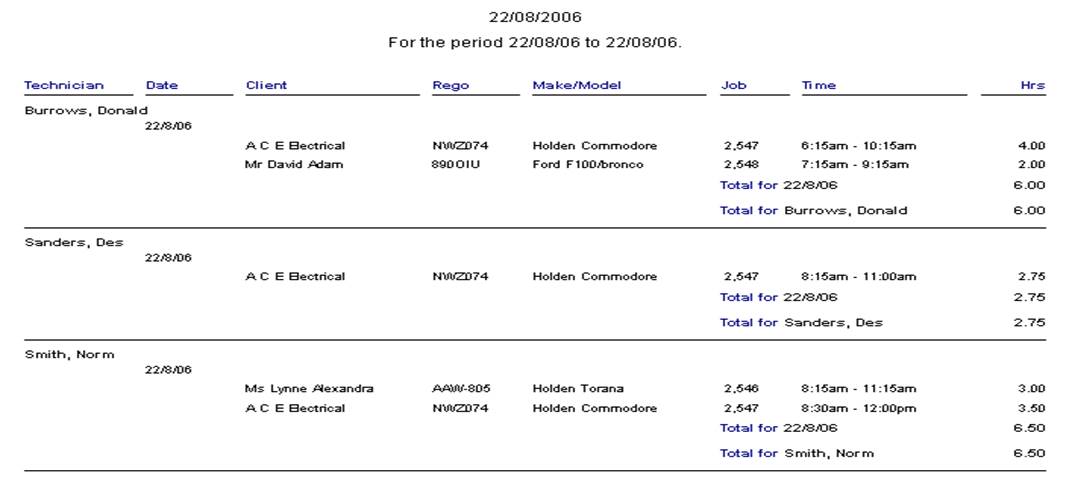
To print the job / technician status for the day select the print function located at the top of the allocation display, select all or the individual technicians you wish to send to the report.
 .
.
Jobs Carried Forward: This version allows the operator to set-up a prompt reminder to edit the allocated hours for the day when a job that is carried over from a previous day is opened for the first time. If you wish to use this feature go to settings and select this option from database setting:
 When
set to true a message will be displayed on opening a carried forward job
for the first time.
When
set to true a message will be displayed on opening a carried forward job
for the first time.
 Message
is displayed the first time a job is opened.
Message
is displayed the first time a job is opened.
Overview: This function allows the operator to track the actual time worked by each technician on individual jobs. The technician can log on from both the labour allocation screen or directly from the job card, Automation provides the user with a barcode option, requiring the technician to scan a unique printed barcode from the technicians list and job card. The clocked time is displayed in the labour allocation table on job close when time tracking is used.
Time Tracking, Logging On And Off: An employee record must be created for a technician to log on / off of jobs, If a barcodes are the preferred method of identifying a technician you must print these from the report provided – Select reports / Other Reports / Technician Barcodes
A unique barcode will be printed for each employee, it is suggested that you cut out and laminate the code

To log onto a job select either the F11 key or click on activities, point and click on the clock on / off job function from the menu list. It is possible to log a technician on and off a job from anywhere within the program. Simply press the F11 key or Activities / Clock on / off function. Using this function from forms other than the job card will require you to enter the job number via the keyboard or scanning the job barcode
The select or scan technician form allows technicians to log on / off of selected jobs, two fields are displayed, job number and technician. If you are using barcodes point at the barcode on the bottom of the job card and scan, the job number is recorded, next scan the technician’s bar code a message is displayed showing the date and time the technician logged on or off a job complete the process by clicking OK. If you are not using a scanner type the job number into the Job # field, tab to the technician selection and click on the button to the right, the technicians list is now in view, highlight the technician you wish to log on / off and select OK (F12).
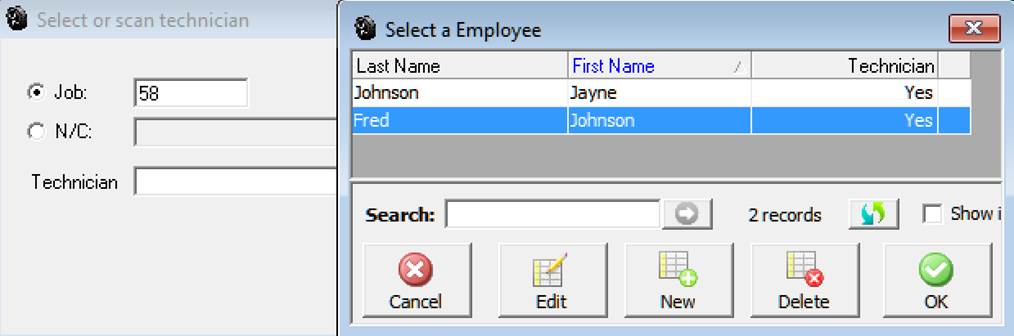
When clocking On / Off of jobs a message is displayed informing the user who has clocked onto or off of a job and at what time. If you are using a barcode scanner, scan the code and select enter, there is no need to open the technicians list.
Note:It is not possible for a technician to be logged onto two jobs, if you try to log a technician onto a job twice a prompt will request that you log off from the original job.
Time Tracking / Viewing & Editing: To view, edit or delete time tracking, select F11 or Activities / Log on / off job function. Enter the job number point and click on view, the clock times are displayed, if you wish to delete an entry highlight the line and select the delete function from the bottom of the screen. To edit an entry point and double click on the line or highlight the record and select edit (F2) from the bottom menu bar.

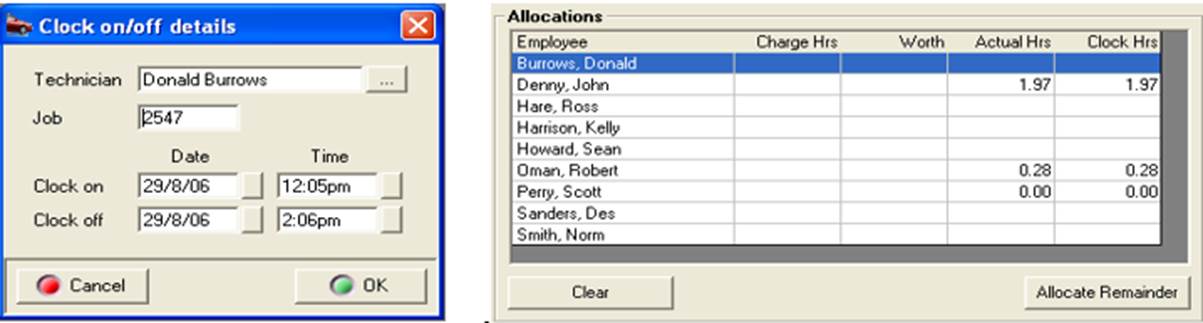
Time Tracking, Labour Allocations:The clocked hours by technician are displayed in the labour allocation screen. If you wish to edit the actual hours point and click on the value and overtype
Click on the button to the right of the fields to change the data displayed. It is also possible to allocate labour to alternate technicians by selecting the button to the right of the Technician field, highlighting the replacement technician and selecting OK (F12) from the bottom of the technicians list. To save changes made to the clock on / off details select OK (F12) on close
Clocked Time View: Automation also displays clocked labour allocations by technician on the Allocated / Clocked time screen, to access this function select the time clock icon from the top left hand corner of the diary screen
Select the fourth icon to the right to display the Allocated / Clocked time screen. On the lower grid the following is displayed
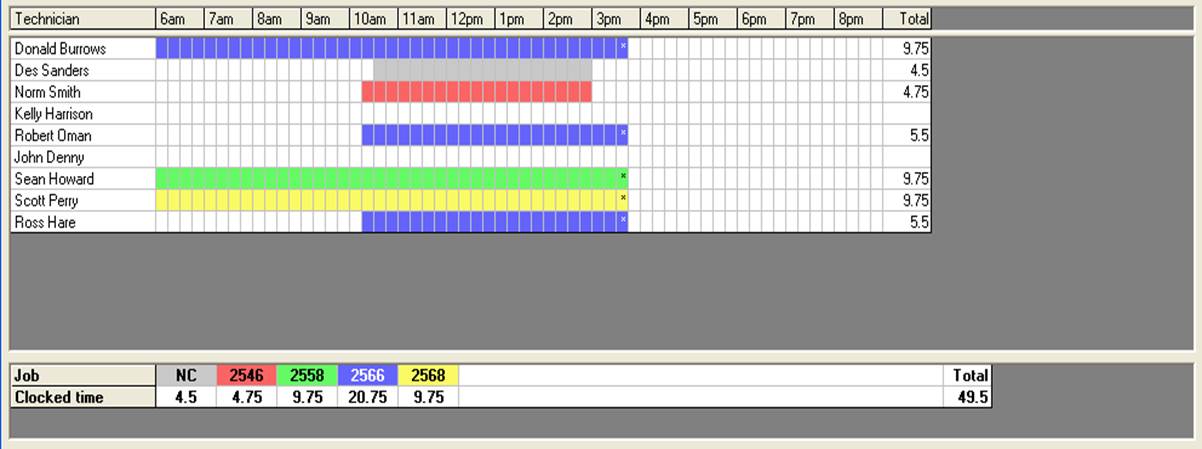
The top grid provides the user with a graphical and statistical representation of clocked time allocated to each technician for the day. Each job has a unique colour code, the job numbers and allocated total time is displayed in the lower grid. If a technician has clocked on / off multiple jobs during the day each job is represented by a colour coded bar to the right of his name in the time column.
Clocked Time View, Accessing Job Details: To view job details point and double click on the job number displayed in the lower grid, this action opens the booking form, from this display it is possible to view the job by selecting the job card button located on the bottom left hand side of the display.
Clocked Log On, Viewing: It is possible to view the last log on time and job number by technician from the labour allocation screen. To display this data select the Labour allocation icon from the top of the diary screen. Details of the last log on (the job a technician is currently assigned to) is recorded at the bottom of the labour allocation screen.

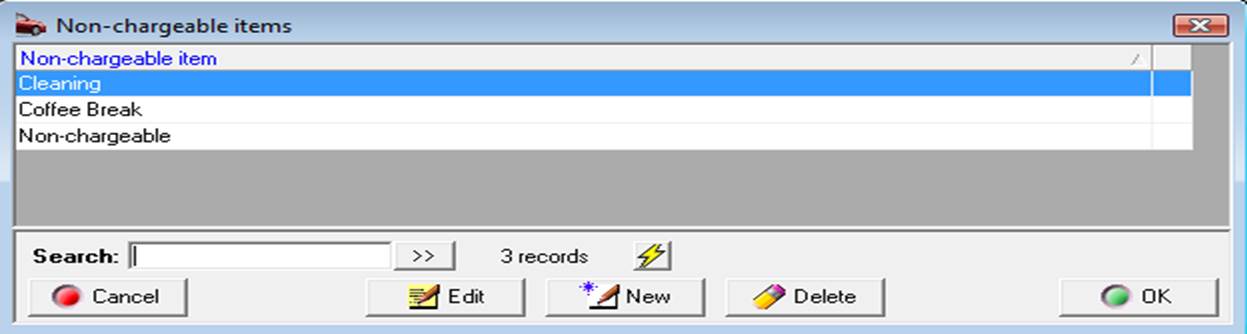
Non-Chargeable Items, Creating: To create a new non-chargeable item select lists / non chargeable items. To create a new item select new from the bottom of the display, enter the name of the item and save using OK (F12).
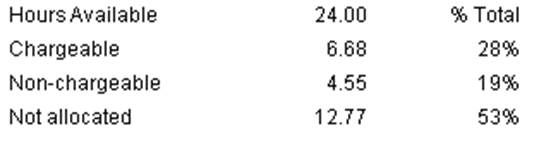
Non-Chargeable Time, Allocating: Automation allows the operator to track the amount of time technicians are allocated to non-chargeable tasks. The allocation is summarised separately from chargeable allocations in a technician’s productivity report.
To allocate a technician to a non-chargeable task select the F11 key from any screen, manually enter or scan the barcode for the unique non-chargeable item. Barcodes are printed at the bottom of the technician’s barcode report.
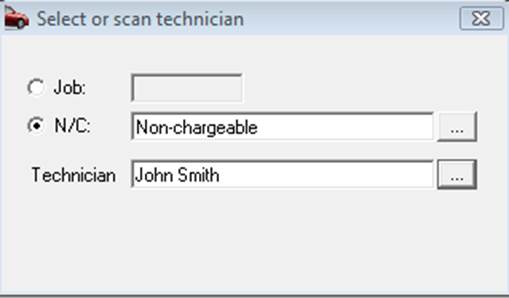
To allocate a technician to a non-chargeable task select the N/C option, click on the button to the right of the N/C field select the task, next select the technician you wish to allocate. A prompt will display the status of the selection. Non-chargeable time is represented by a grey time bar on the clocked time view screen; the total amount of hours for the day allocated to non-chargeable activities is displayed under the NC job type grid

Hovering your cursor over the technician’s allocation for non-chargeable labour from the tech time view with display the task he is currently logged onto.

Productivity Reporting: The productivity report displays all clocked labour allocations by technician / job for a selected day. Chargeable and non-chargeable times are totalised by each and all technicians. To access this report select reports / technician time reports / productivity report – enter the date / dates you wish to view and proceed by selecting OK (F12).

Note: The productivity report can be run for any date range or period
Technician’s allocations by job allocation summary
Labour Allocation Table: The labour allocation table is displayed at the top of the diary screen; values can be calculated in two ways.
1) Total technician hours available minus the allocated total value from the technicians allocation screen.
2) Total technicians time available minus the total estimated time for all jobs on the viewed day.
Automaton defaults to calculate via the labour allocation screen, if you wish to change the calculation to the second option select File / Settings / Database Settings, click in the checkbox of the following option:

Save your selection by exiting setting with OK (F12).
 The
table displayed at the top of the diary screen records available / allocated
and hours remaining according to the selection.
The
table displayed at the top of the diary screen records available / allocated
and hours remaining according to the selection.
Technician hours available: Automation allows you to record days or periods when a technician is not available. If for instance an apprentice attends classes on a Monday you can record from the employee form that he is not available on that day of the week. When this option is selected the employees daily hours will not be added to the available total for that day.
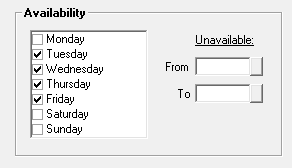
Availability is calculated by the total daily hours and days the technician is available. To select a period ie: holidays point and click on the box to the right of the unavailable fields, select the dates from the calendar. Daily hours will not be added to the total hours available in the period displayed.
An Estimates selection is available from the top task bar

On selection there are 2 x choices create which will take you directly to the client list and view which opens the sales screen in estimate view with the months estimates displayed, to view an alternate date range select the period or date options from the top of screen.